Run MongoDb Using Docker & Persist Data
Content
Background
Docker is one of the most popular platform to create, run & deploy applications faster. It helps you to run things in isolation, you don't have to worry about the application environment / OS. You build it once & deploy it anywhere using docker.
In this post we are going to:
- Run MongoDB community server in a container
- Publish DB server port to access MongoDB via Compass GUI
- Persists DB data so that if we restart the container or terminate it, the DB data is safe and can be used again when we start container next time.
- Access MongoDB via Node Express server
Quick summary of this post - TL;DR
Prerequisites
Below are the stuff I assume you have done it before.
- You have Docker CLI & Desktop installed on your system.
- Pulled docker images & ran containers from it using CLI or from Desktop GUI
You do not need know how to persists data, that we will go through in detail.
I am going to show how to do things using Docker Desktop GUI & also with docker cli commands.
Pulling Docker Images
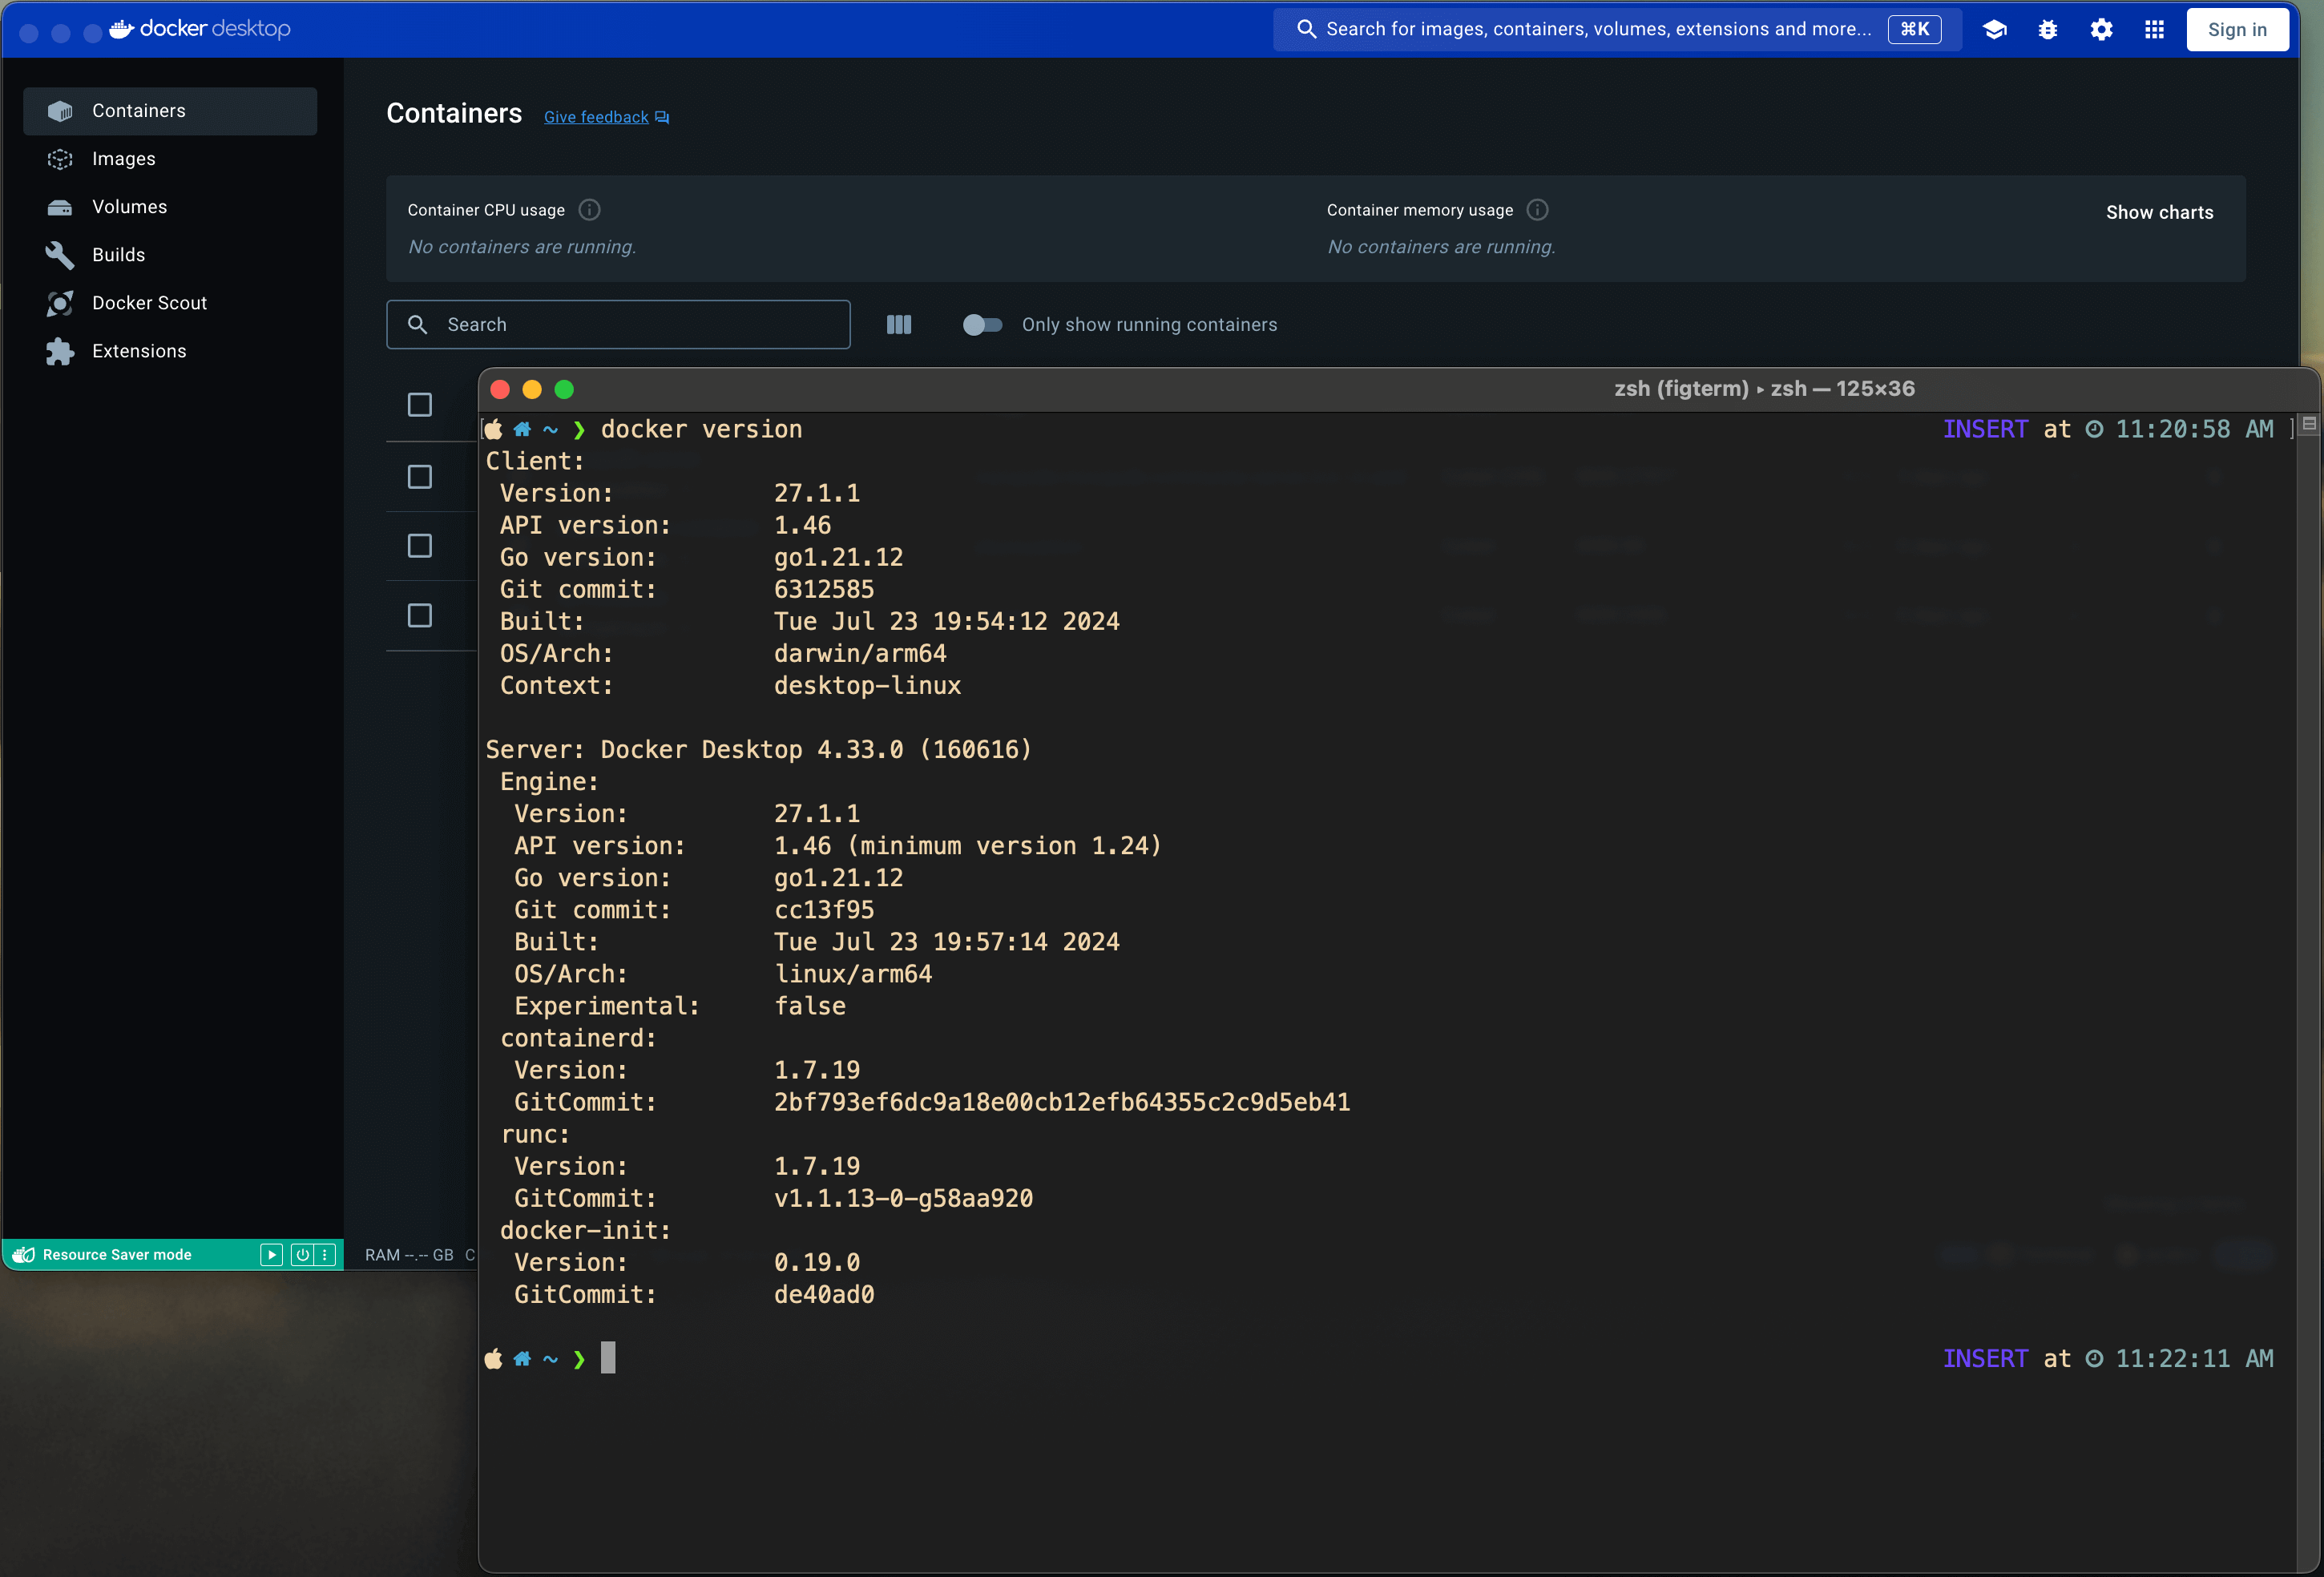
Before spinning up containers we need the images of MongoDB server. Make sure your docker desktop is running & docker cli is accessible via Terminal / Command prompt.
docker version
Pulling mongoDB image from docker hub via CLI & GUI. You can run either below command in terminal or use Docker Desktop GUI like I have shown in the screenshot.
docker pull mongodb/mongodb-community-server:5.0.15-ubuntu2004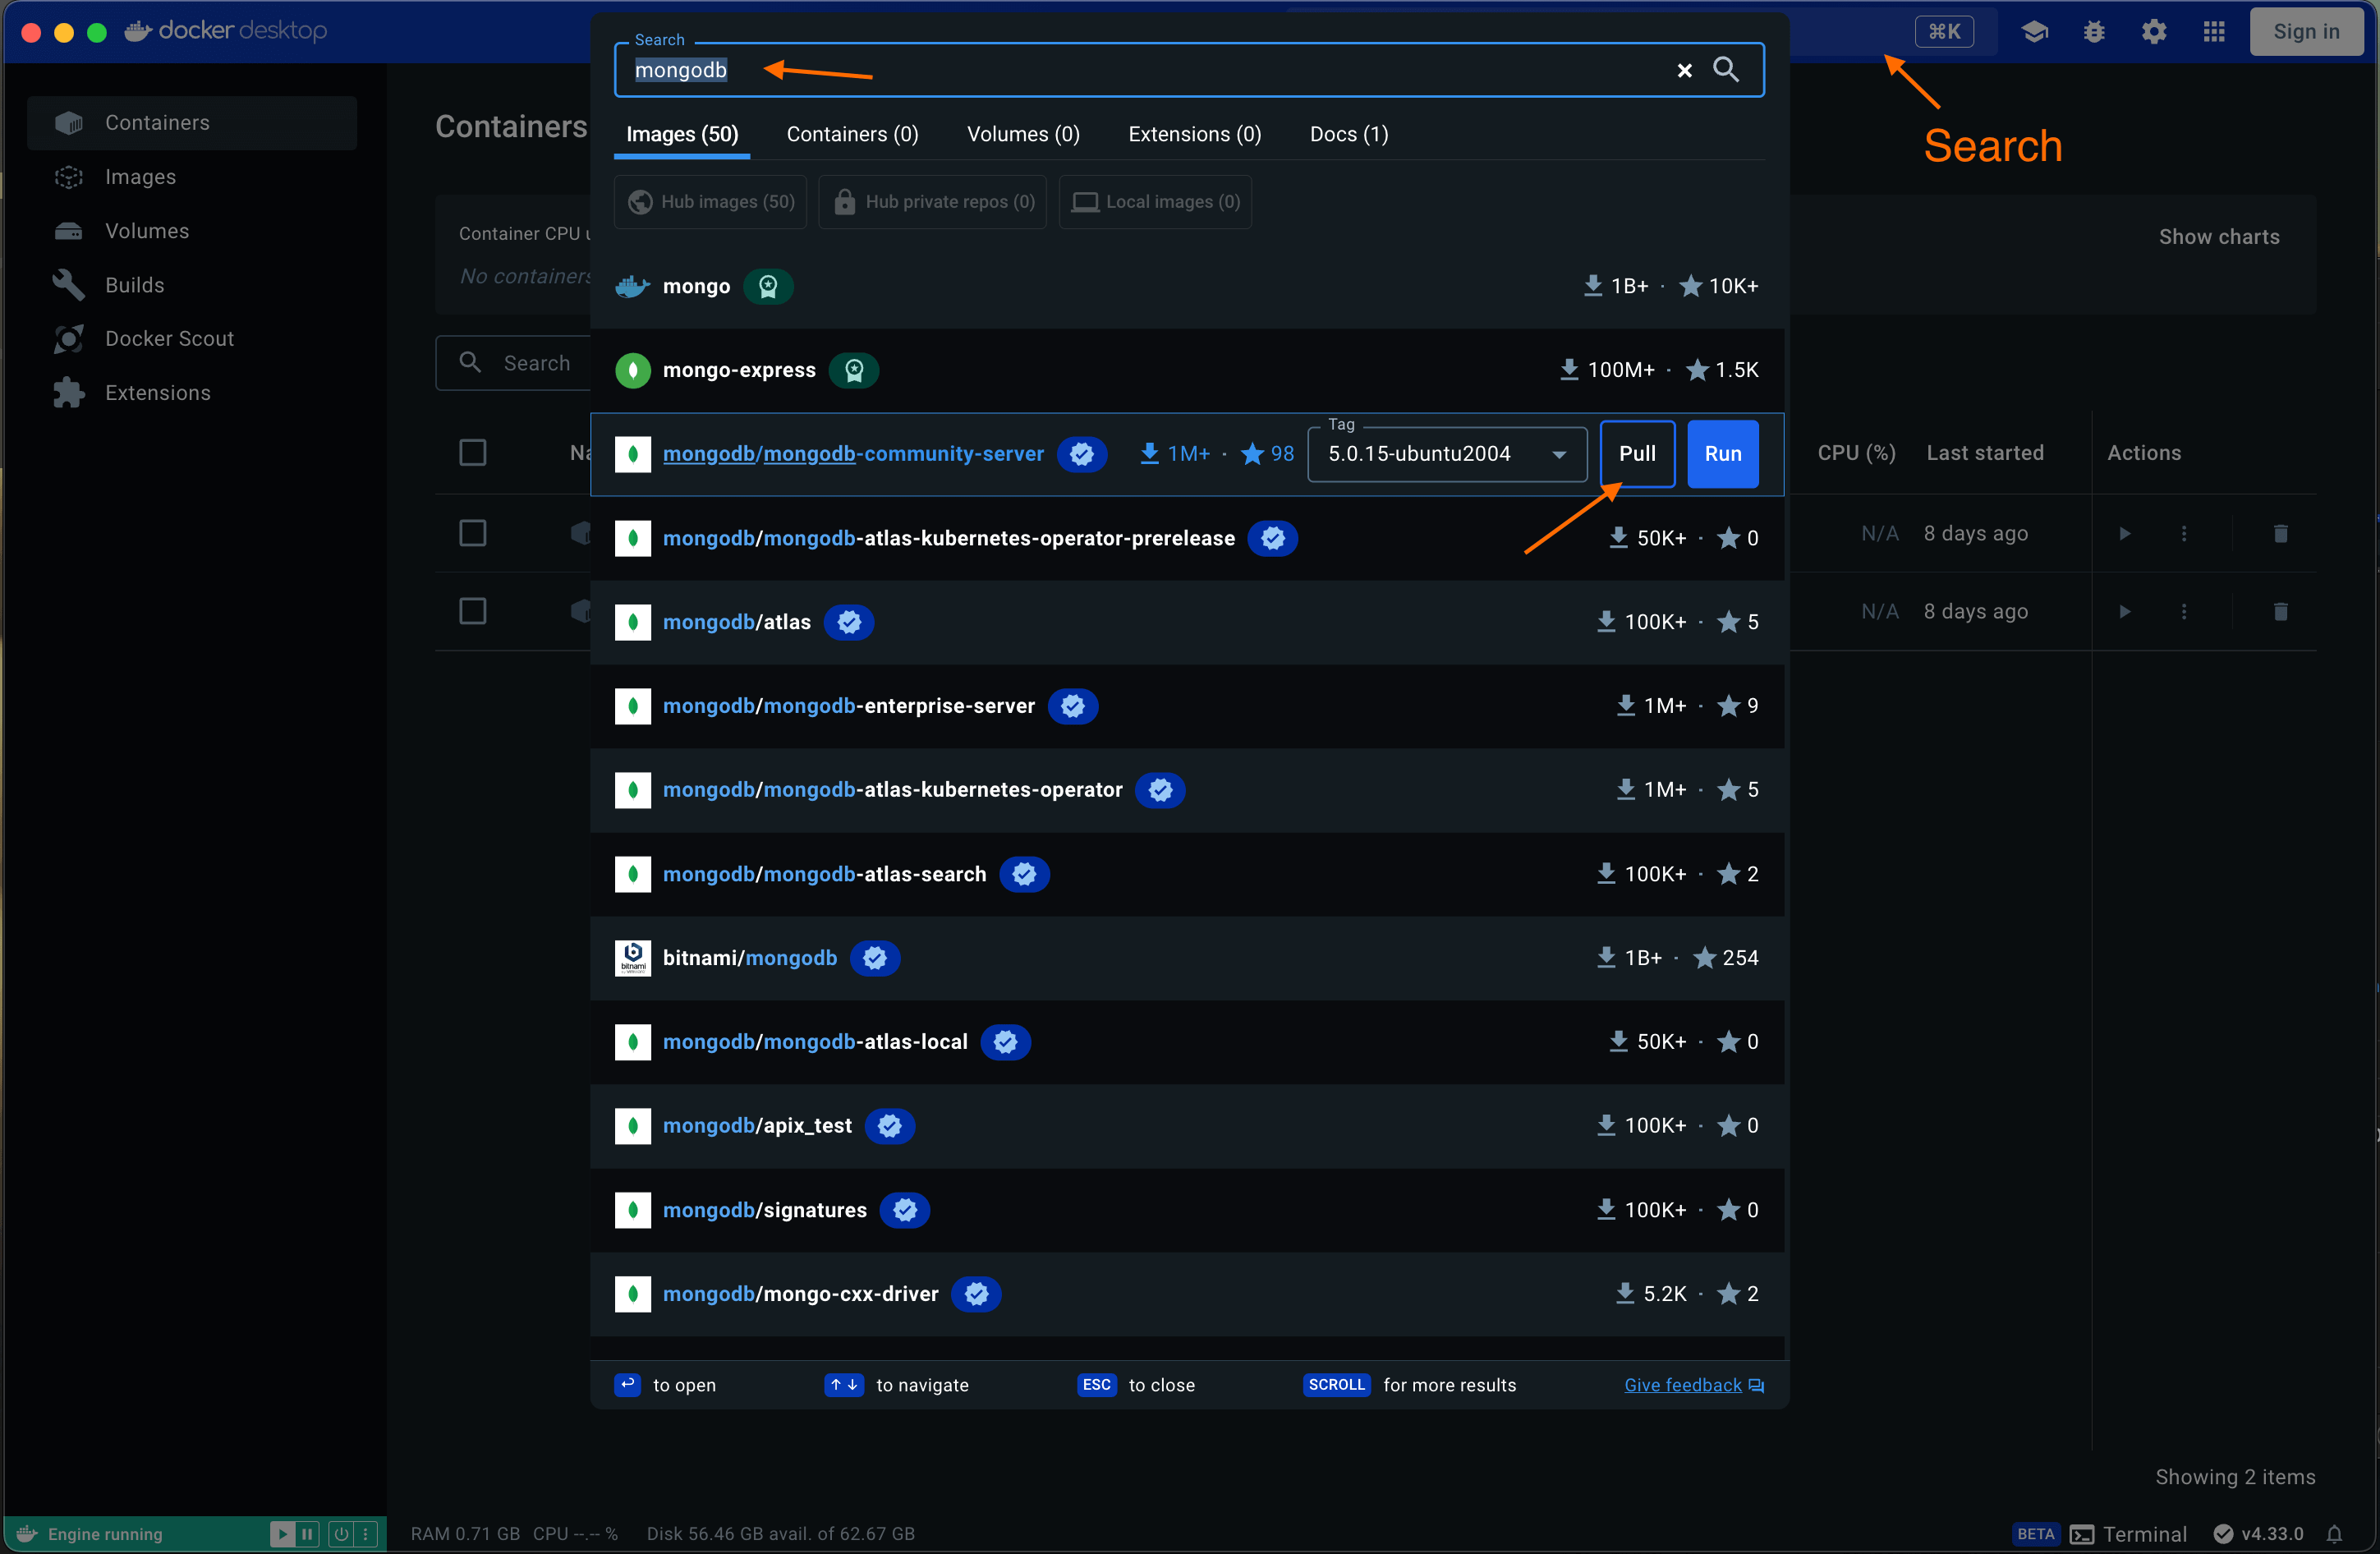
Size of docker image for mac OS is around 1GB, it might take more time if your internet bandwidth is less.
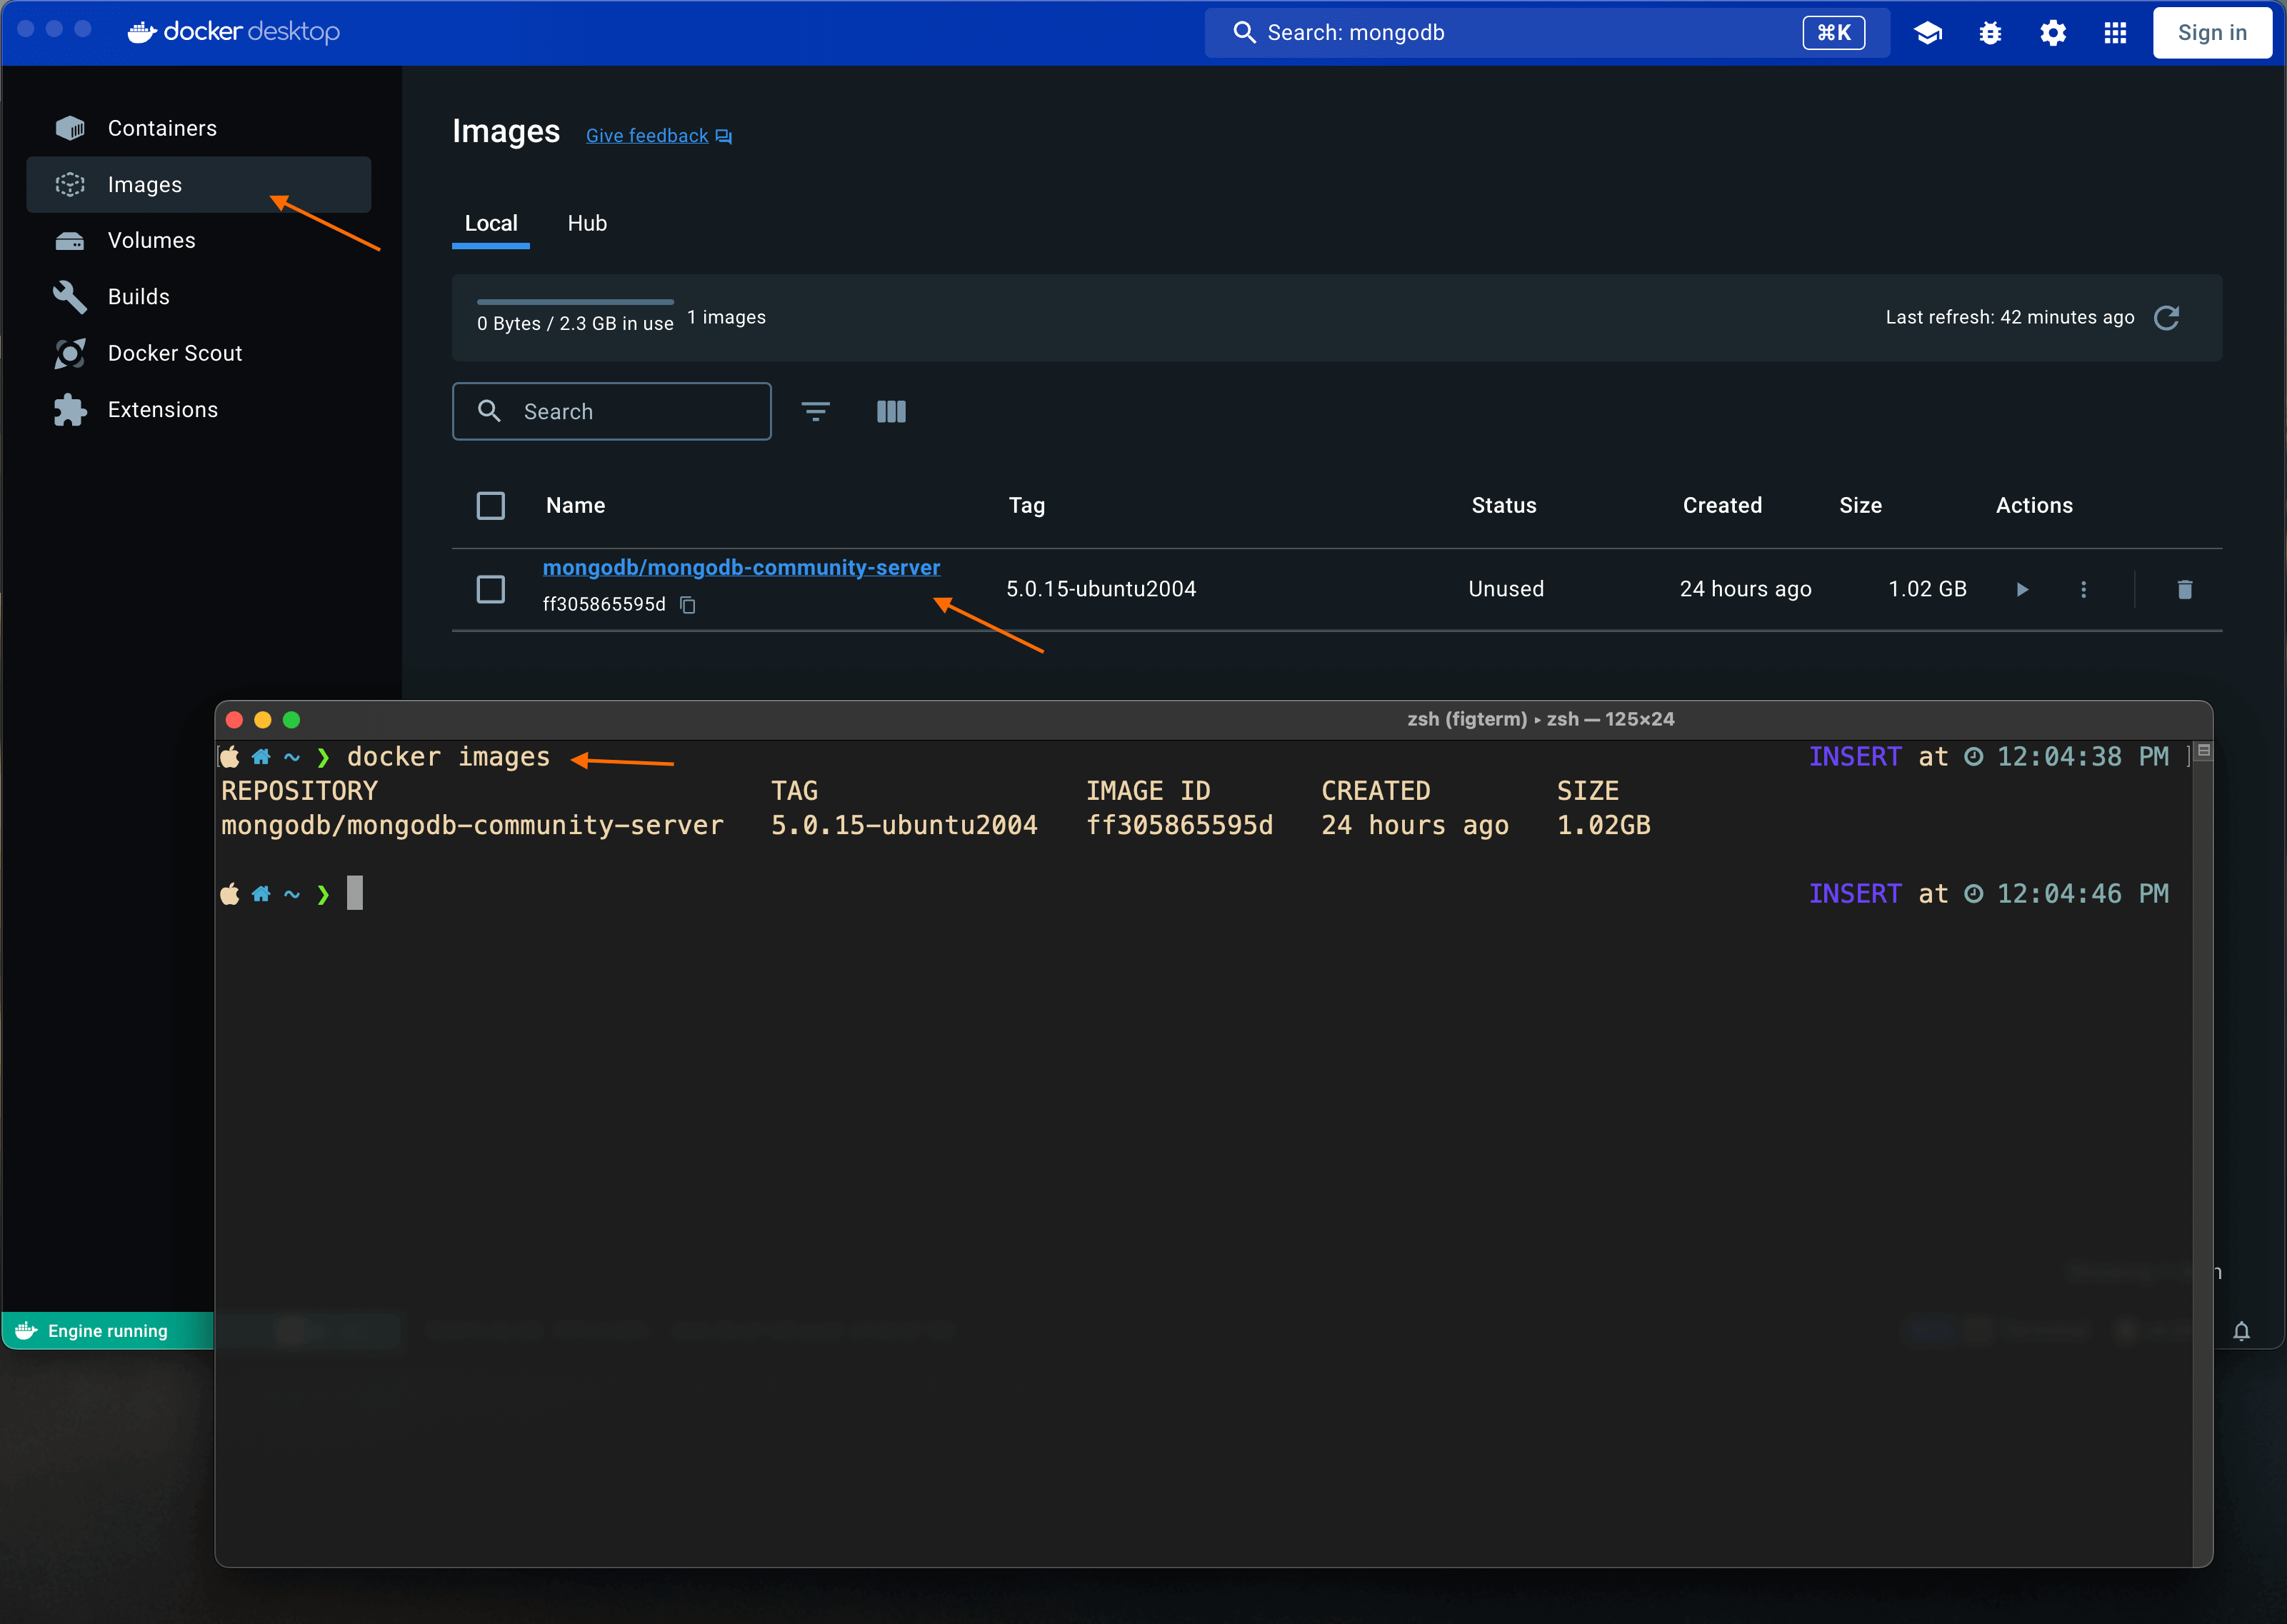
You can verify that the pull was successful by listing all docker images.
docker images
Running MongoDB Container
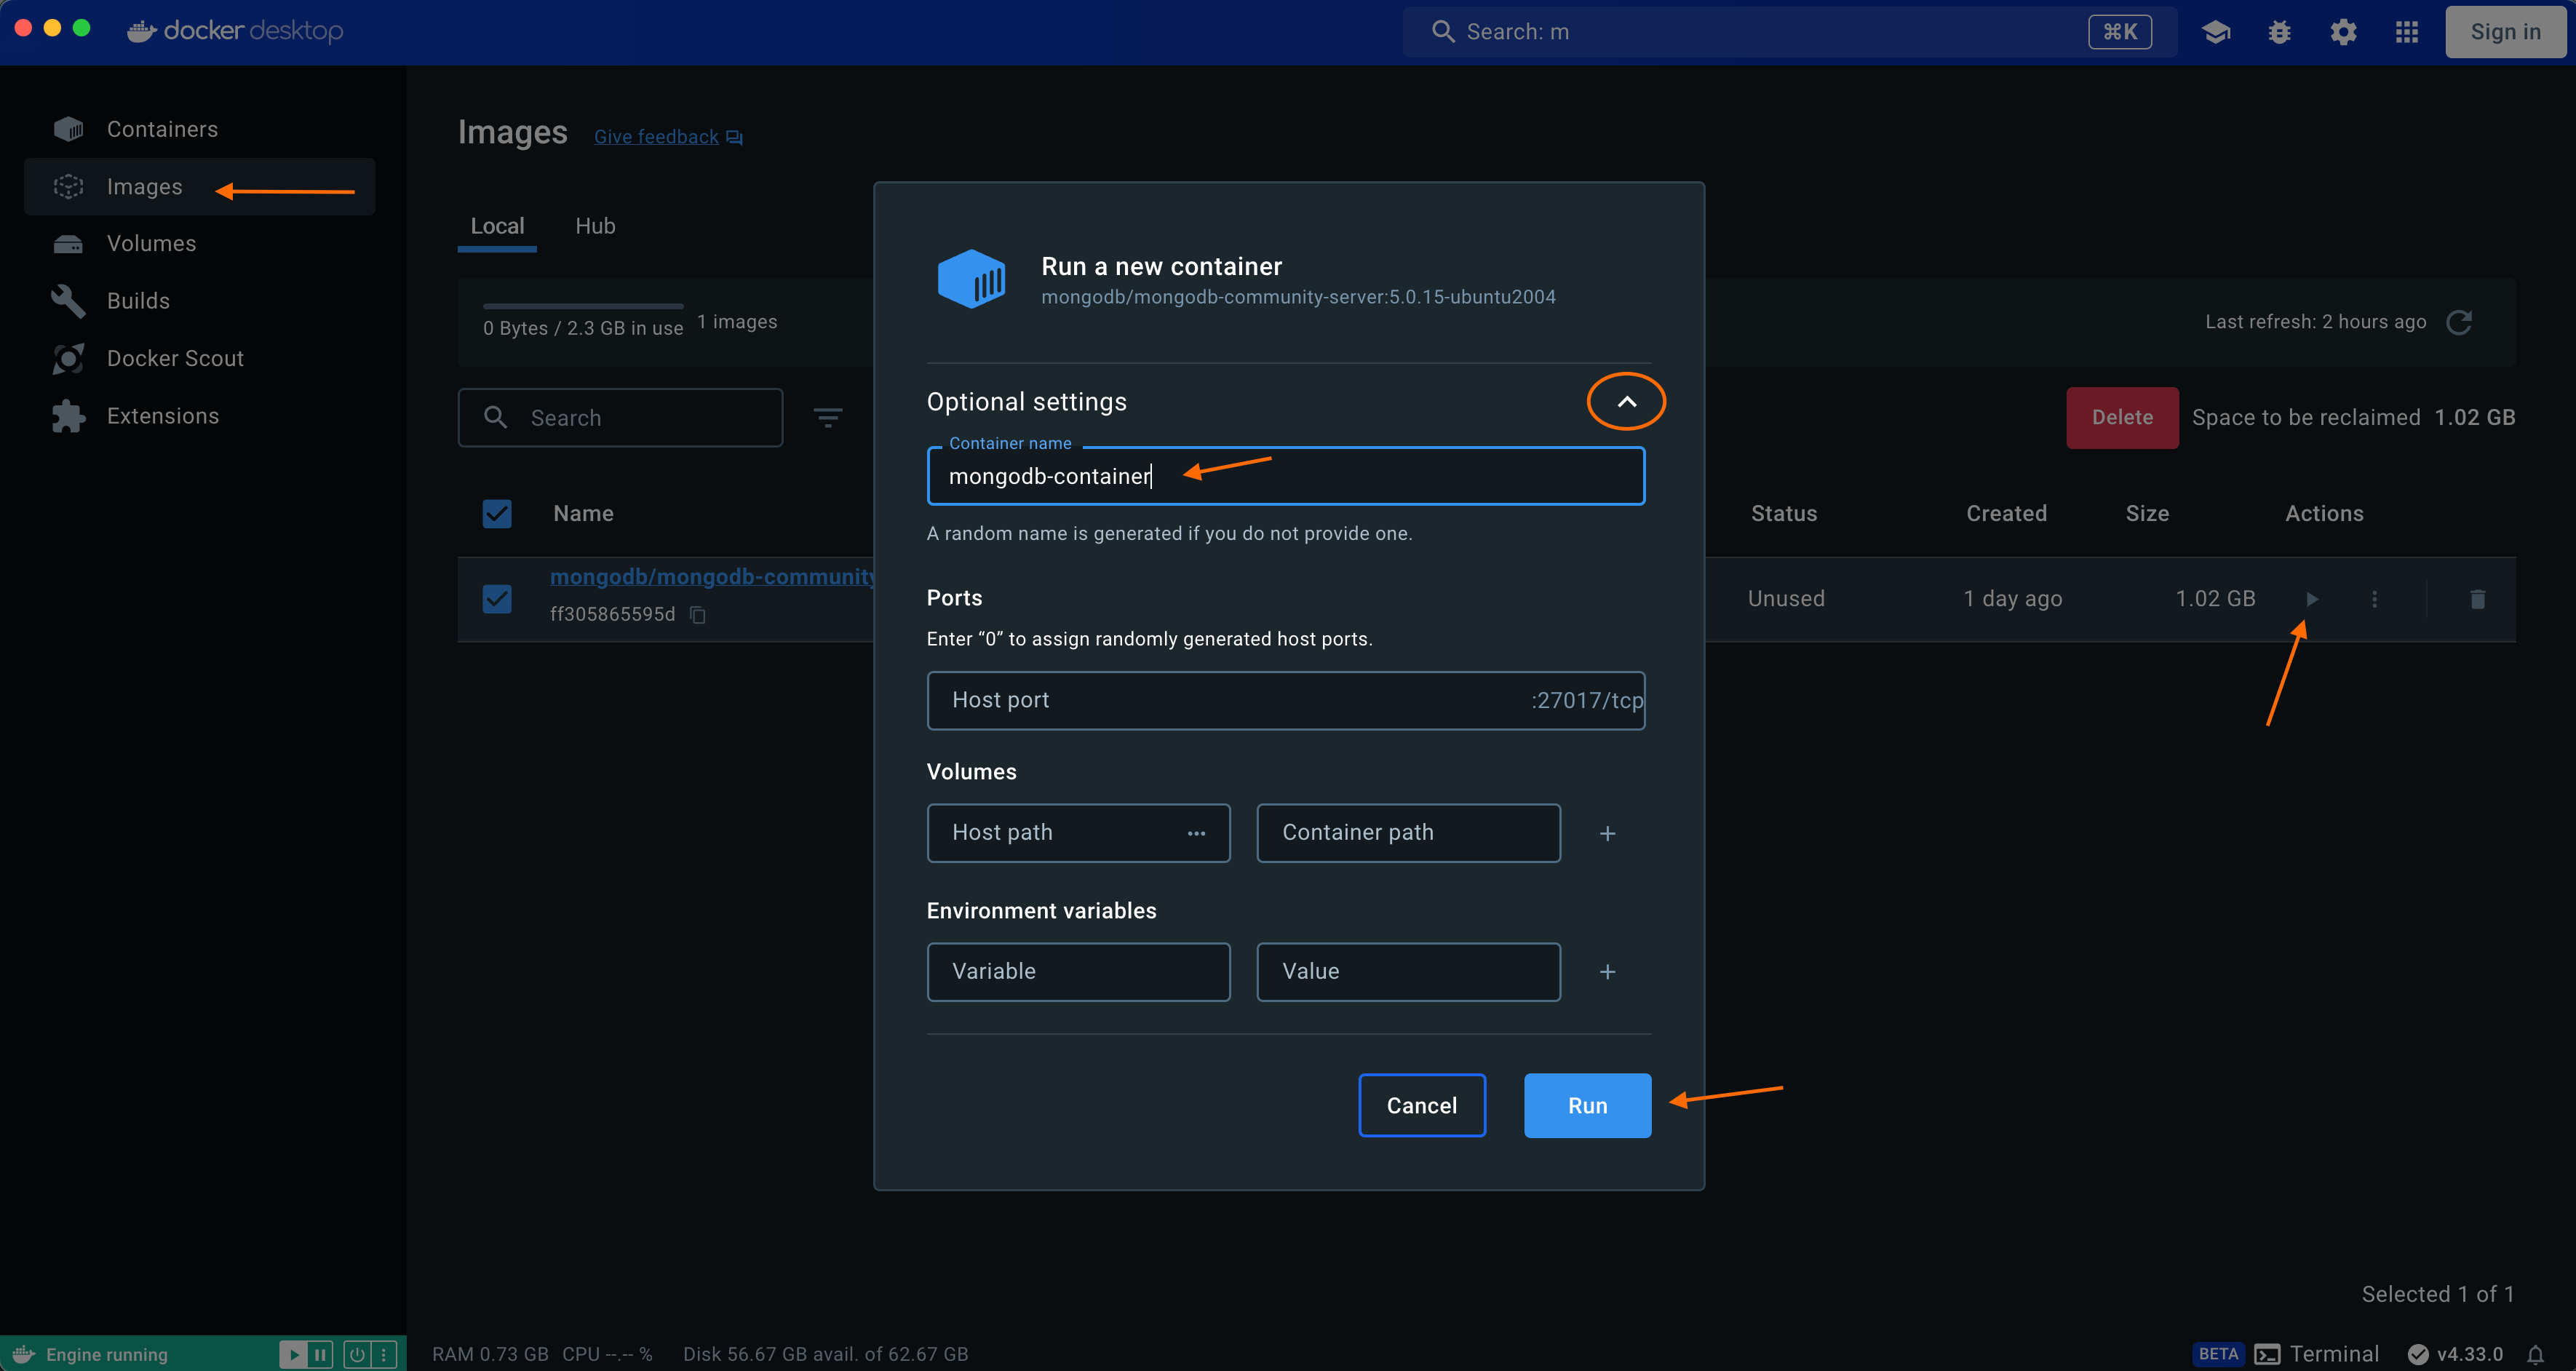
To start the mongoDB container using CLI (terminal), you need image name and tag. docker images command will show these. Execute below to create & start container.
docker run --name mongodb-container --detach mongodb/mongodb-community-server:5.0.15-ubuntu2004--name mongodb-containersets the name of container--detachtells it to run the container in detached mode which will not print any container logs in your terminalmongodb/mongodb-community-server:5.0.15-ubuntu2004is the name image:TAG
After starting the container you can access its shell via command
docker exec -it mongodb-container /bin/sh
-itstands for interactive modemongodb-containeris the name of container/bin/shis the program we want to exec (execute)
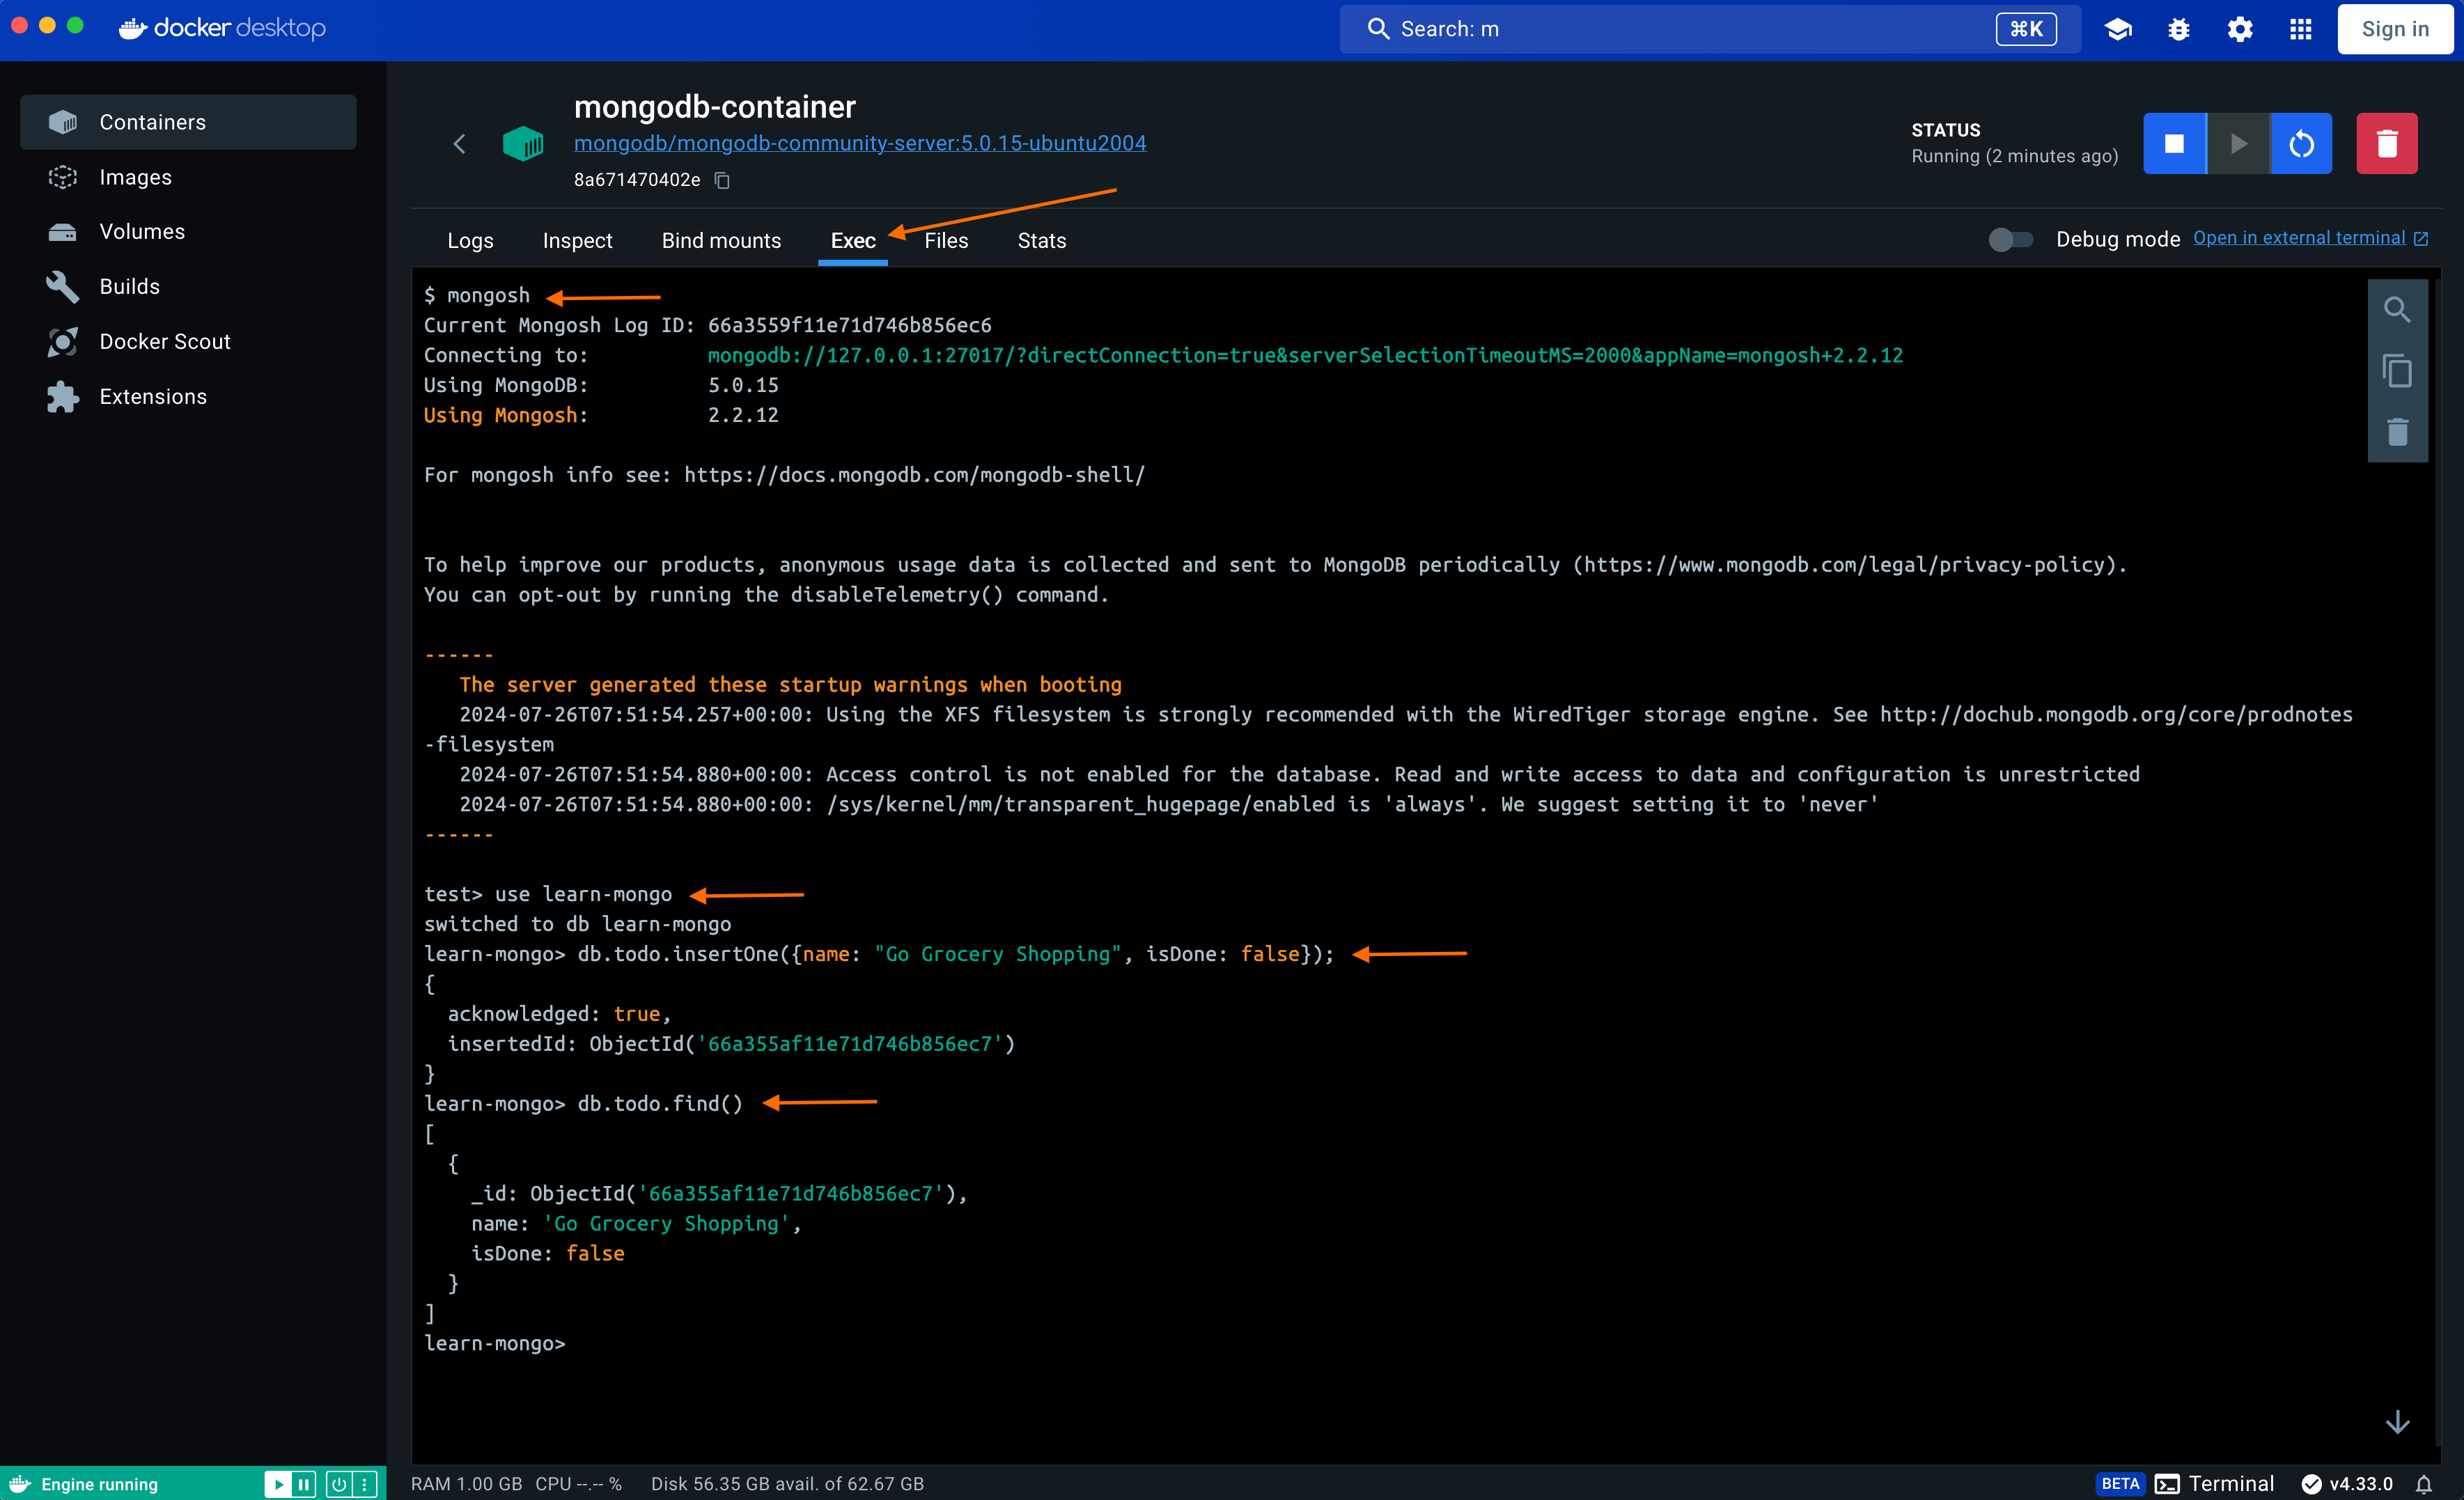
Below are some more example of mongodb cli commands.
> use learn-mongo
> db.todo.insertOne({name: "Go Grocery Shopping", isDone: false});
> db.todo.find()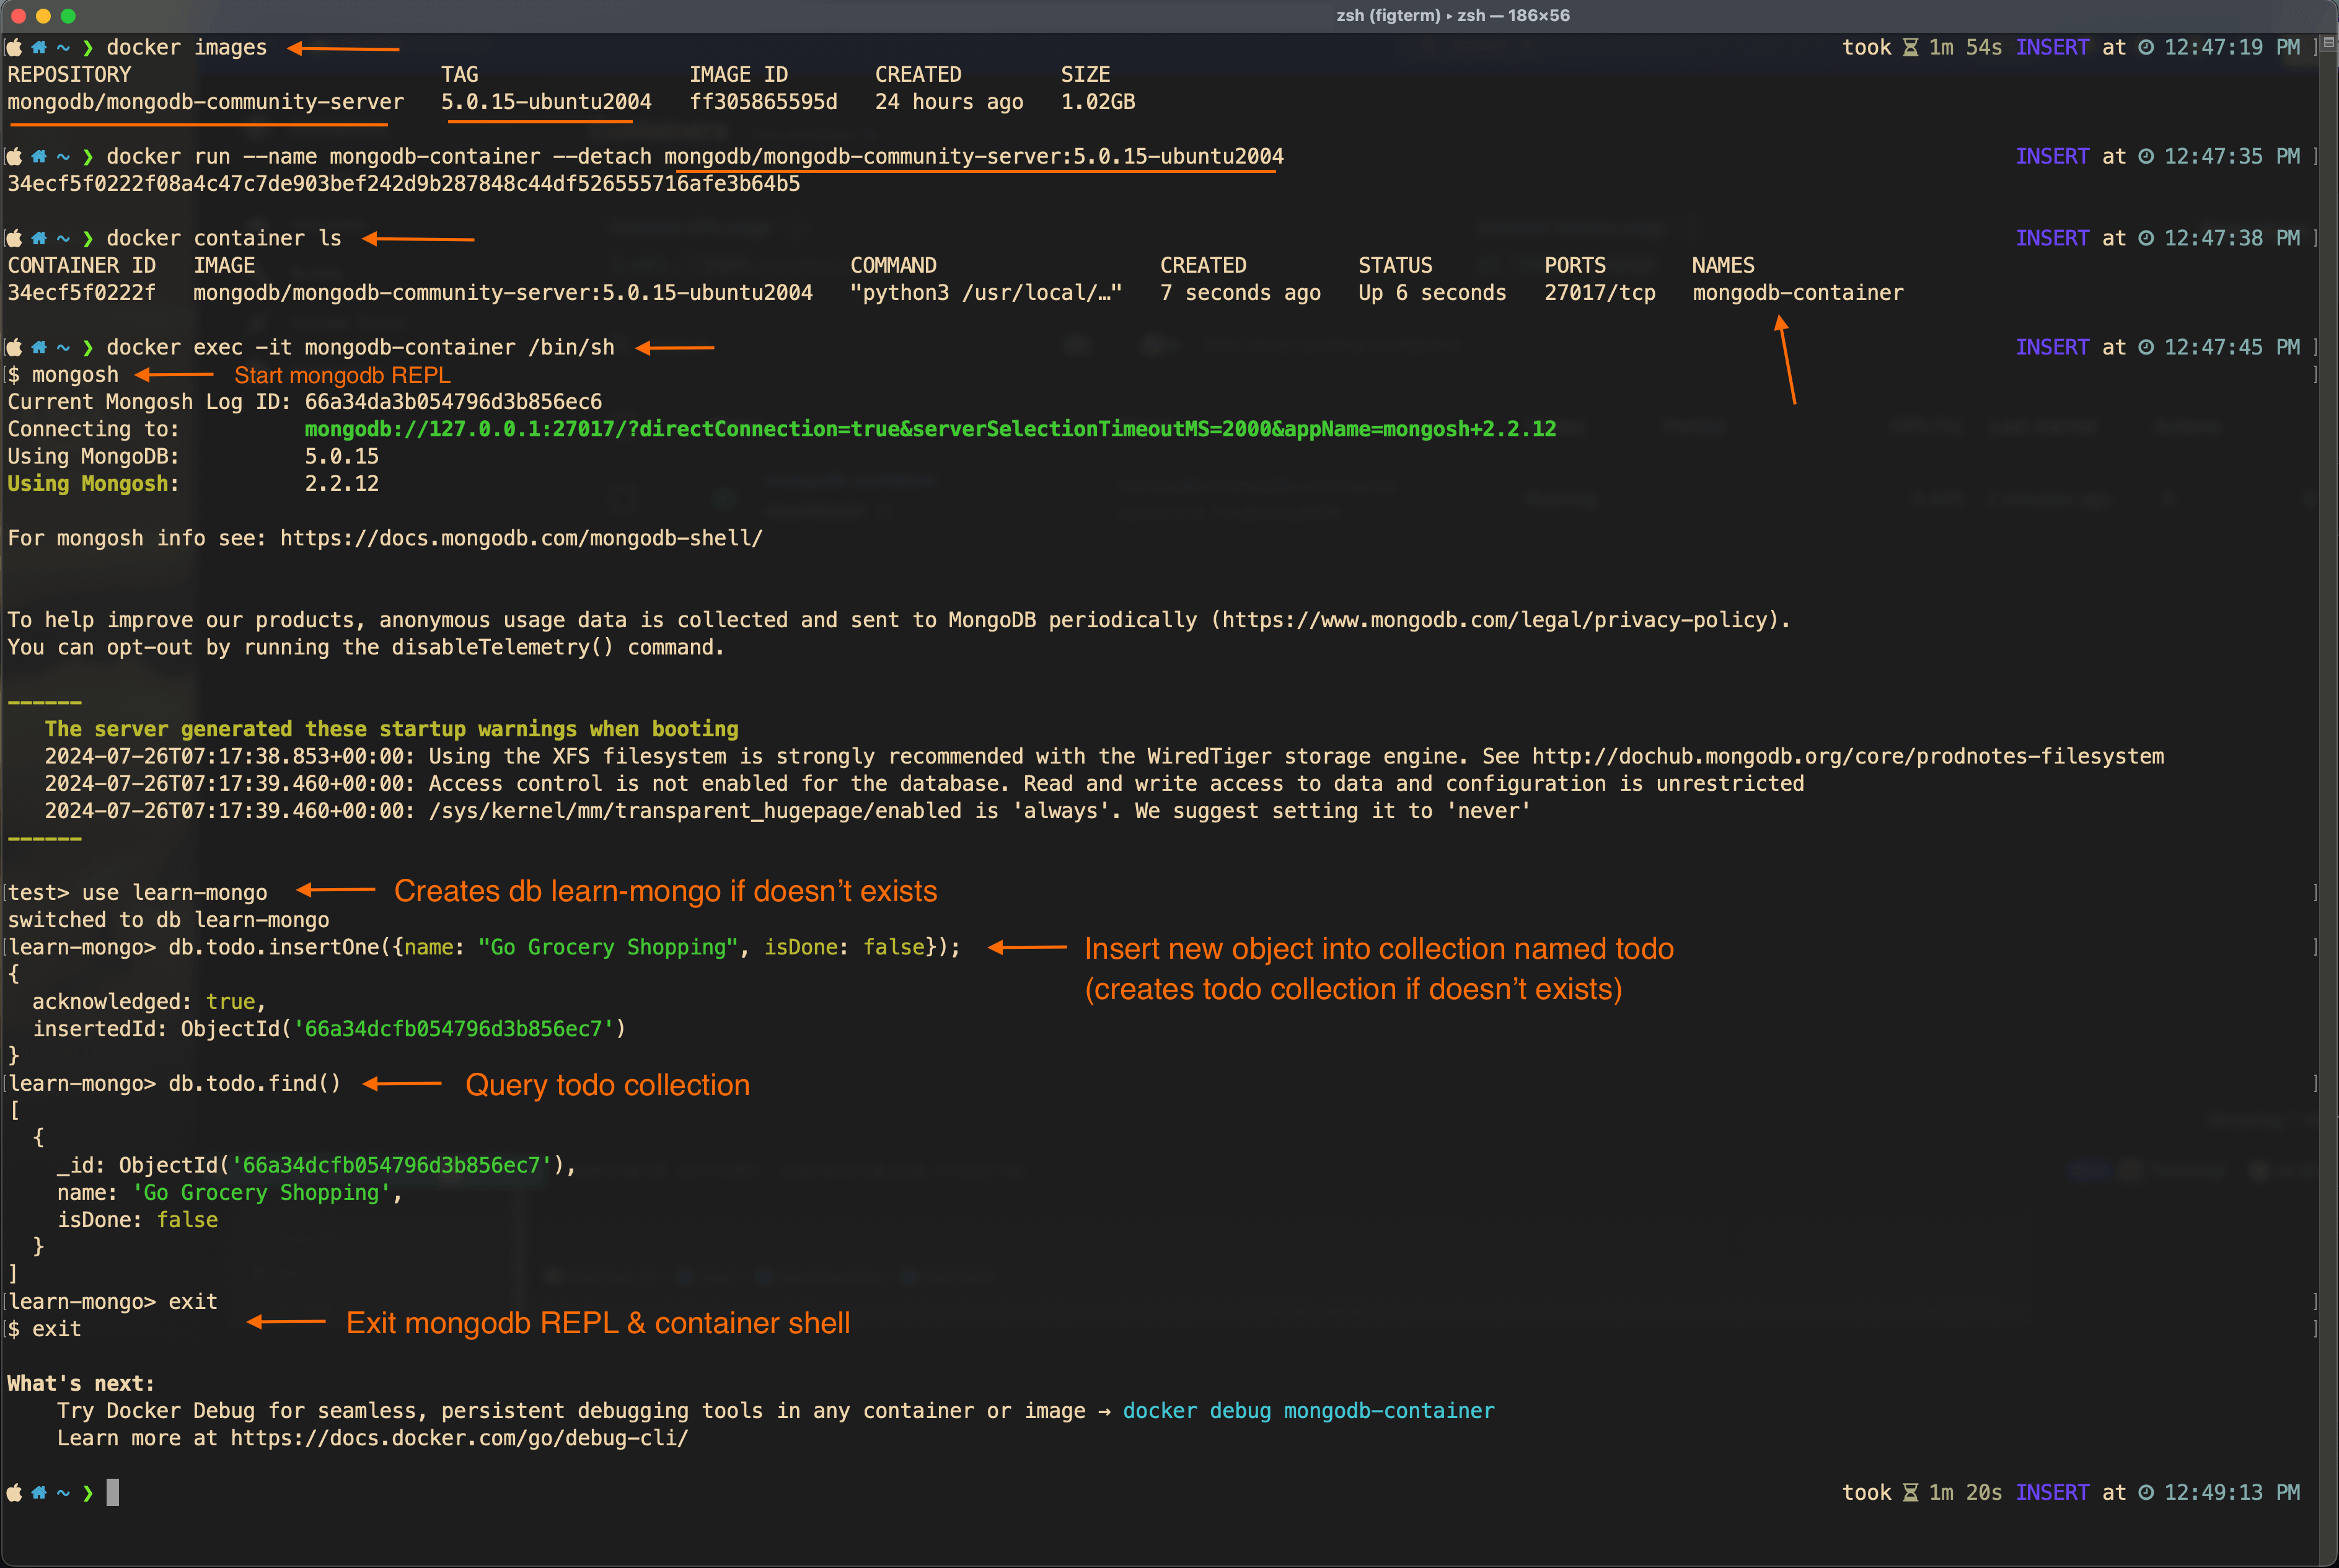
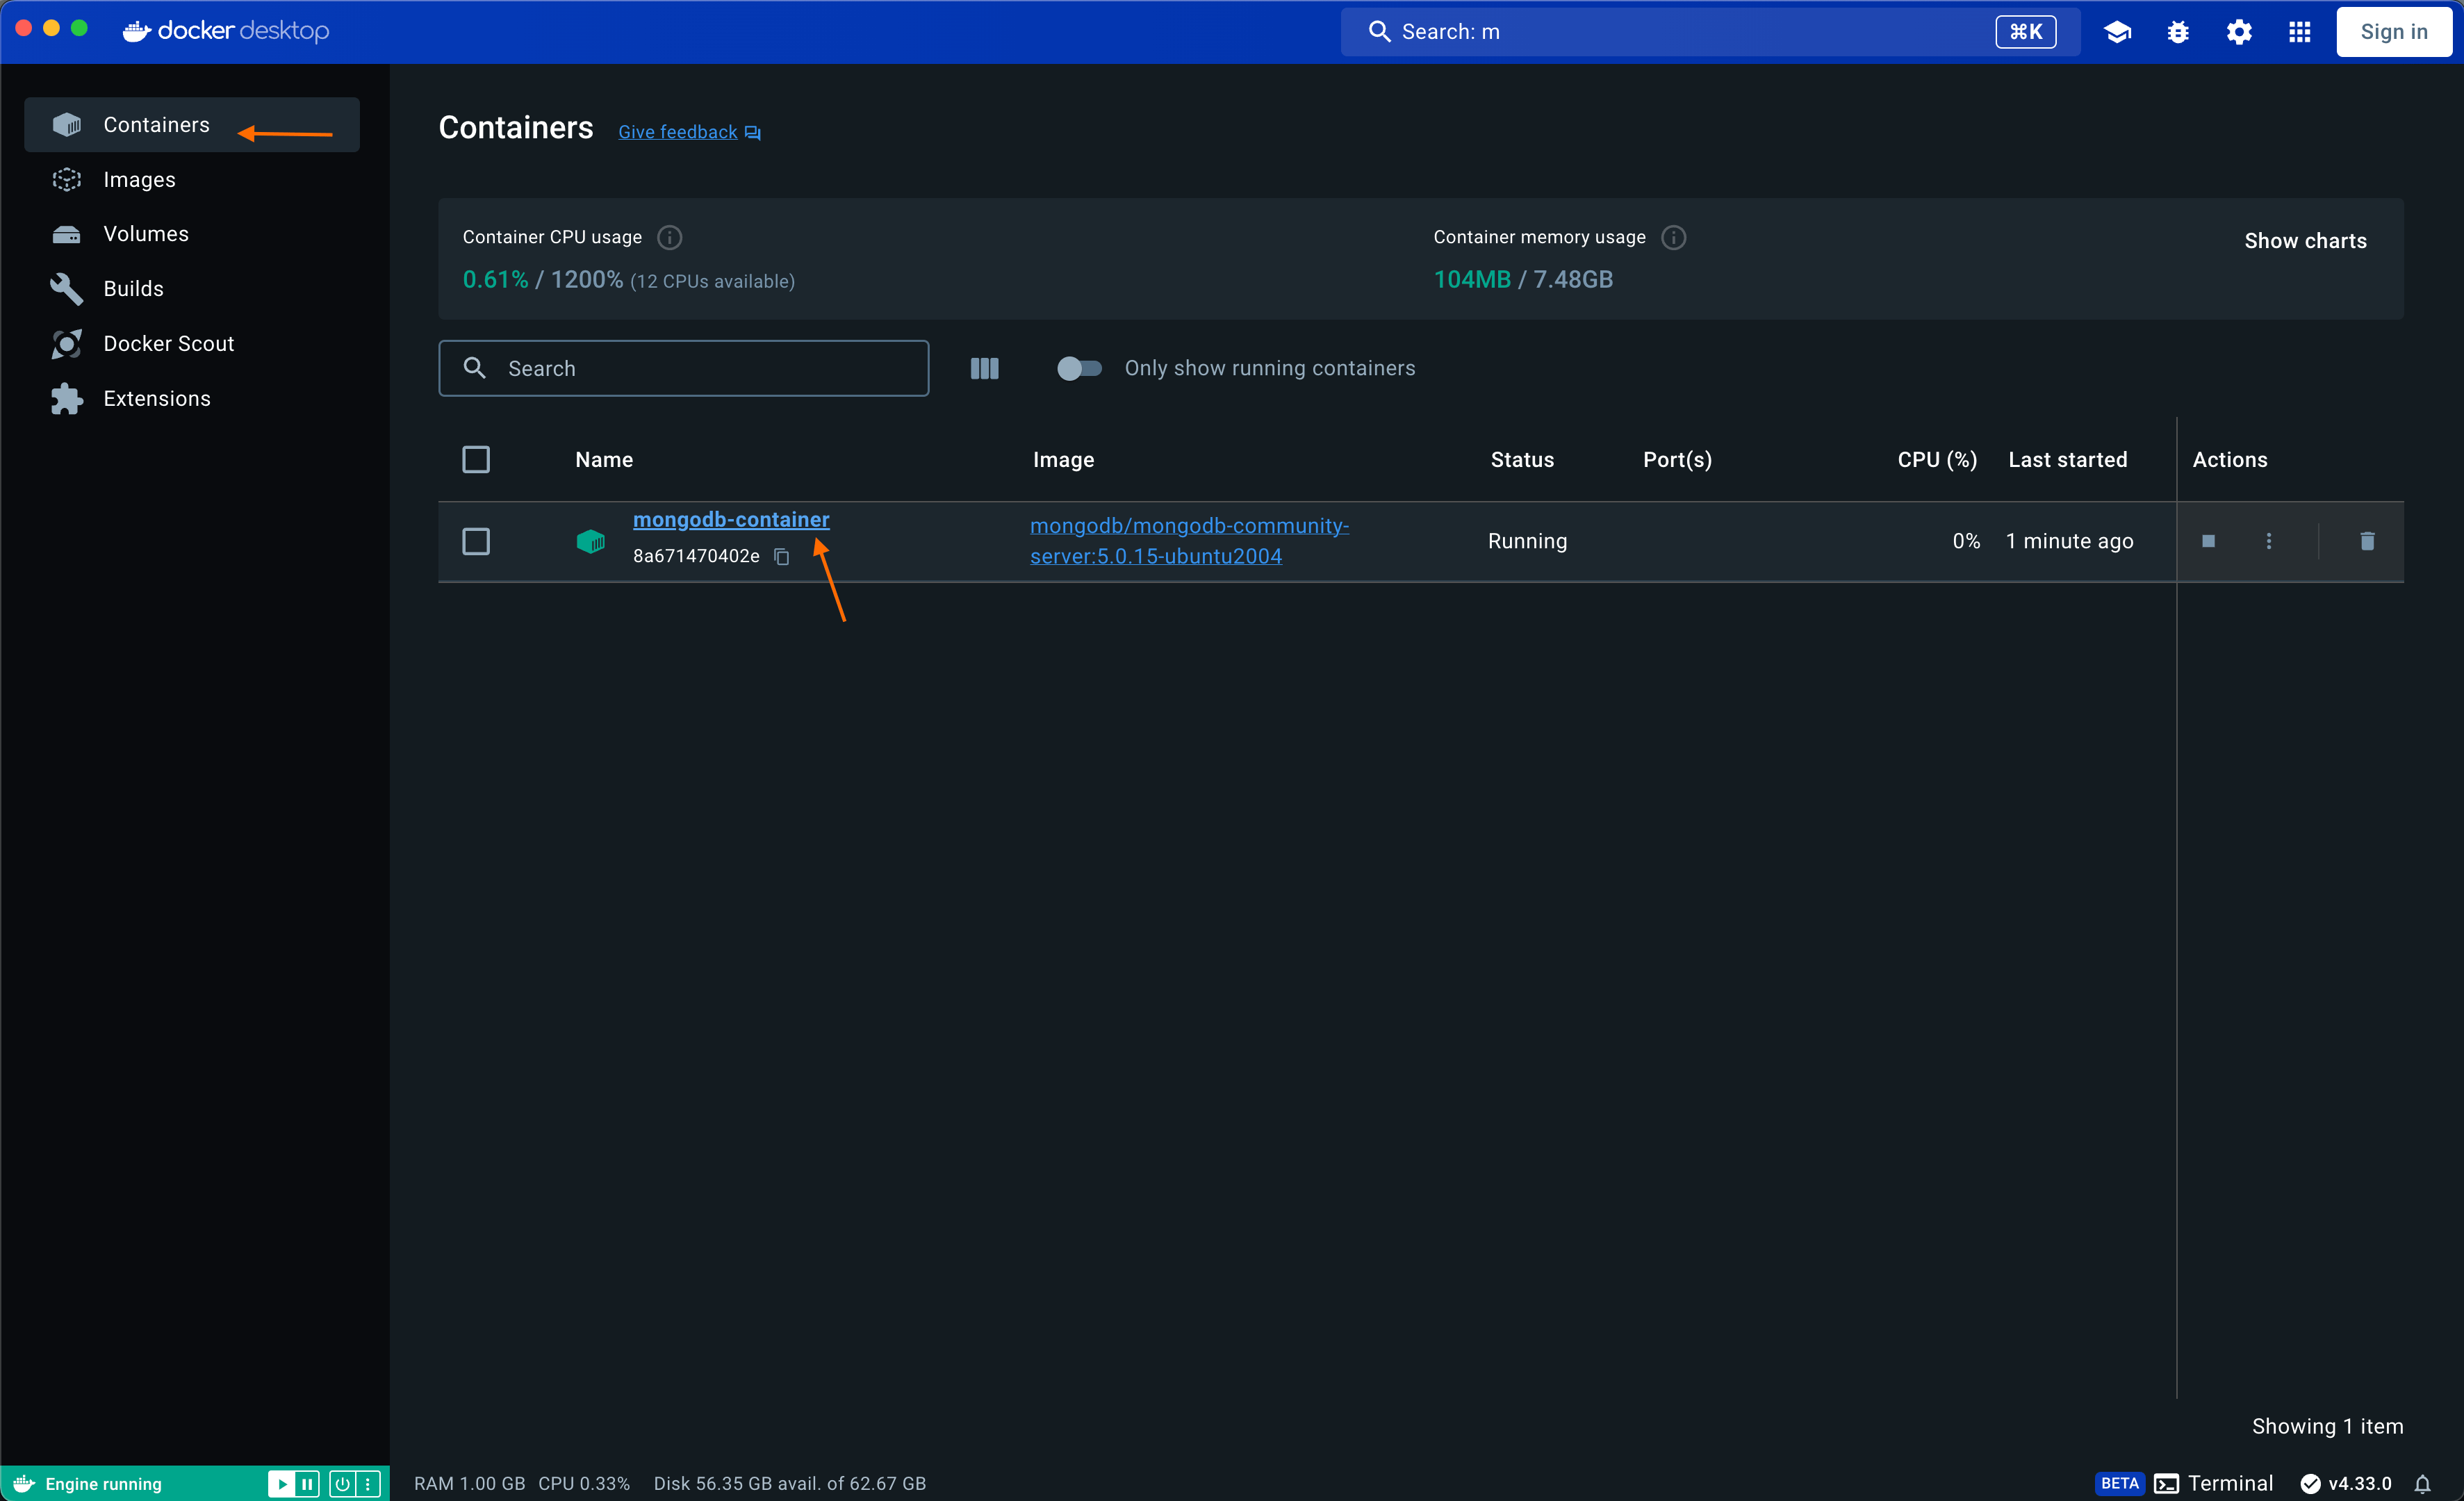
Doing all of above in Docker Desktop GUI is very straight forward:
Data Persistence & Publishing Port
Docker containers are ephemeral, they are not designed to hold data or state of application for long. One can also say that they are stateless. You may lose data when container is restarted or if you delete the container & start a new one.
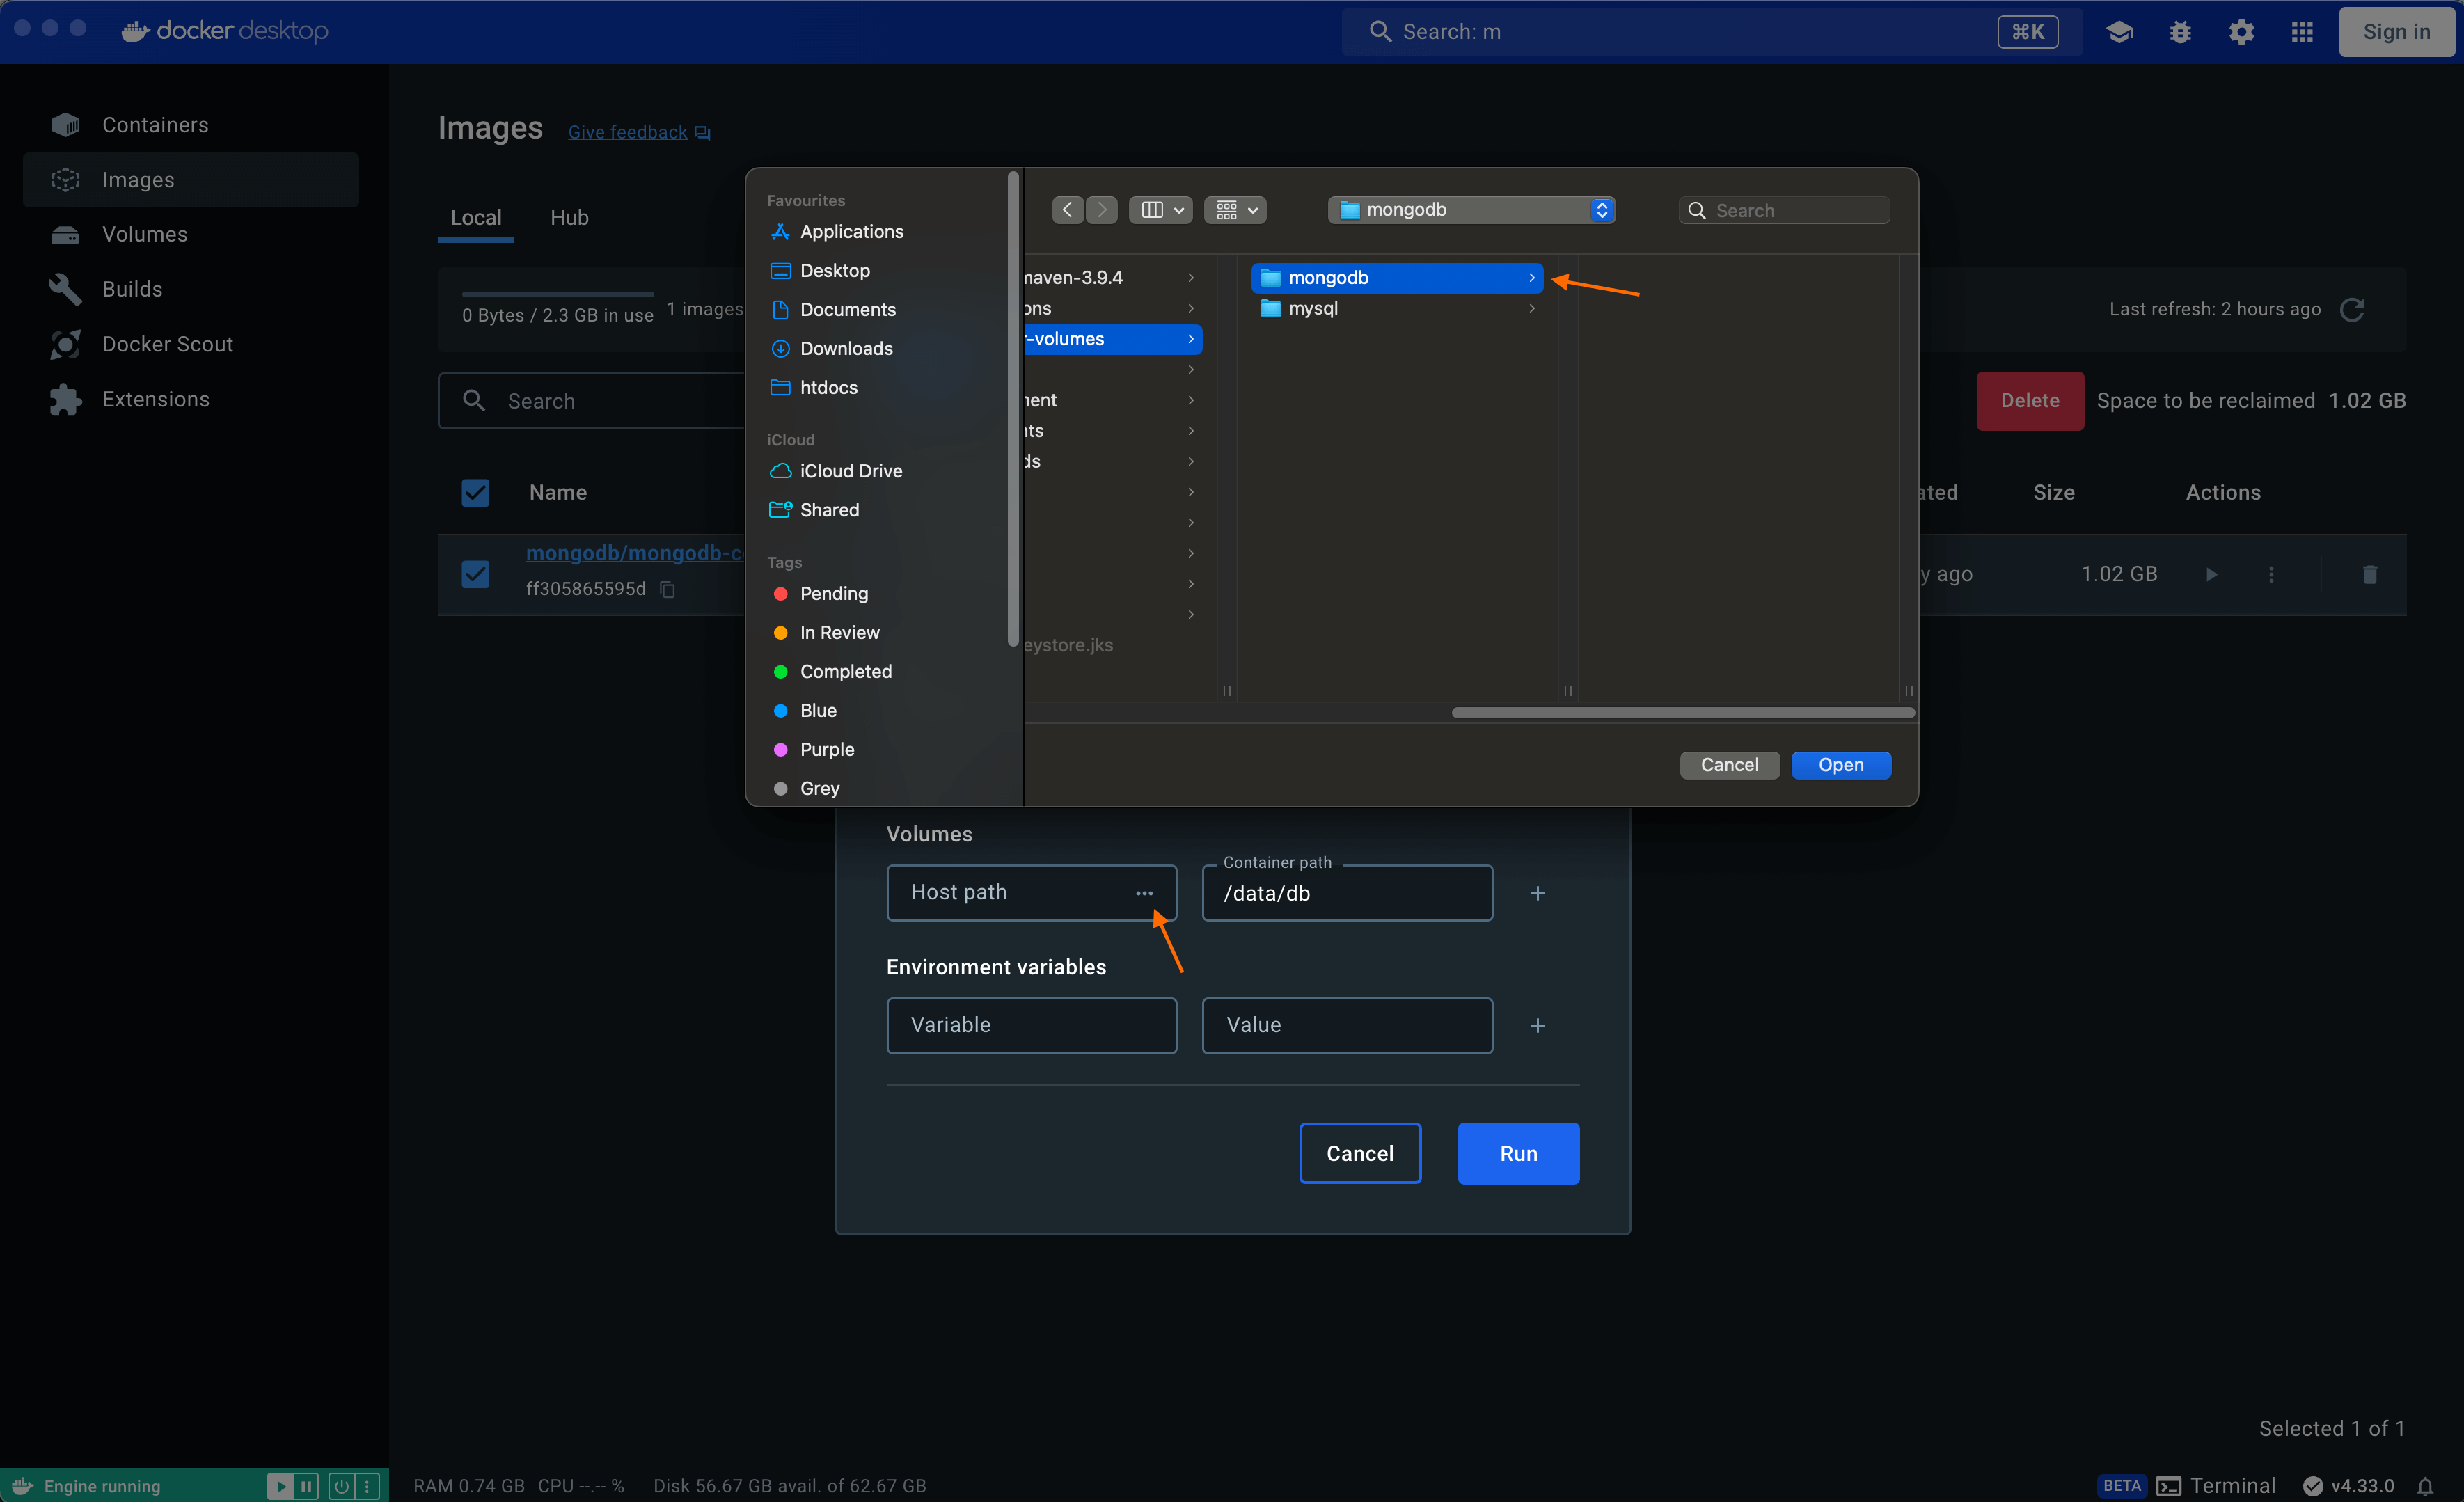
In order to solve this problem we need to map a persistent volume, a folder in our system which docker container can point to for storing / modifying the data. By default mongodb community server stores data in container at /data/db
We can map a empty folder from our to container's path /data/db. I have already created an empty folder mongodb in my mac file explorer. Follow below screenshot of Docker Desktop GUI
You need to stop & delete existing mongodb container.
docker rm mongodb-container --force
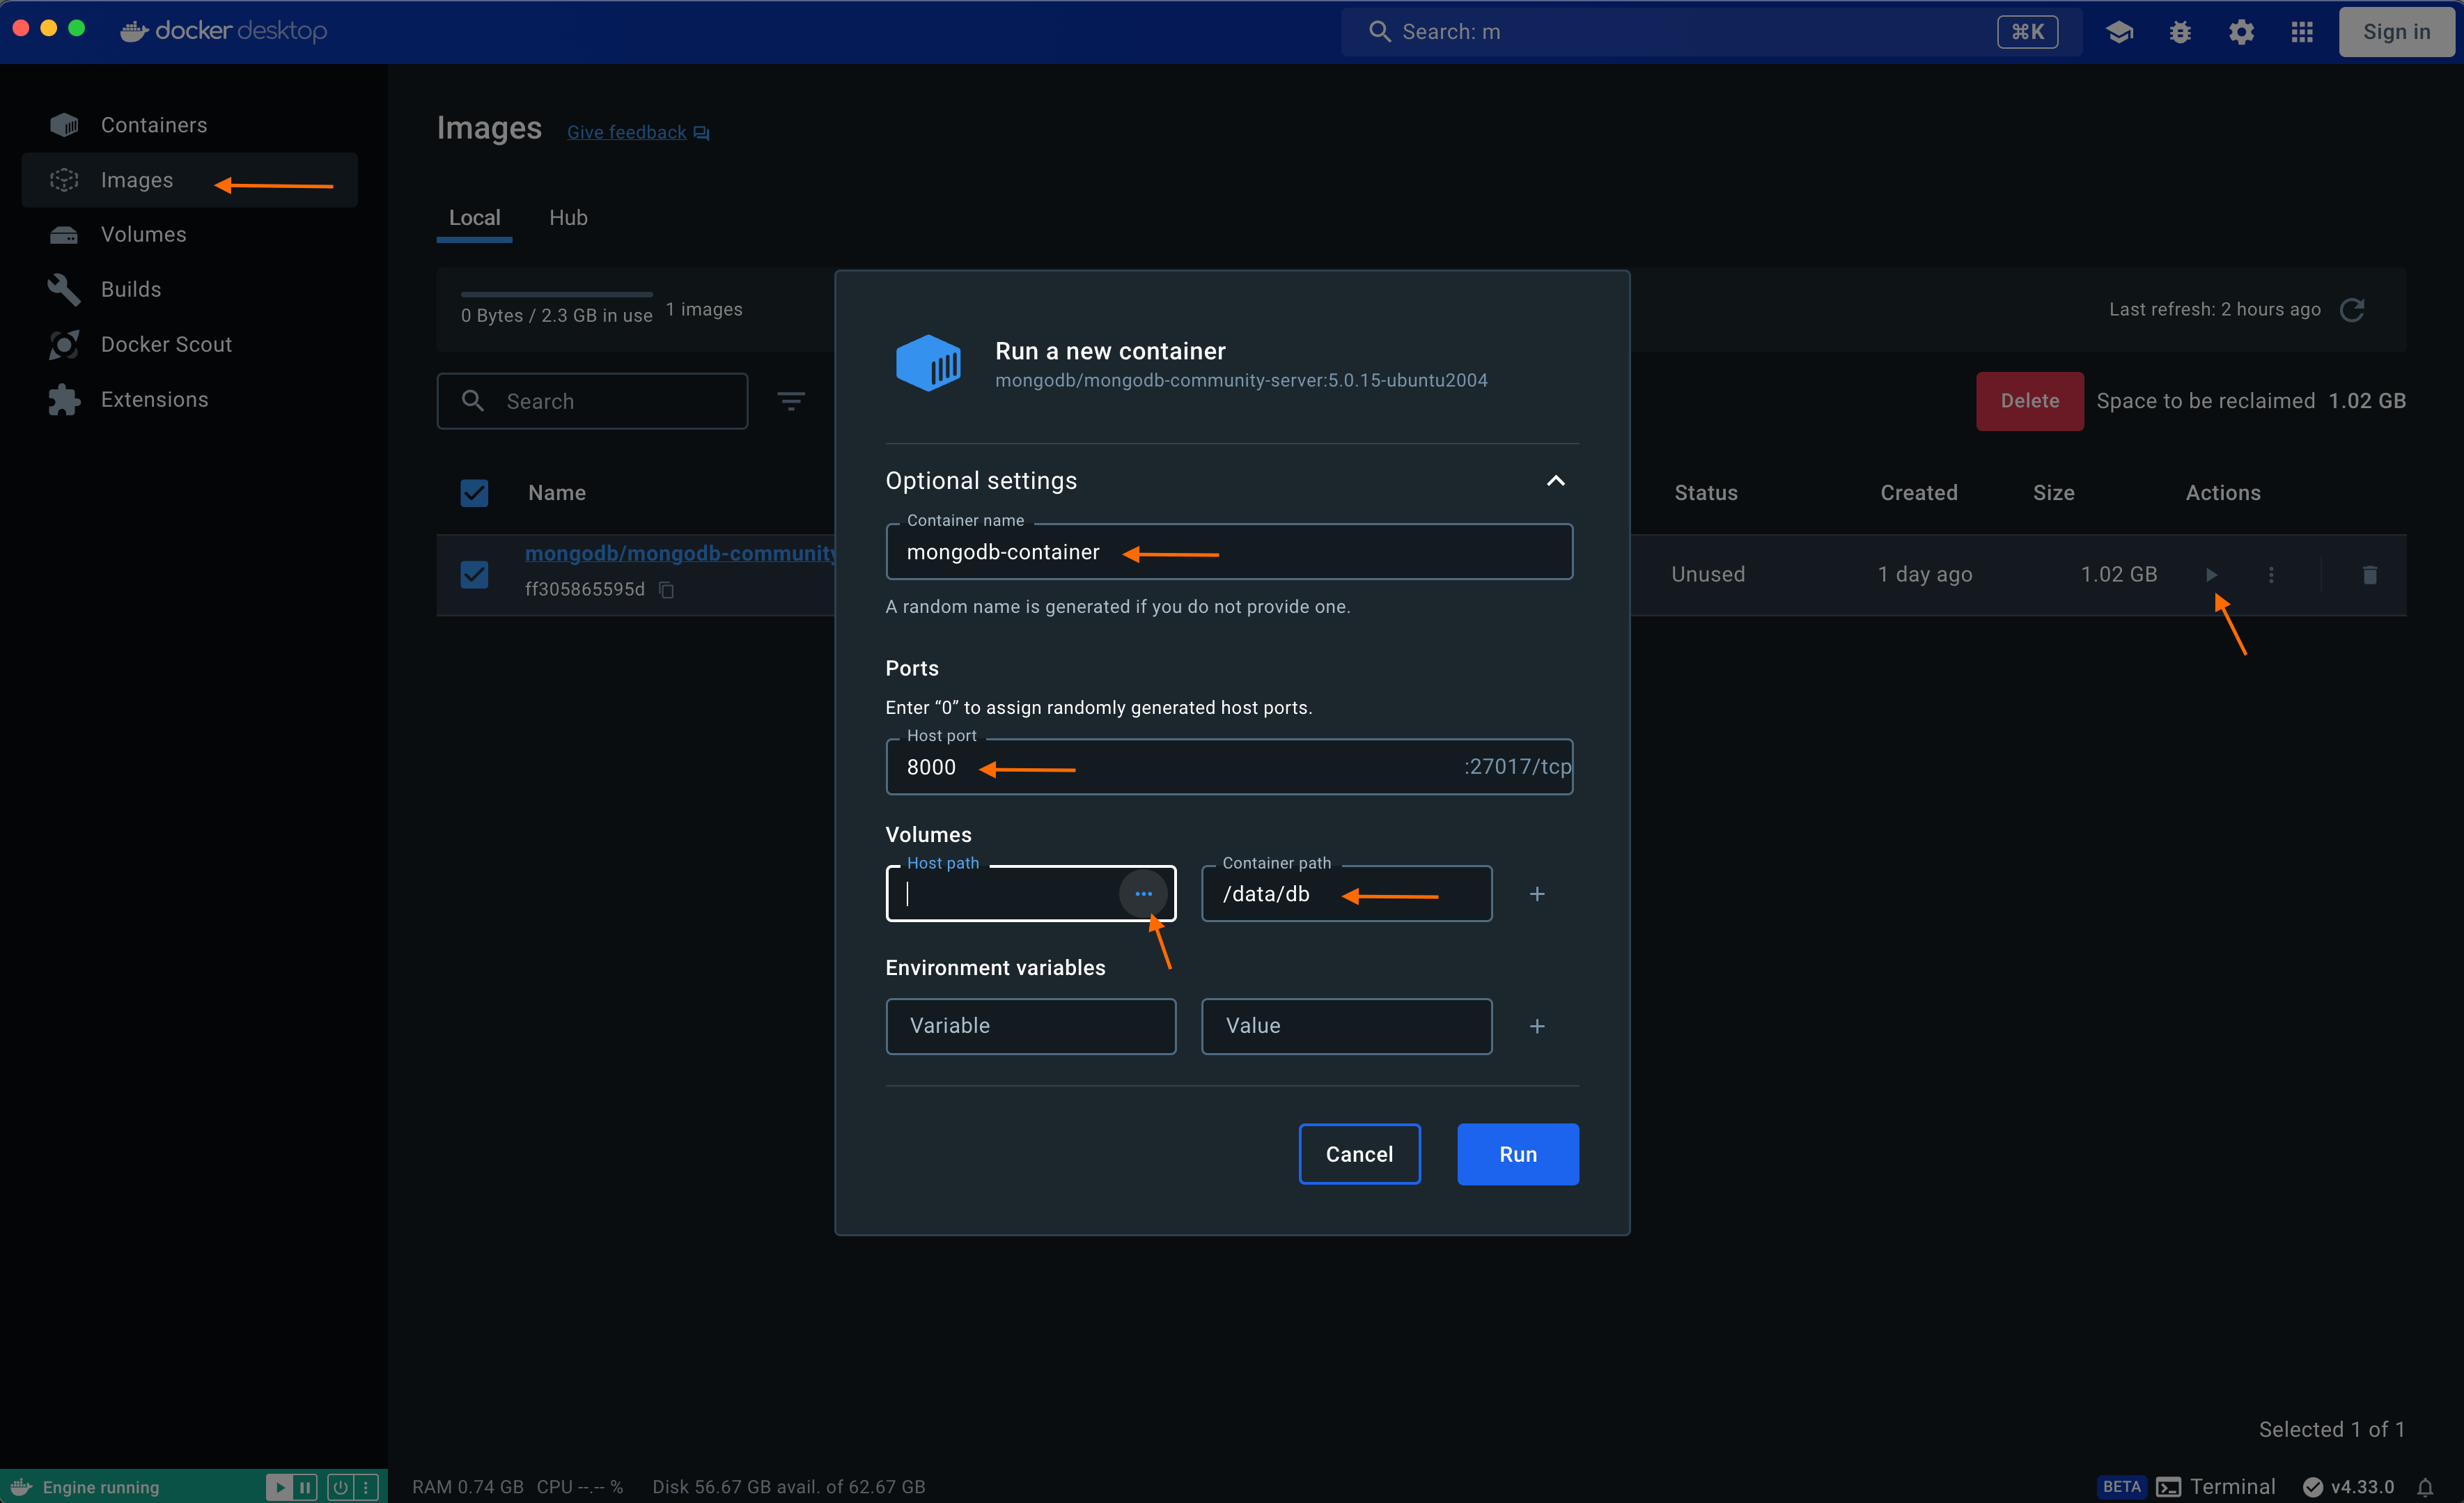
In the above screenshot you can see I have mapped 8000 port of host system (localhost or 127.0.0.1) that exposes tcp port 27017 of container. This will allow us to access mongodb server outside container environment.
/data/db is mapped to a folder in host system like below:
You can now click Run & this will create and start container. Alternatively, you can do all of the above executing below command in terminal:
docker run --name mongodb-container-cmd --volume /Users/username/container-volumes/mongodb:/data/db --publish 8000:27017 --detach mongodb/mongodb-community-server:5.0.15-ubuntu2004
Connecting To MongoDB Compass
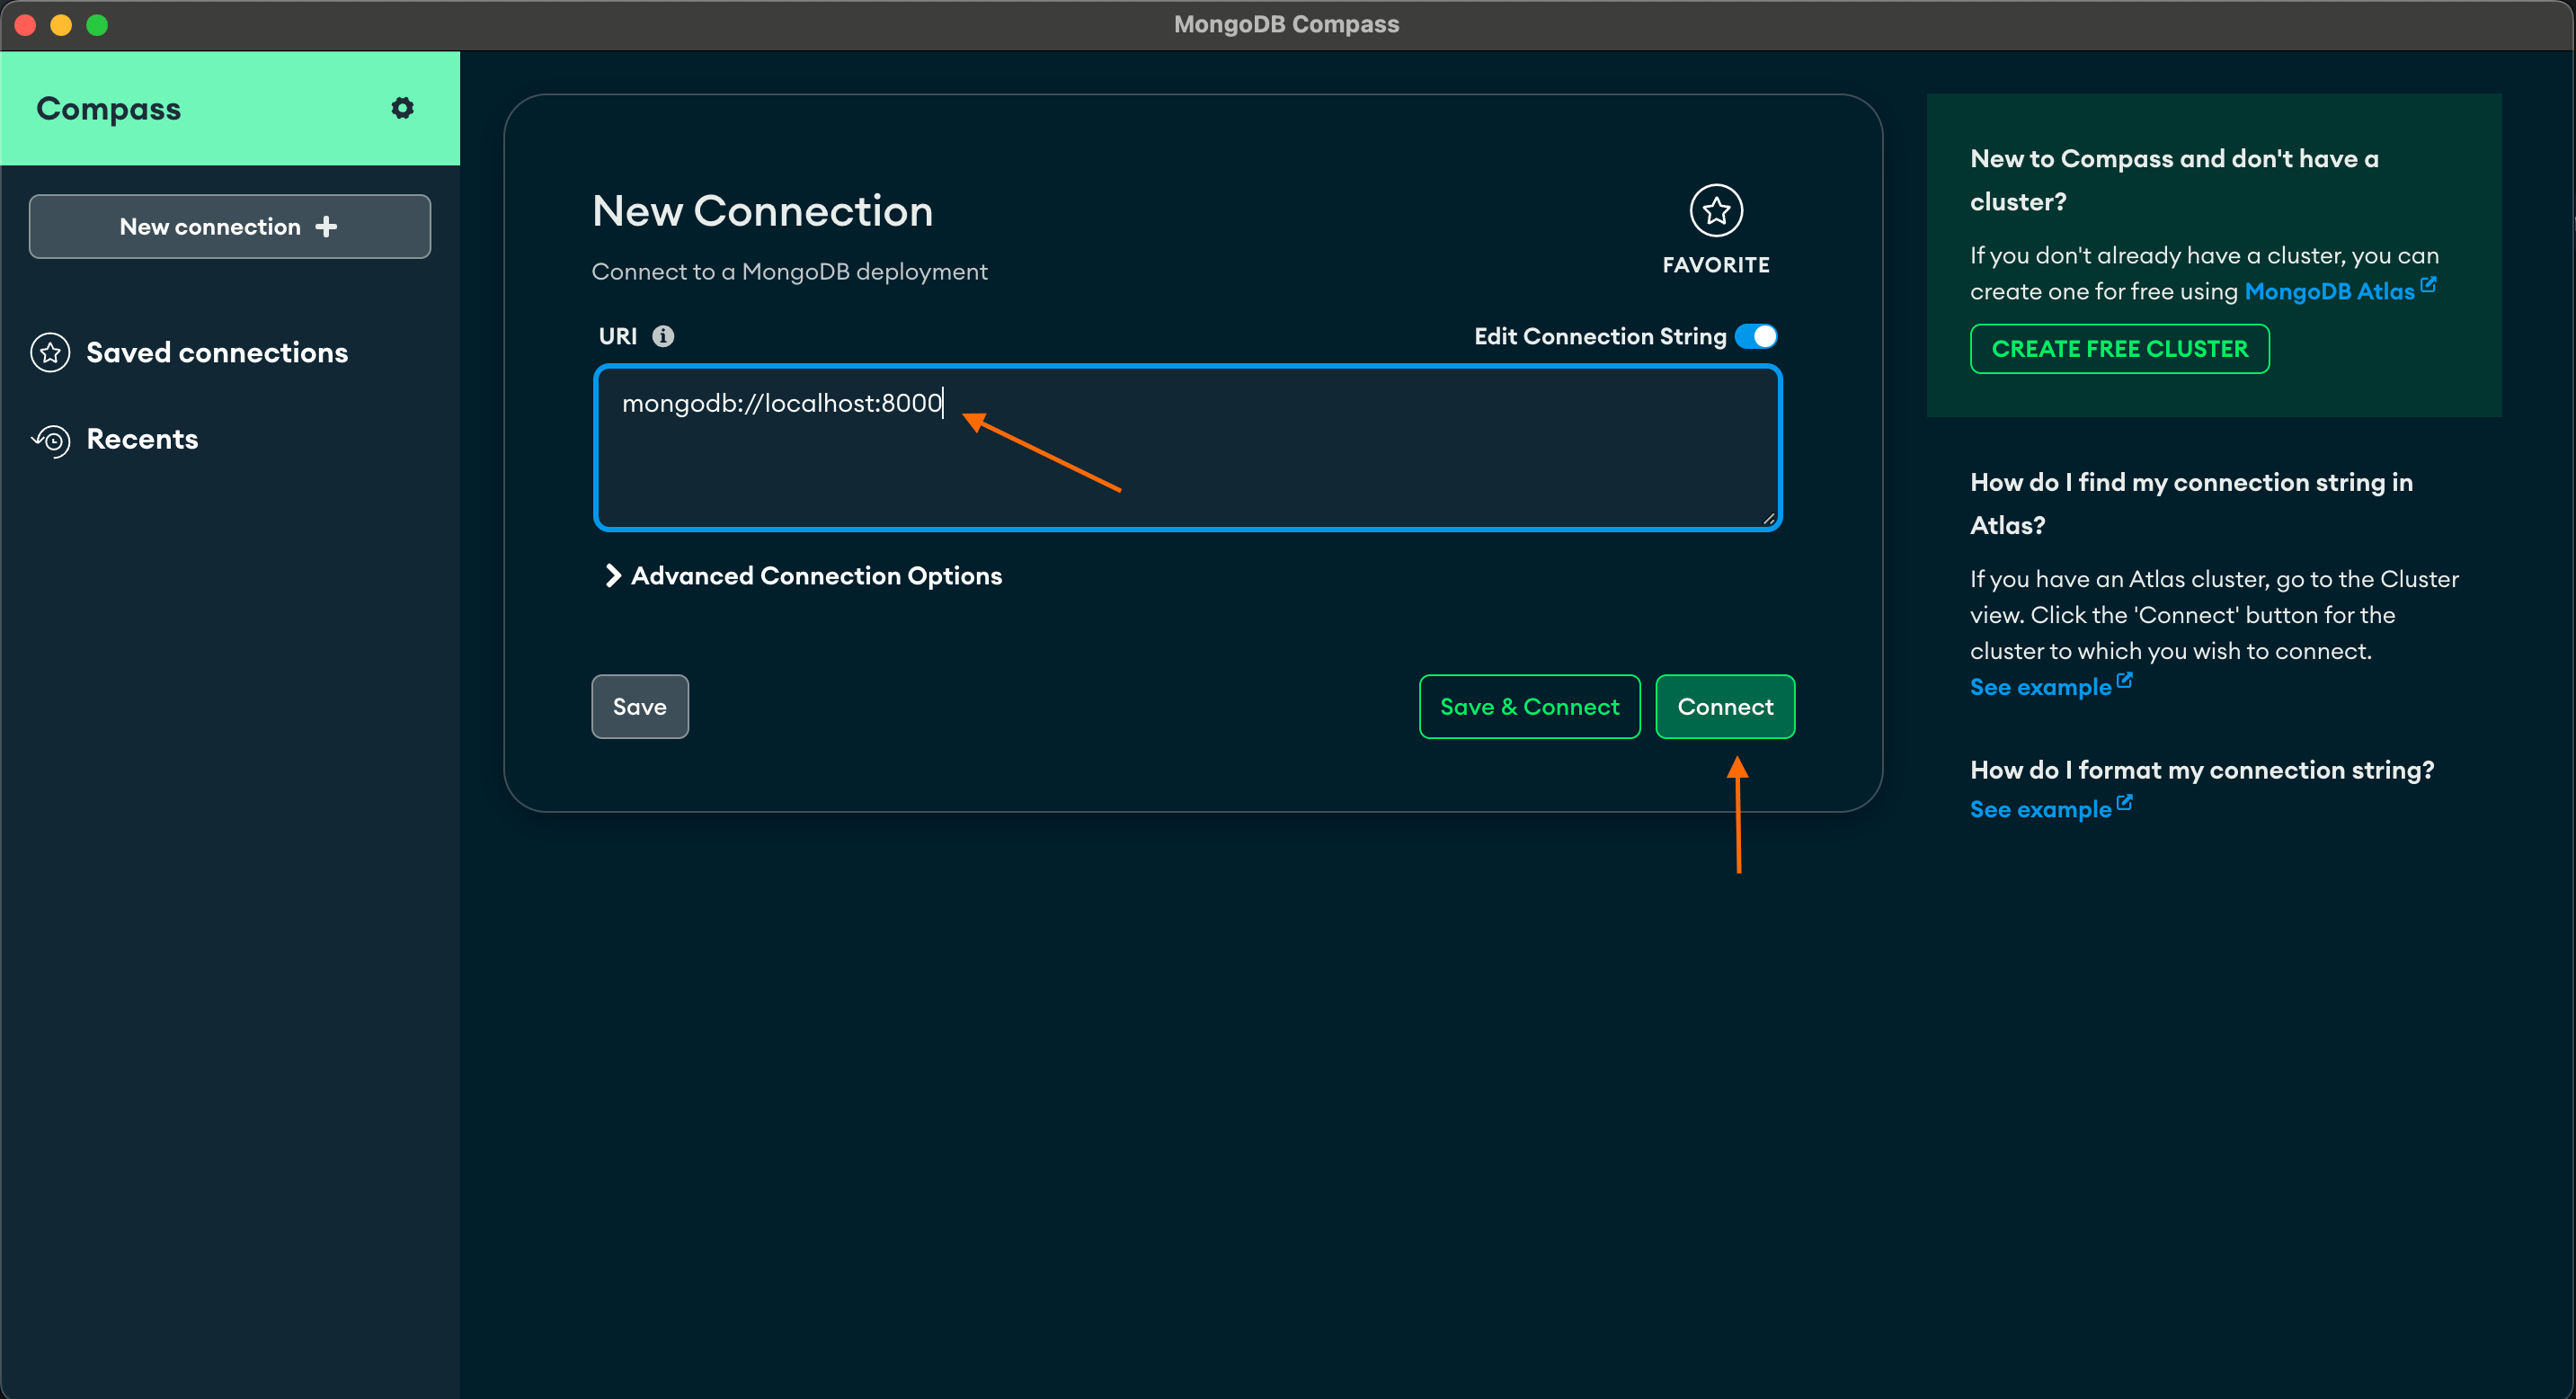
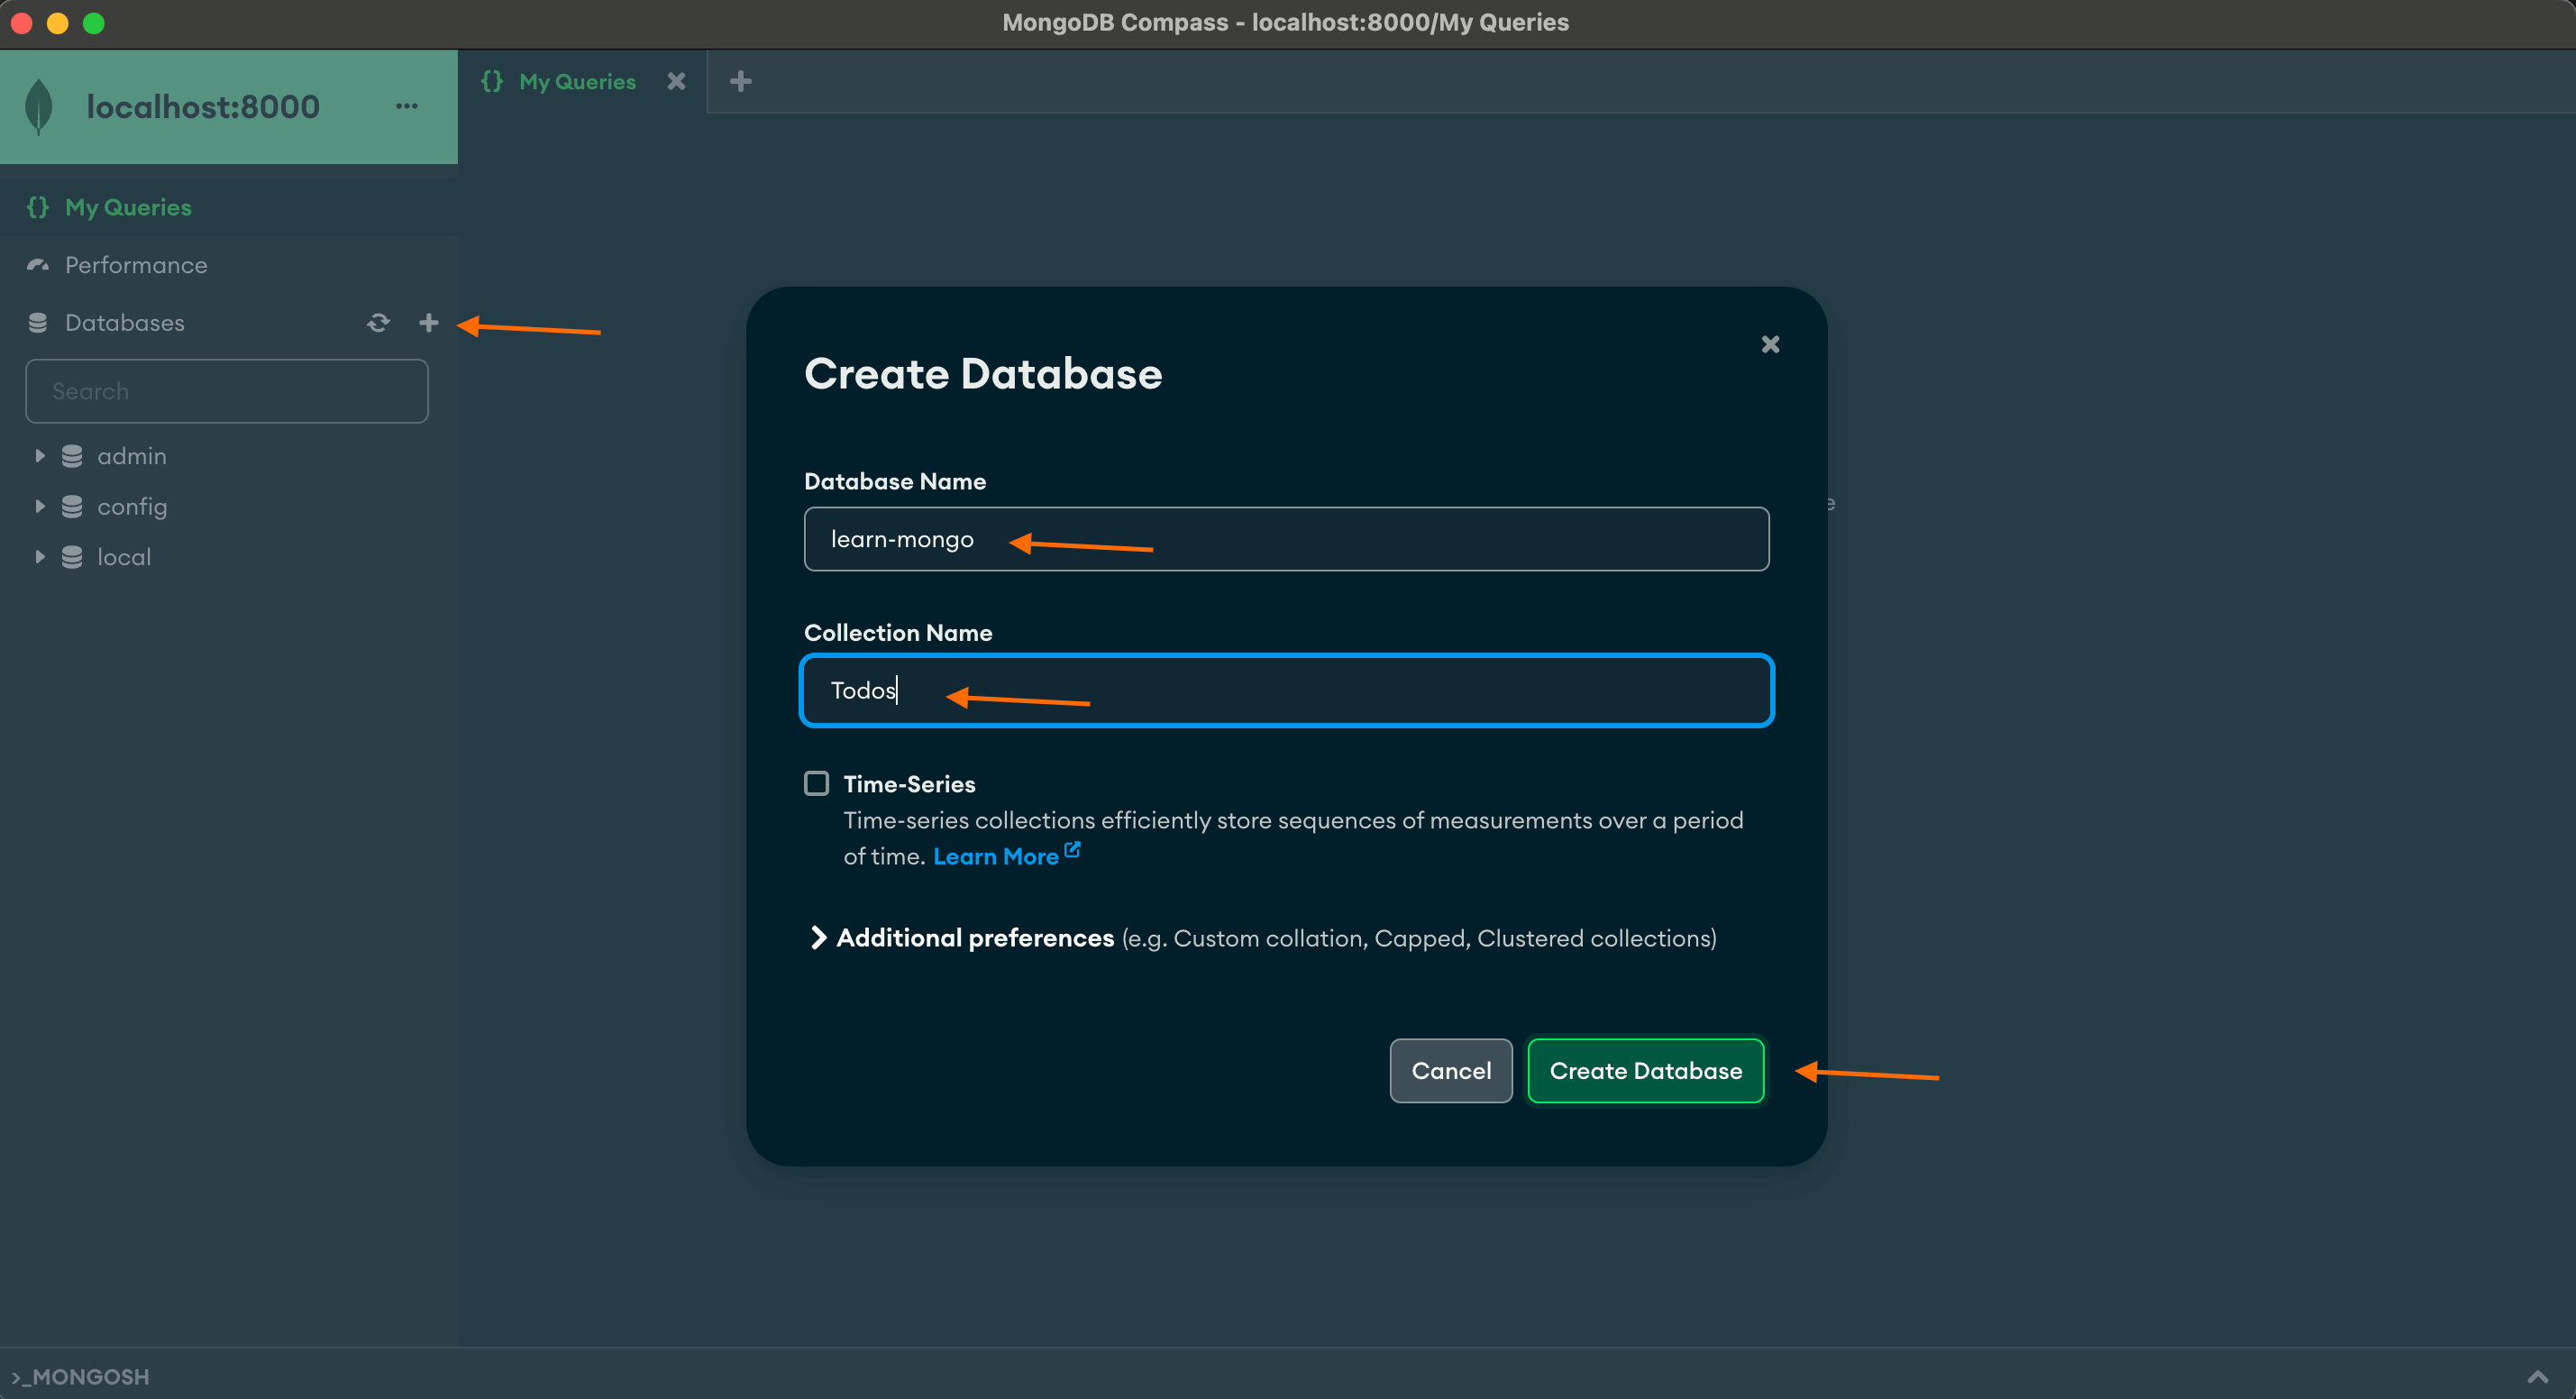
MongoDB Compass is a free GUI tool from MongoDB. We can create DBs, Collections, perform CRUD operations and more using this tool. After you have created and run the container exposing port 8000, you can use this to connect to mongoDB server from Compass.
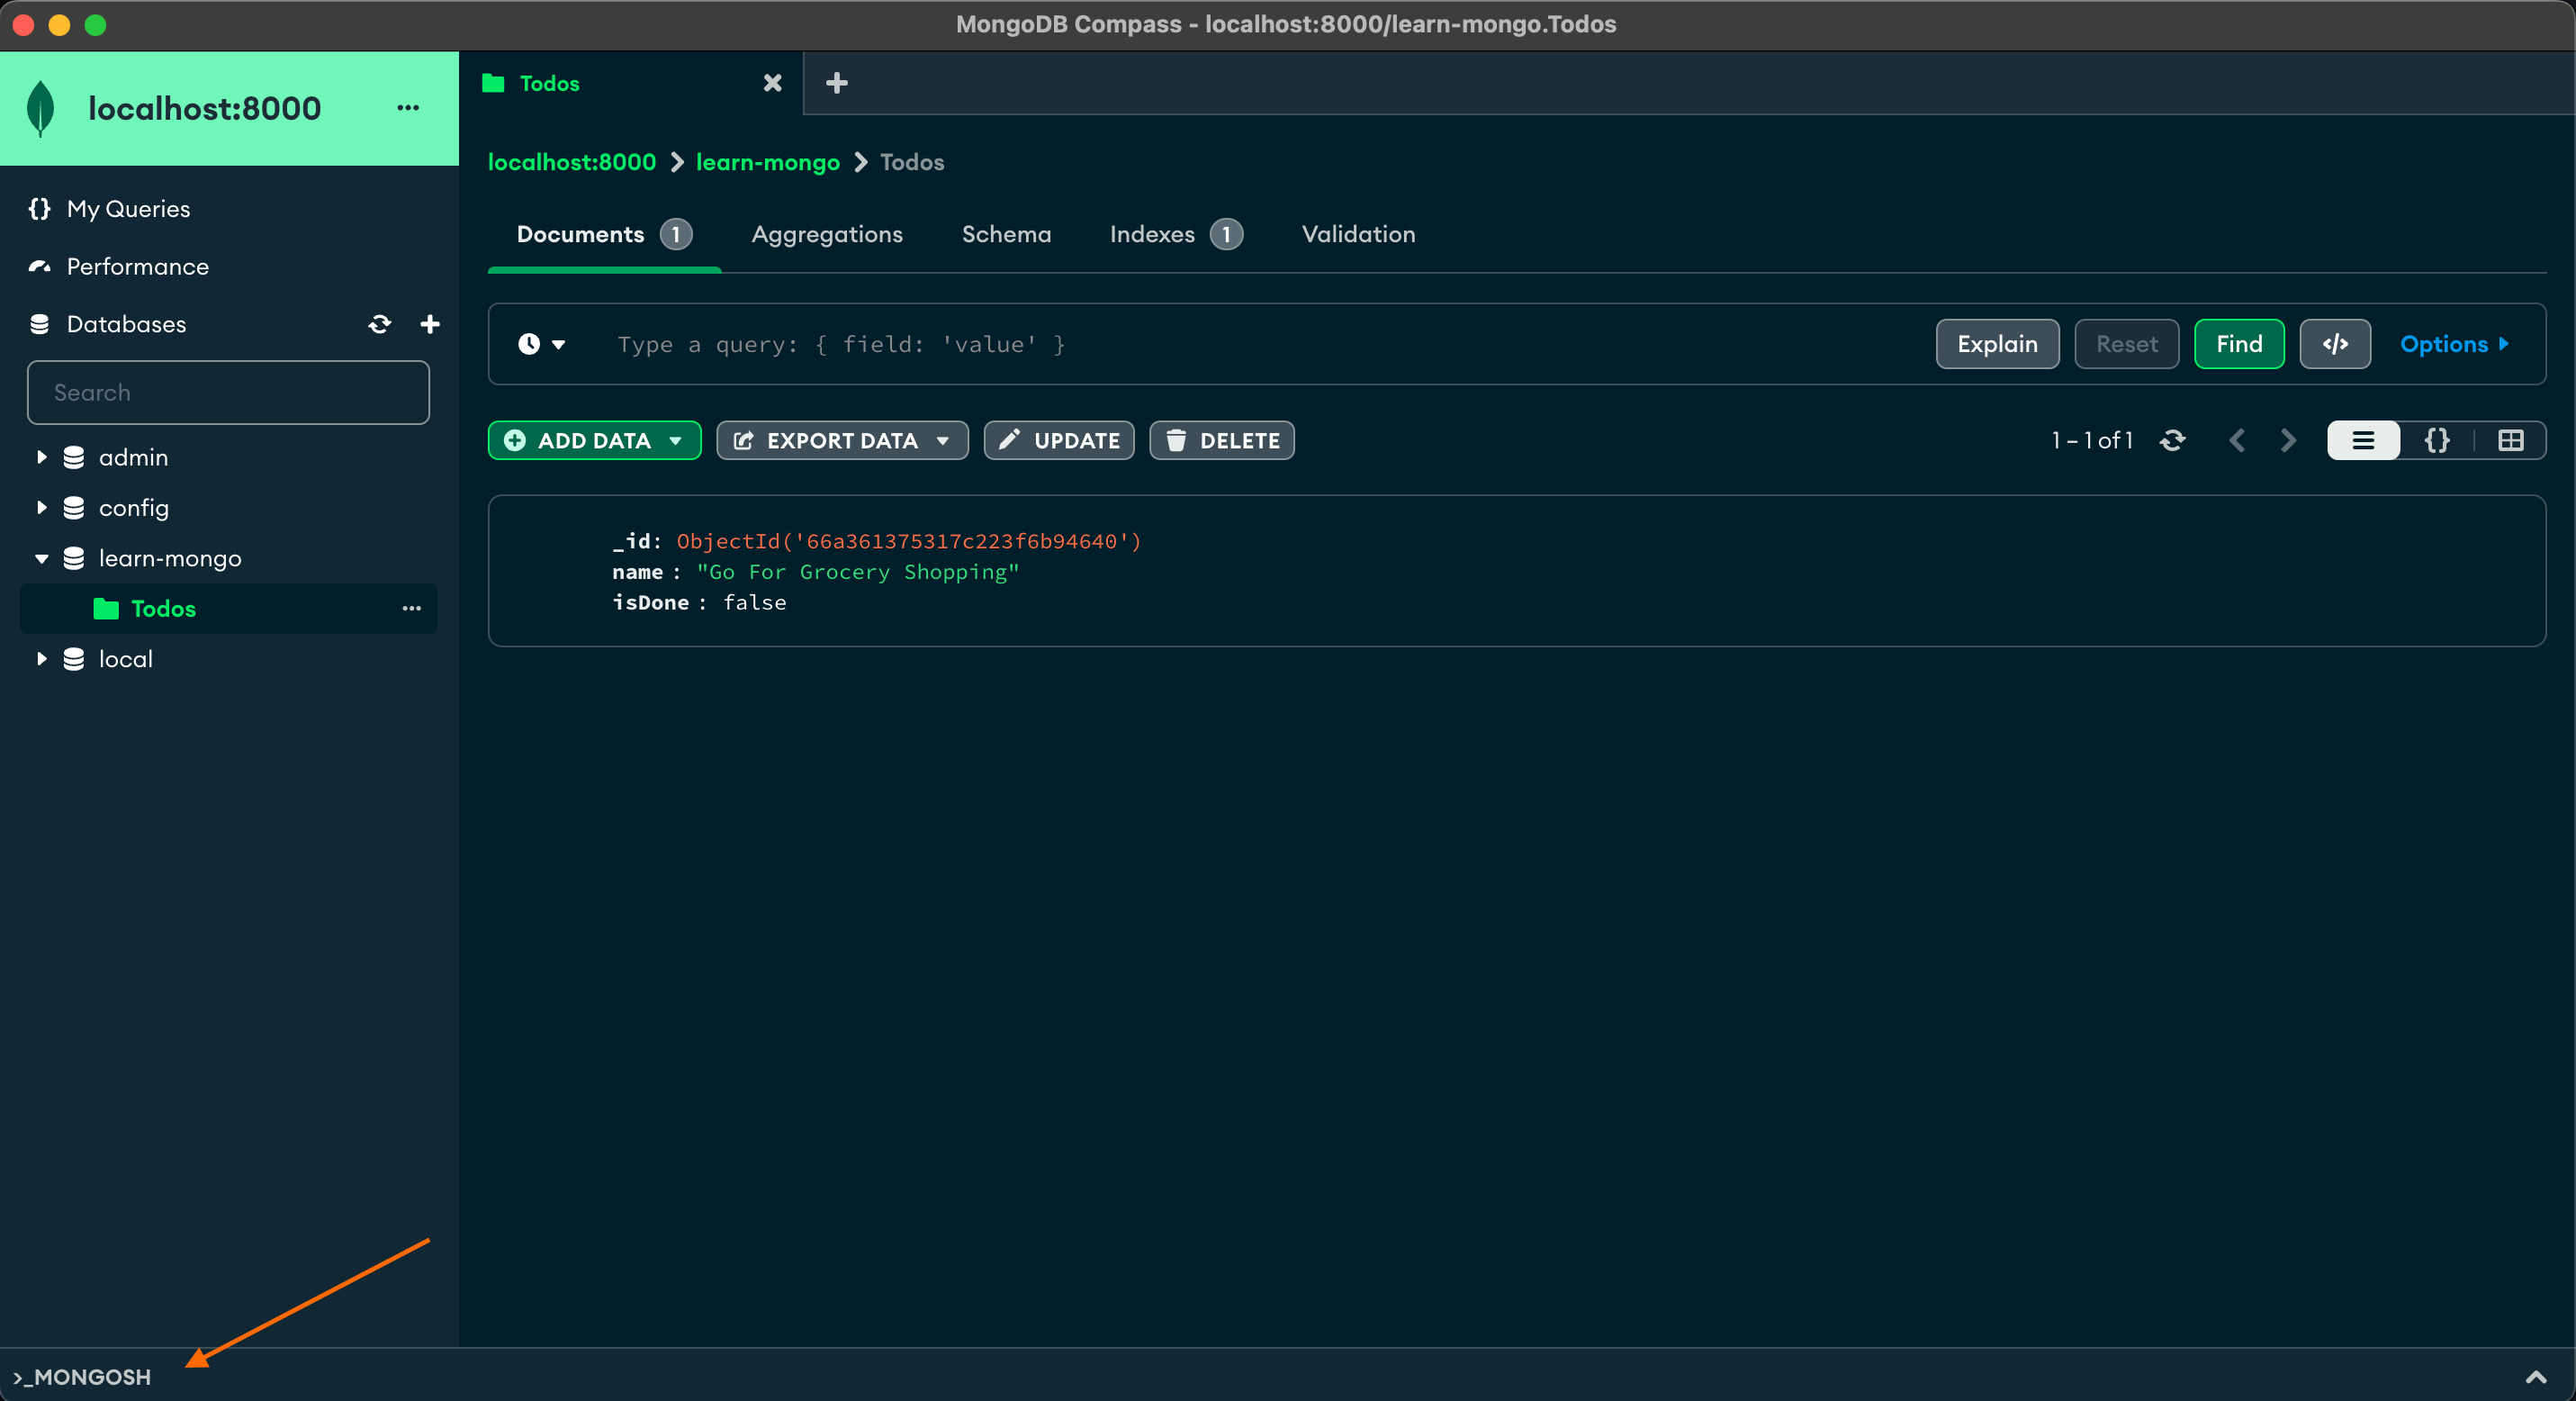
Below are the series of screenshots to follow after opening Compass:
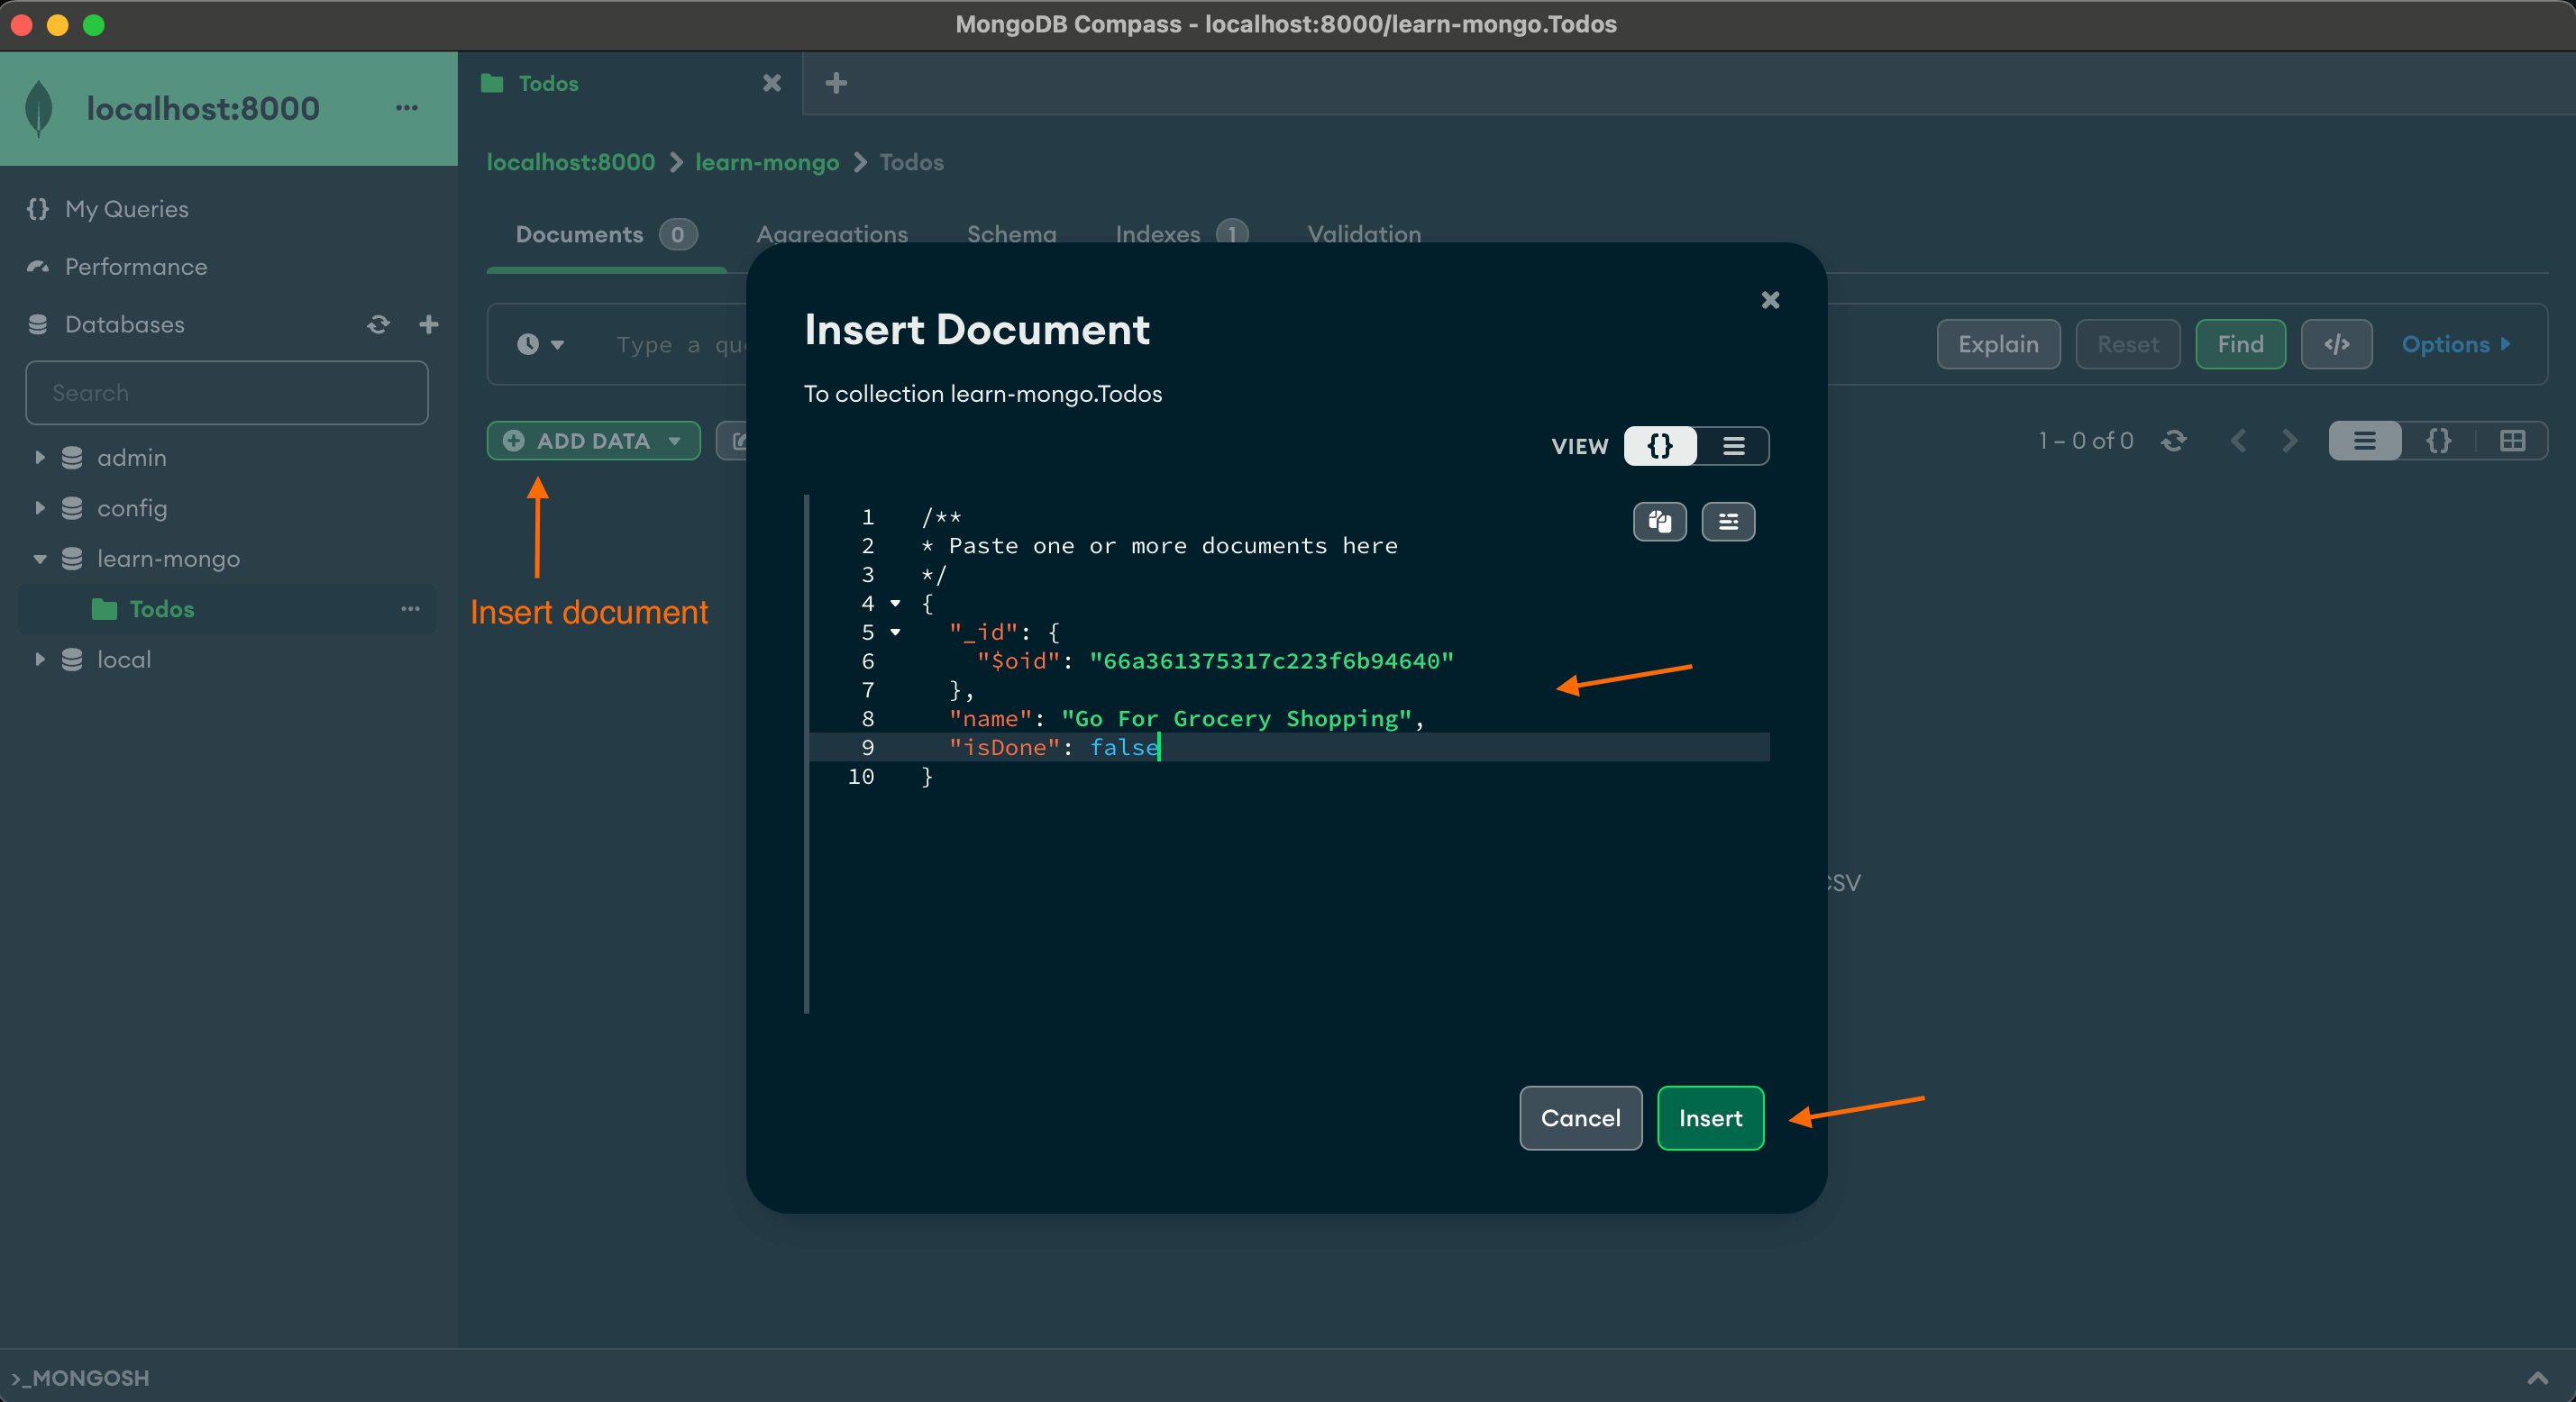
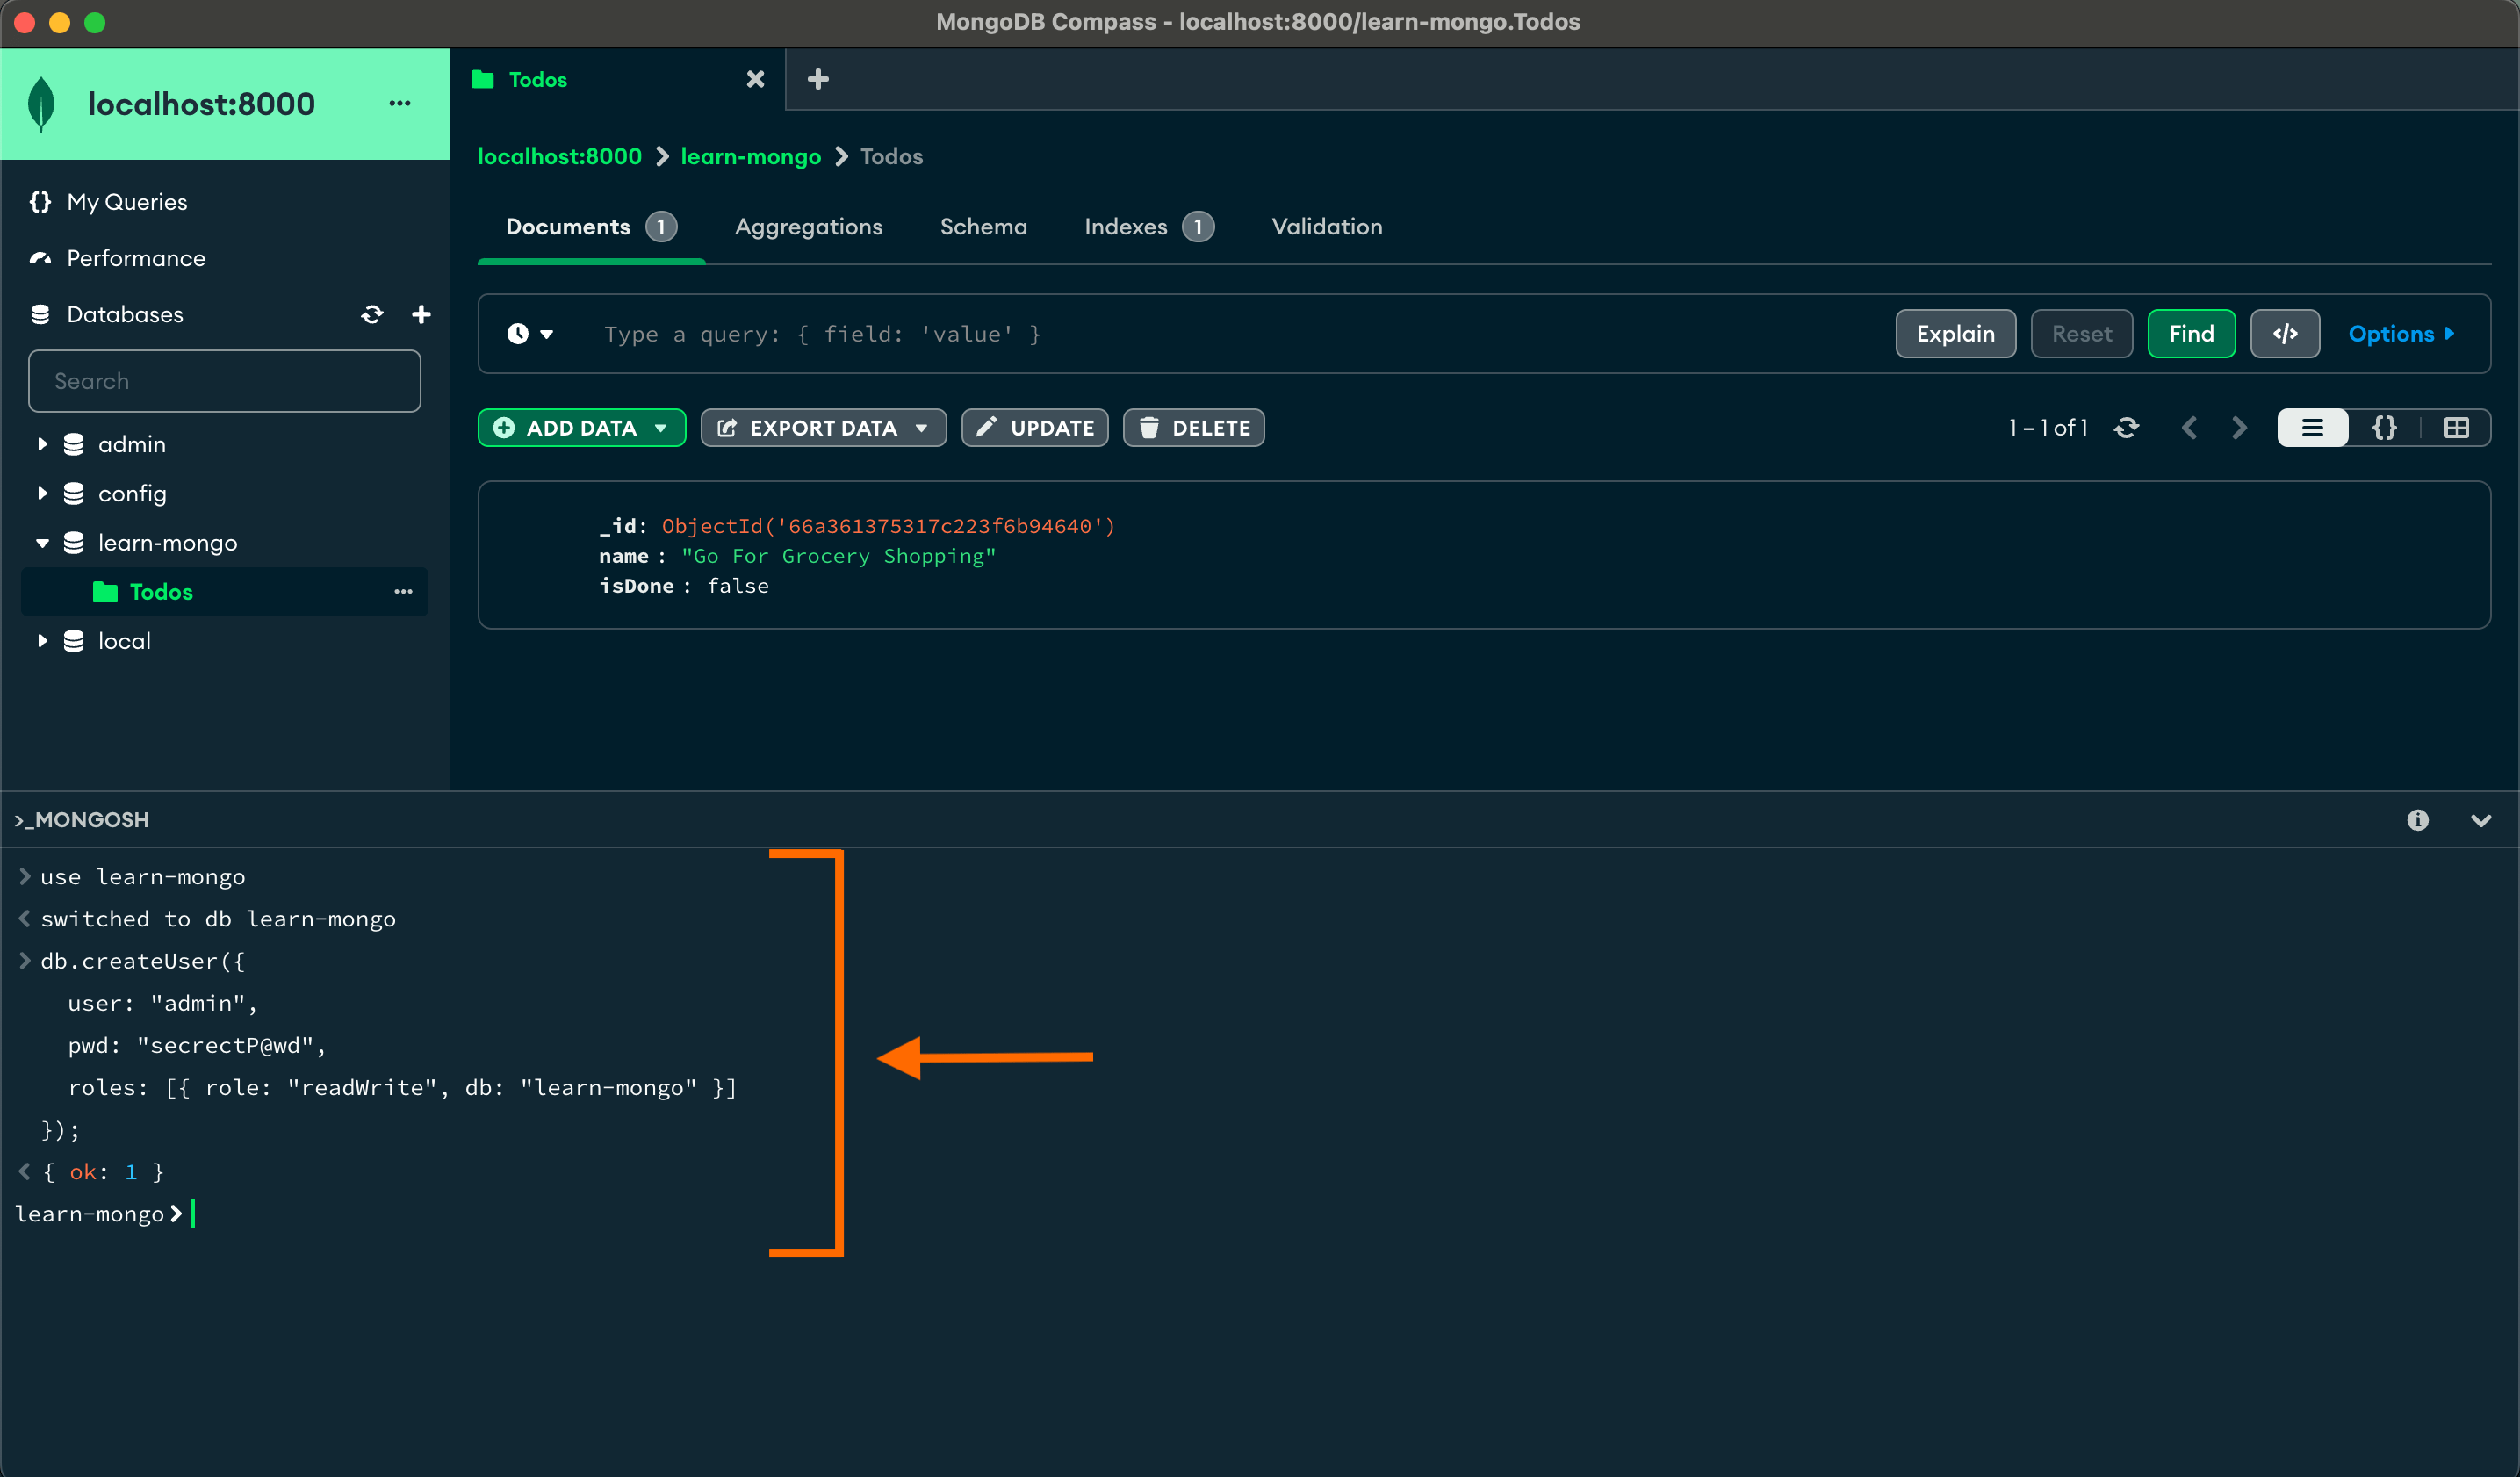
You can perform various other operations like creating a DB user using built in mongo shell:
Connecting to Express Server
Mongoose is a very popular ODM (Object Data Modeling) library for MongoDB that we use in backend servers built with Javascript.
We need a connection string to pass in mongoose.connect function, you can grab it from Compass GUI like below:
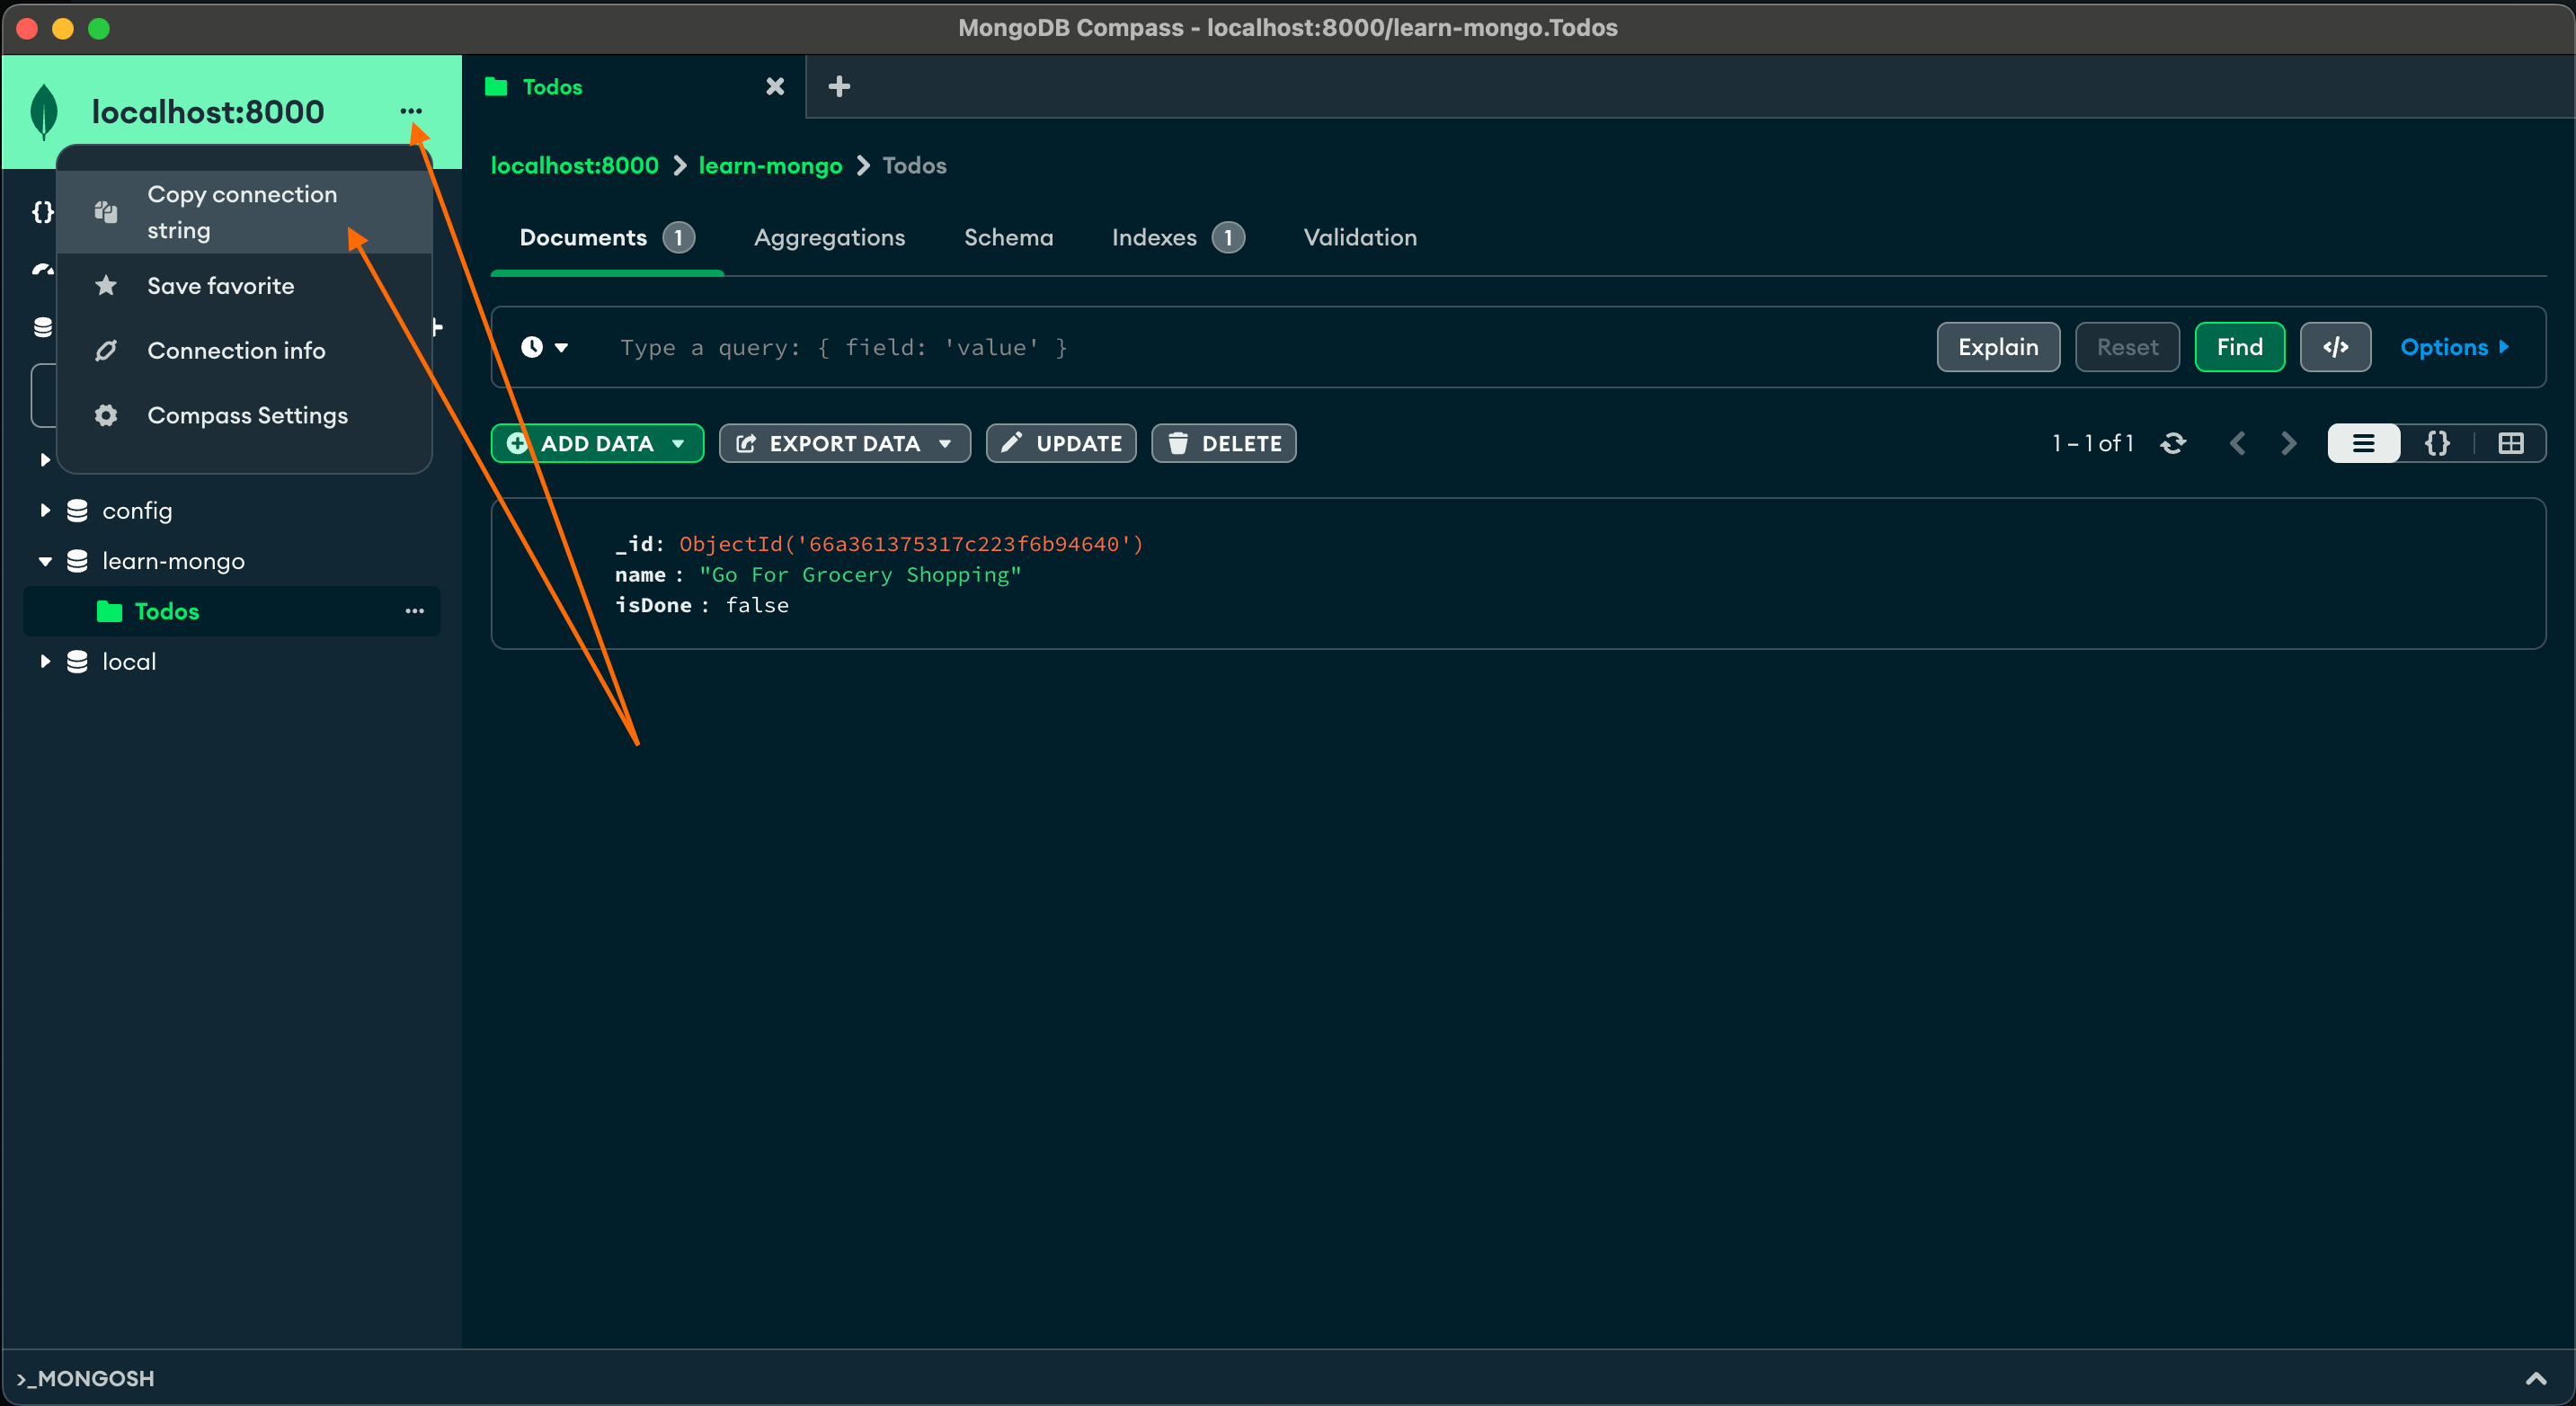
In the connection string append Database name:
mongodb://localhost:8000/learn-mongoThis connection string can be used in an node express server like below to connect & access database.
// db.ts
const connectDb = async () => {
	try {
		const conn = await mongoose.connect('mongodb://localhost:8000/learn-mongo');
		console.log(`MongoDB Connected: ${conn.connection.host}:${conn.connection.port}`);
	} catch (error) {
		console.error('Error connecting to MongoDB', error);
		process.exit(1);
	}
};
// server.ts
import express from 'express';
import connectDb from 'db';
connectDb(); // from db.ts
const app = express();
const port = process.env.PORT || 8081;
app.listen(port, () => console.log('listening on port: ', port));TL;DR
Here is very brief summary of what we did:
## Pull Docker Image
docker pull mongodb/mongodb-community-server:5.0.15-ubuntu2004

# Run MongoDB Server Container
docker run --name mongodb-container-cmd --volume /Users/username/container-volumes/mongodb:/data/db --publish 8000:27017 --detach mongodb/mongodb-community-server:5.0.15-ubuntu2004
