How to Run MySQL & phpMyAdmin Using Docker
Content
Background
Docker is one of the most popular platform to create, run & deploy applications faster. It helps you to run things in isolation, you don't have to worry about the application environment / OS. You build it once & deploy it anywhere using docker. I like to think it with analogy of compiled Java programs that can run on any piece of hardware having JVM.
In this post we are going to:
- Run MySQL server in one container & phpMyAdmin in another container
- Attach persistent volume to MySQL container so that even if we restart the container or create a new one, we don't lose DB data
- Allow containers to talk with each other through docker networking
You can imagine how densely packed this post is. The reason I chose MySQL as the DB server & phpMyAdmin as GUI client is because I am old school :) feel free to use PostgreSQL server or mongoDB server or anything once you are done with this one.
If you are in hurry - TL;DR
Prerequisites
This is a long post, feel free to skim through sections from table of contents above if you are looking for something specific. I am going to assume you have very basic knowledge of Docker Images & Docker Containers. It is ok if you are not a DevOps person & a regular Indie developer or an office software engineer colleague trying to get things done, the right way!
Having said that I need you to have at-least Docker desktop installed. I am running things on mac OS but it should work the same even if you are on windows or ubuntu / debian based OS. (I mean, thats the whole point of using Docker platform, right?)
I am going to show how to do things using Docker Desktop GUI & also with docker cli commands.
Pulling Docker Images
Before spinning up containers we need the images of MySQL server and phpMyAdmin. Make sure your docker desktop is running & docker cli is accessible via Terminal / Command prompt.
docker version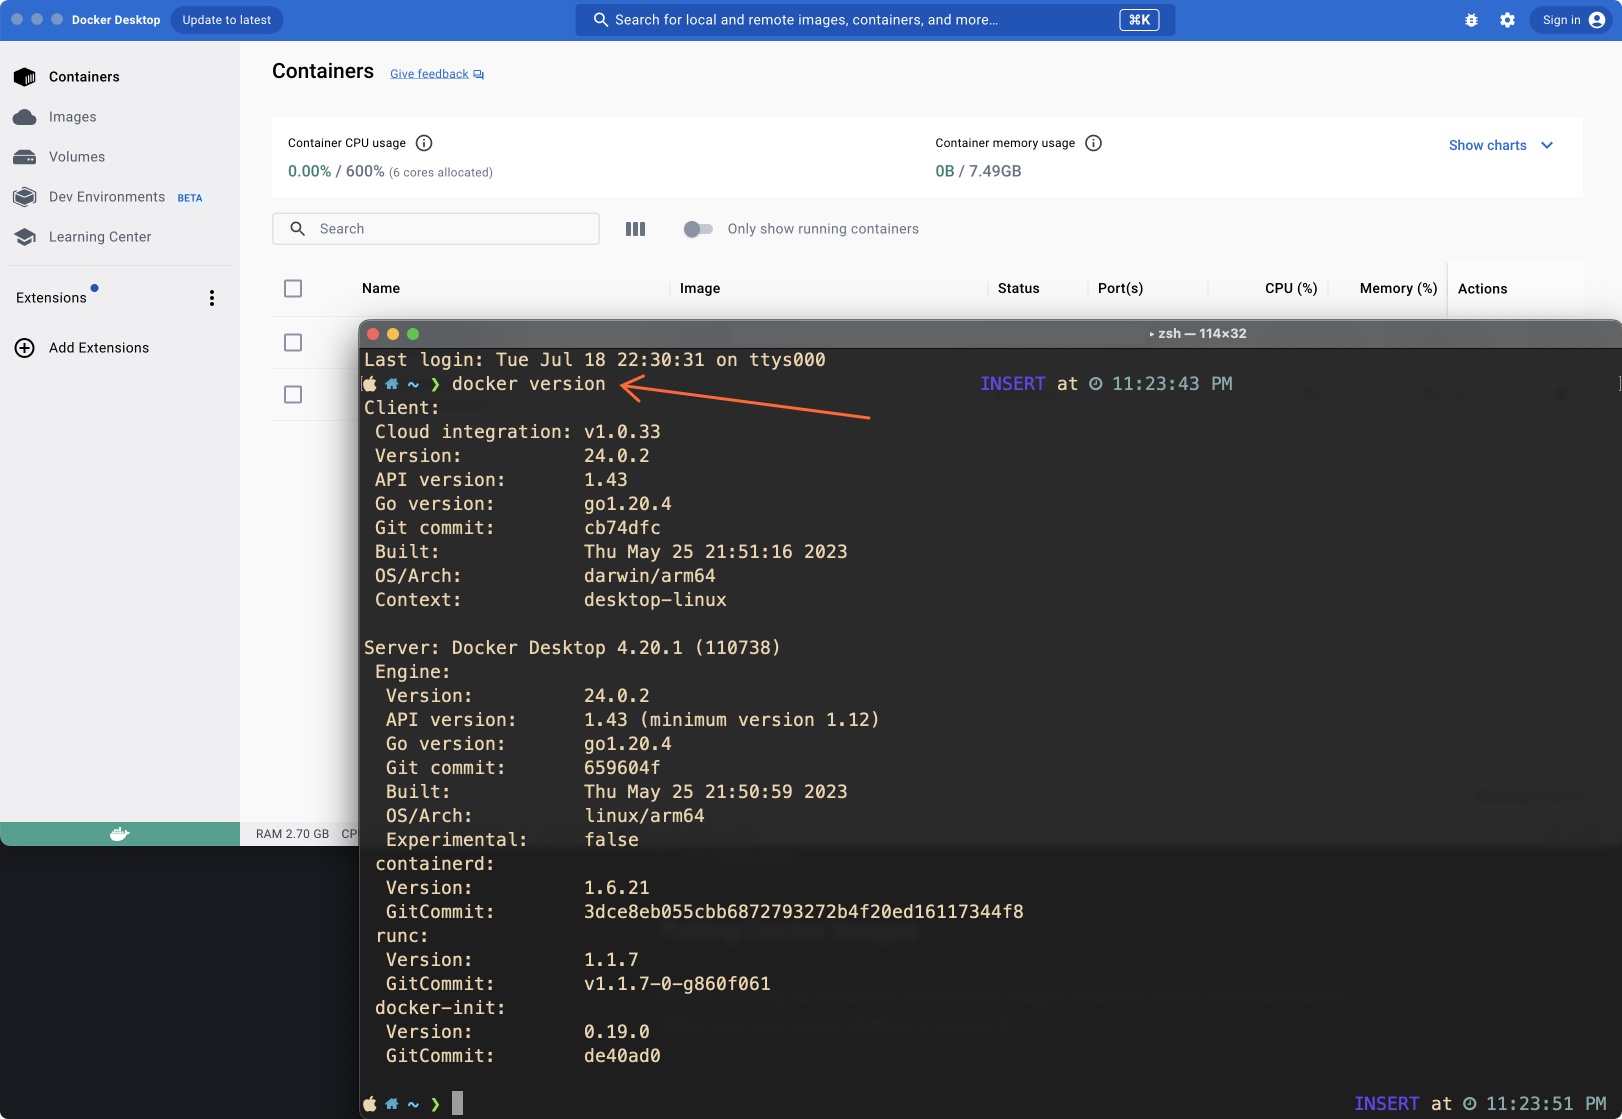
Pulling images from dockerhub for mysql & phpmyadmin via terminal is straight forward, just run below commands separately.
docker pull mysql
docker pull phpmyadmin
By default this will pull the latest versions. If you want specific version, lets say v5.2 of phpmyadmin, you need to run docker pull phpmyadmin:5.2
In Docker Desktop, click the search bar at top, type mysql & under Images tab, the first one is what we need. Verify the latest tag & click Pull.
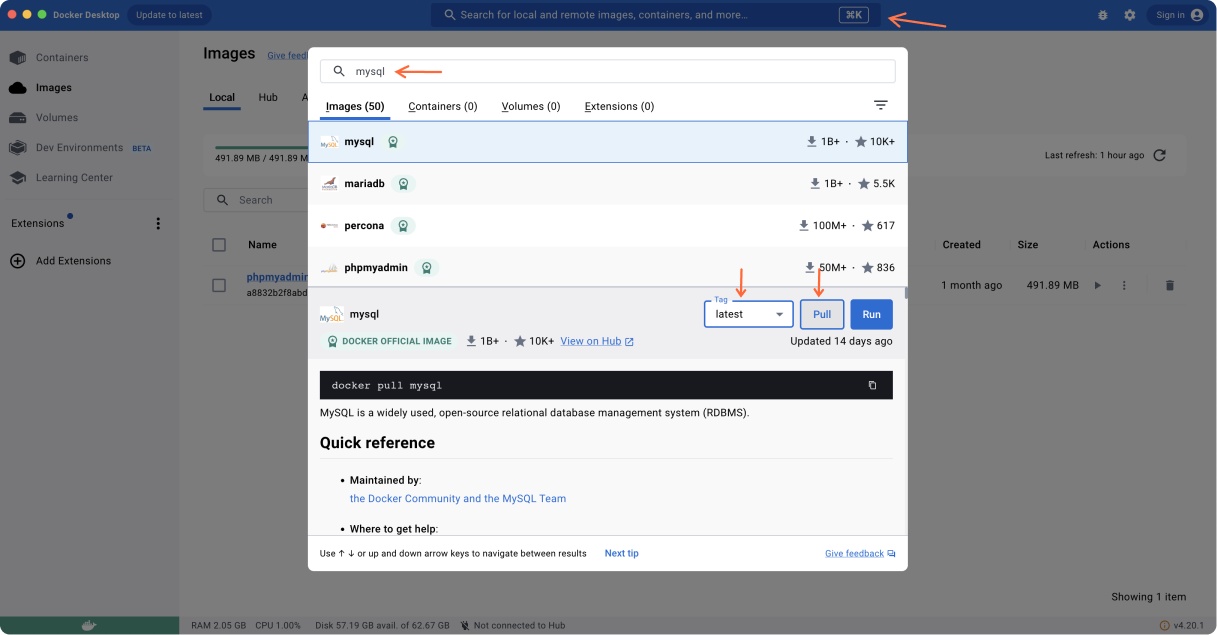
Pulling images can take time depending on the internet speed. Combining mysql & phpmyadmin it will be ~1 GB of download. I wouldn't do this on low network speed. You can verify that the pull was successful by listing all docker images.
docker images
Running MySQL Server Container
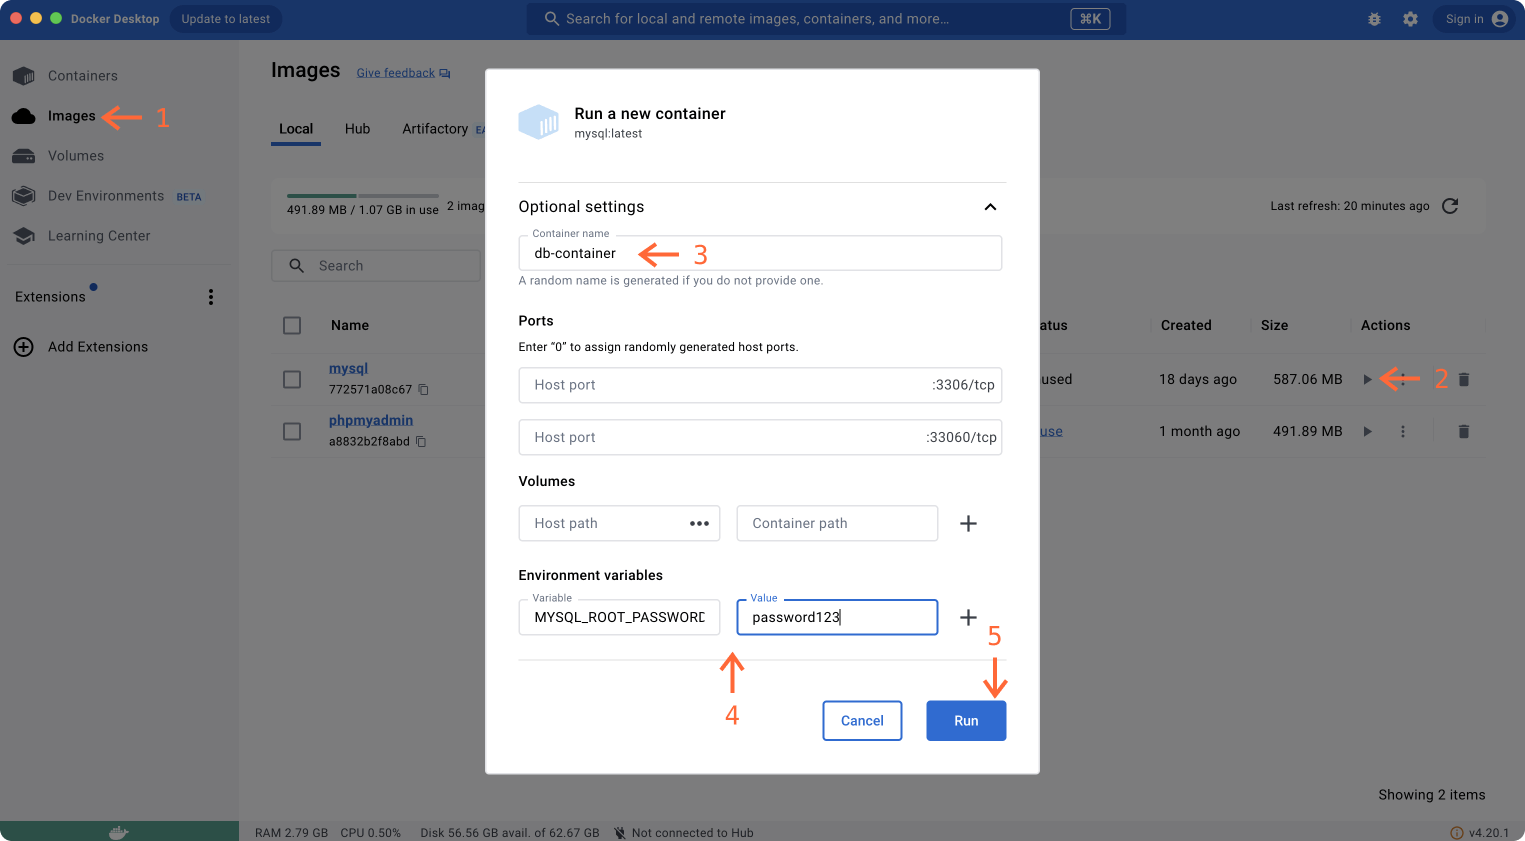
To start mysql server container, it only requires to setup a root user password in the form of an environment variable. Below is the command
docker run --env MYSQL_ROOT_PASSWORD=password123 --name db-container --detach mysql--env MYSQL_ROOT_PASSWORD=password123is for setting the password of root user. You may want to setup a very strong password.--name db-containersets the name of container.--detachtells it to run the container in detached mode which will not print any container logs in your terminal.mysqlis the name of docker image we are using to run container. It is good practice to always specify image name at the end.
Above command might look simple for now, but when you start putting more env variables, publish ports, configure network or volume then that simple command becomes so huge & it becomes very difficult for beginners to get hang of it. Alternatively, you could use Docker Desktop GUI which is very intuitive & beginner friendly.
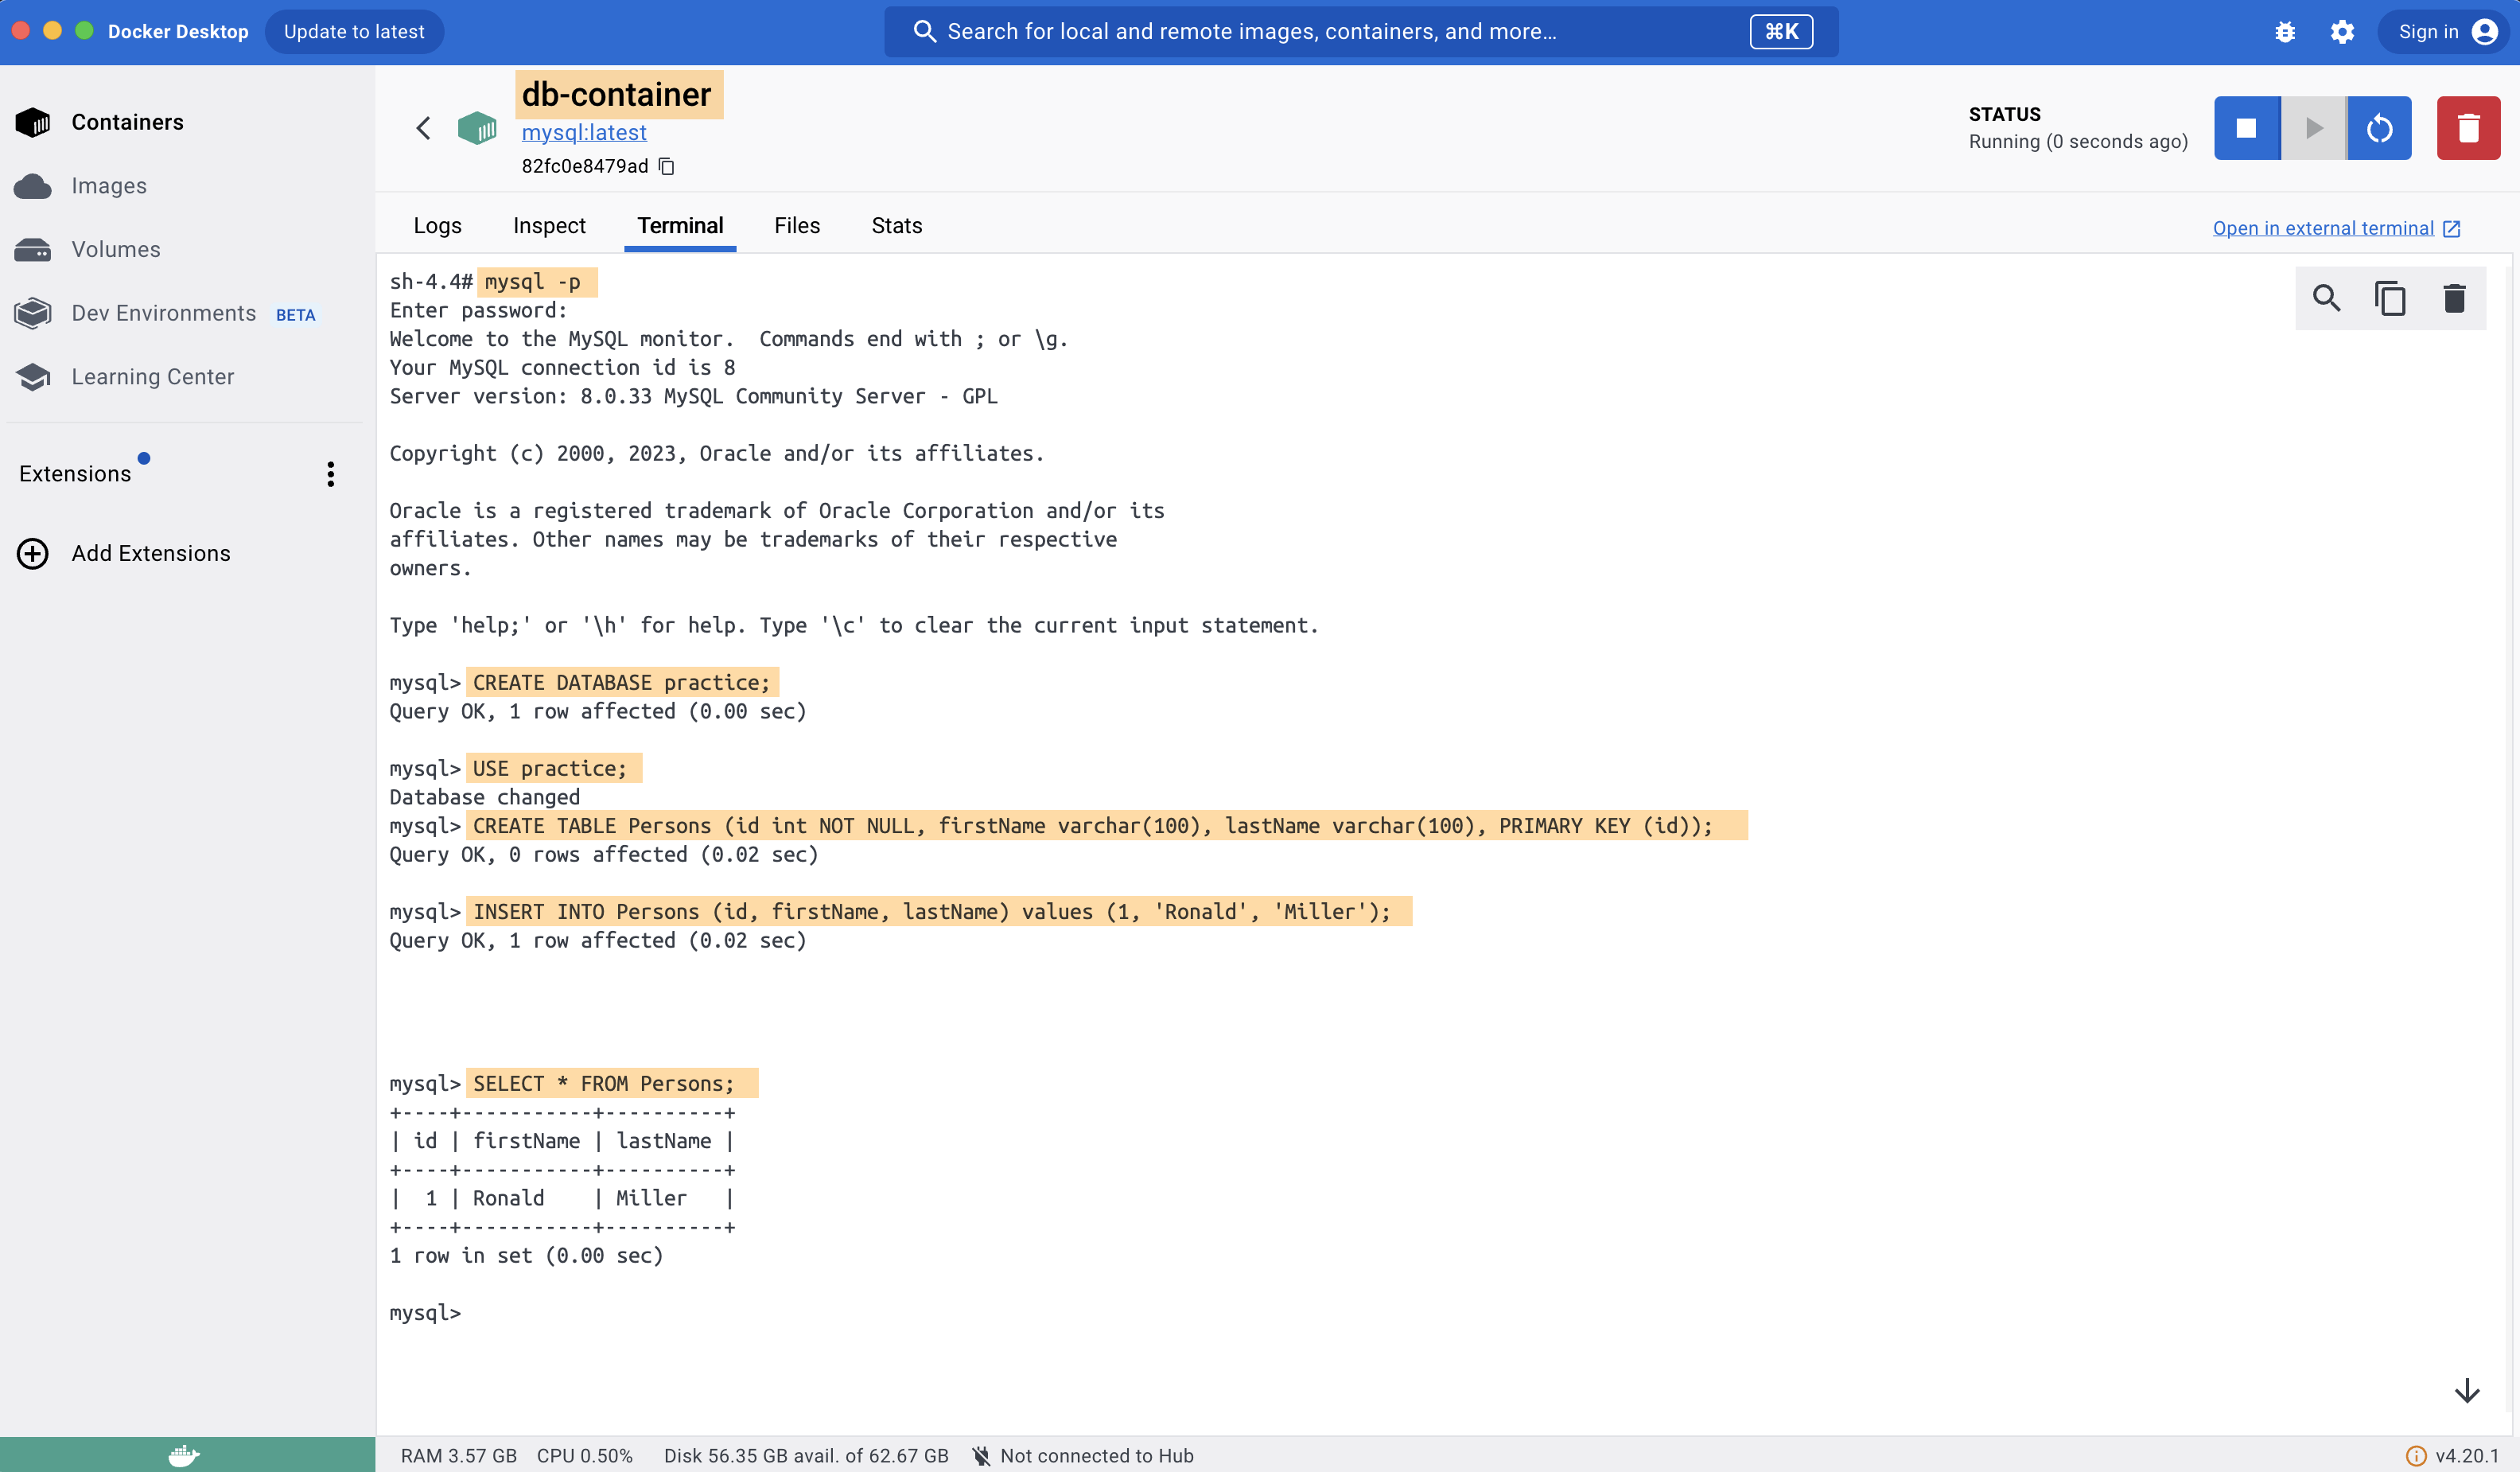
Once you hit Run in GUI, it will open Logs tab of container, after few seconds you would see something like /usr/sbin/mysqld: ready for connections that means your mysql server container is ready for use. If you missed the Logs tab, just go to Containers list & click name of Container (db-container in this case). Now head to Terminal & you can start executing mysql commands in shell.
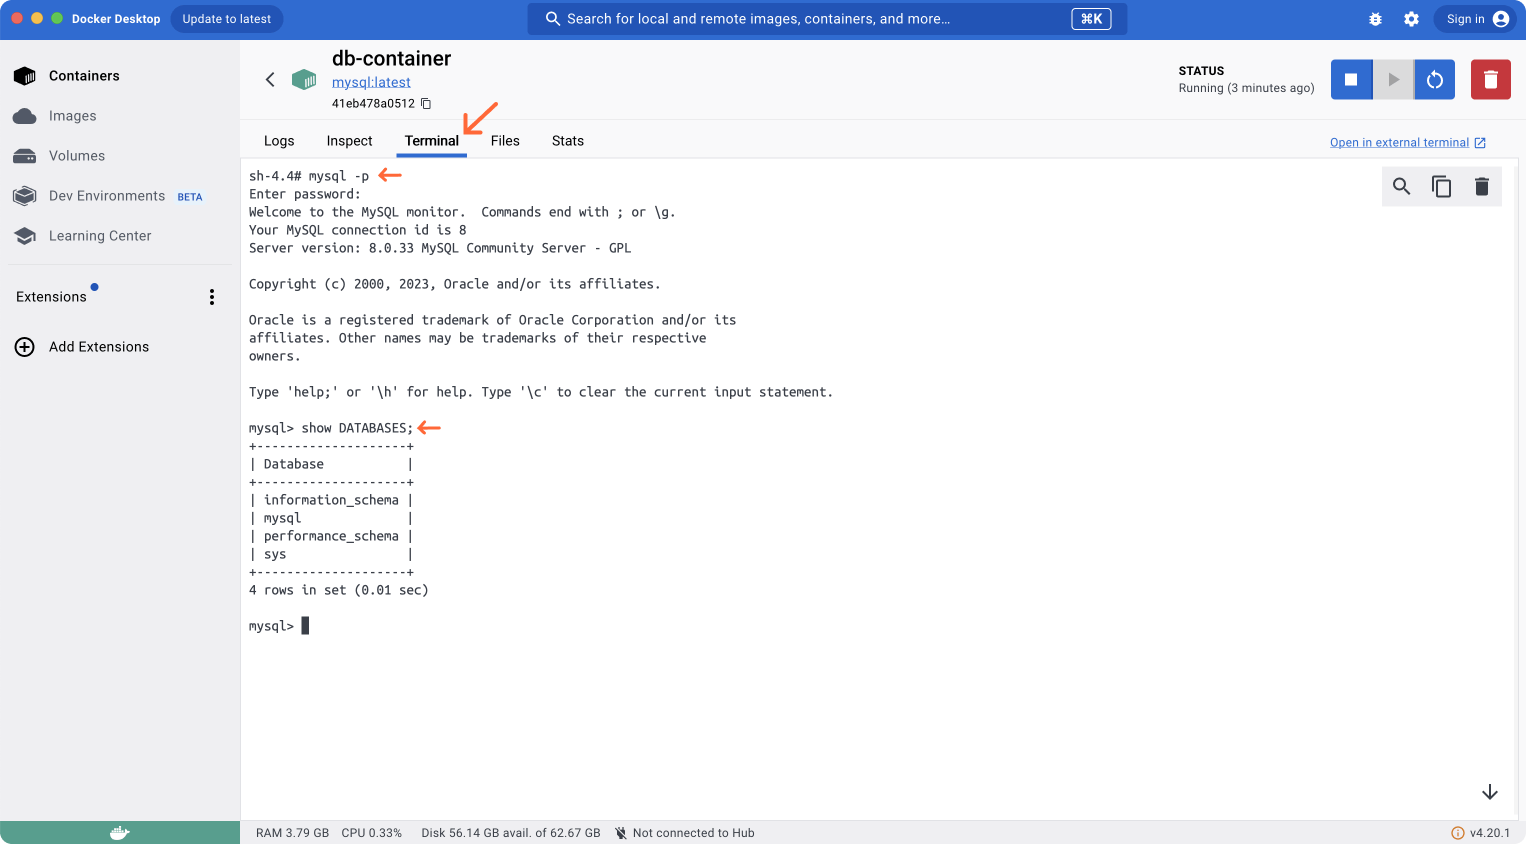
In the above screenshot, I ran mysql -p to enter in mysql repl it will ask password of root user, its the same we set in environment variable password123 (it won't show anything as you type - that is by design, hit enter after you are done with it). You can then run mysql commands like show DATABASES;
If you have run docker container from Terminal of your os, then you can get into shell of container by running following:
docker exec -it db-container /bin/sh
-itstands for interactive modedb-containeris the name of container/bin/shis the program we want to exec (execute)
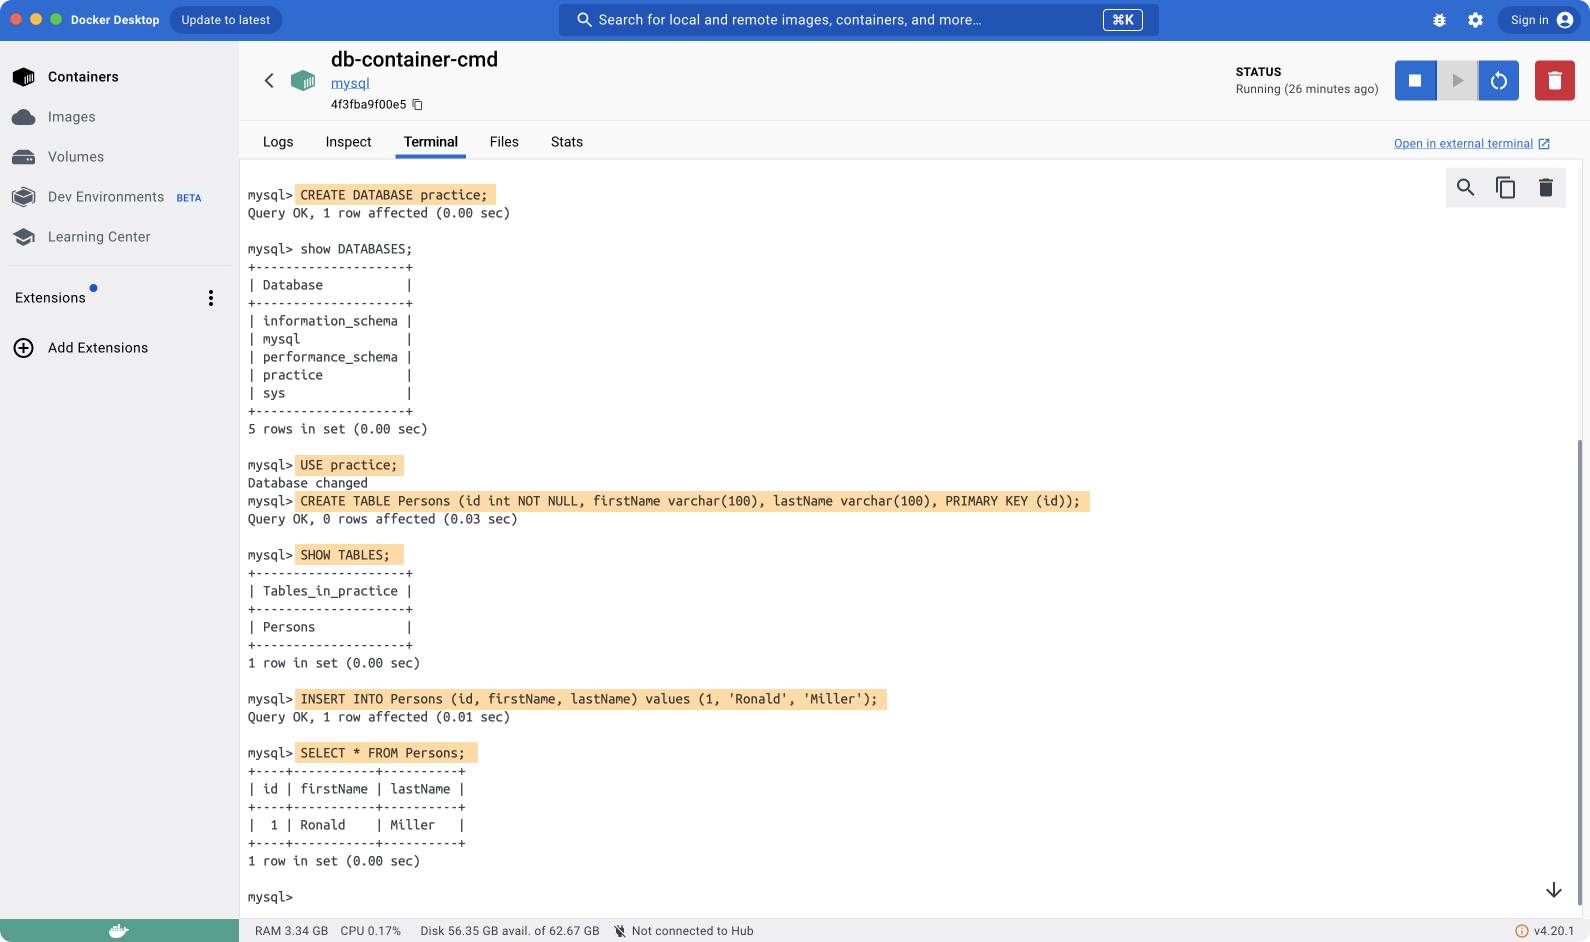
If you are trying to learn mysql & do not want to go through traditional long process of installing a software then above docker container setup could save you lot of time :) Below are some more example of mysql commands.
Persisting Container Data
Docker containers are ephemeral, they are not designed to hold data or state of application for long. One can also say that they are stateless. You may lose data when container is restarted or if you delete the container & start a new one.
In order to solve this problem we need to map a persistent volume, a folder in our system which docker container can point to for storing / modifying the data. First, we need to find where mysql server is storing db data inside the container, for that run following command inside mysql repl.
select @@datadir;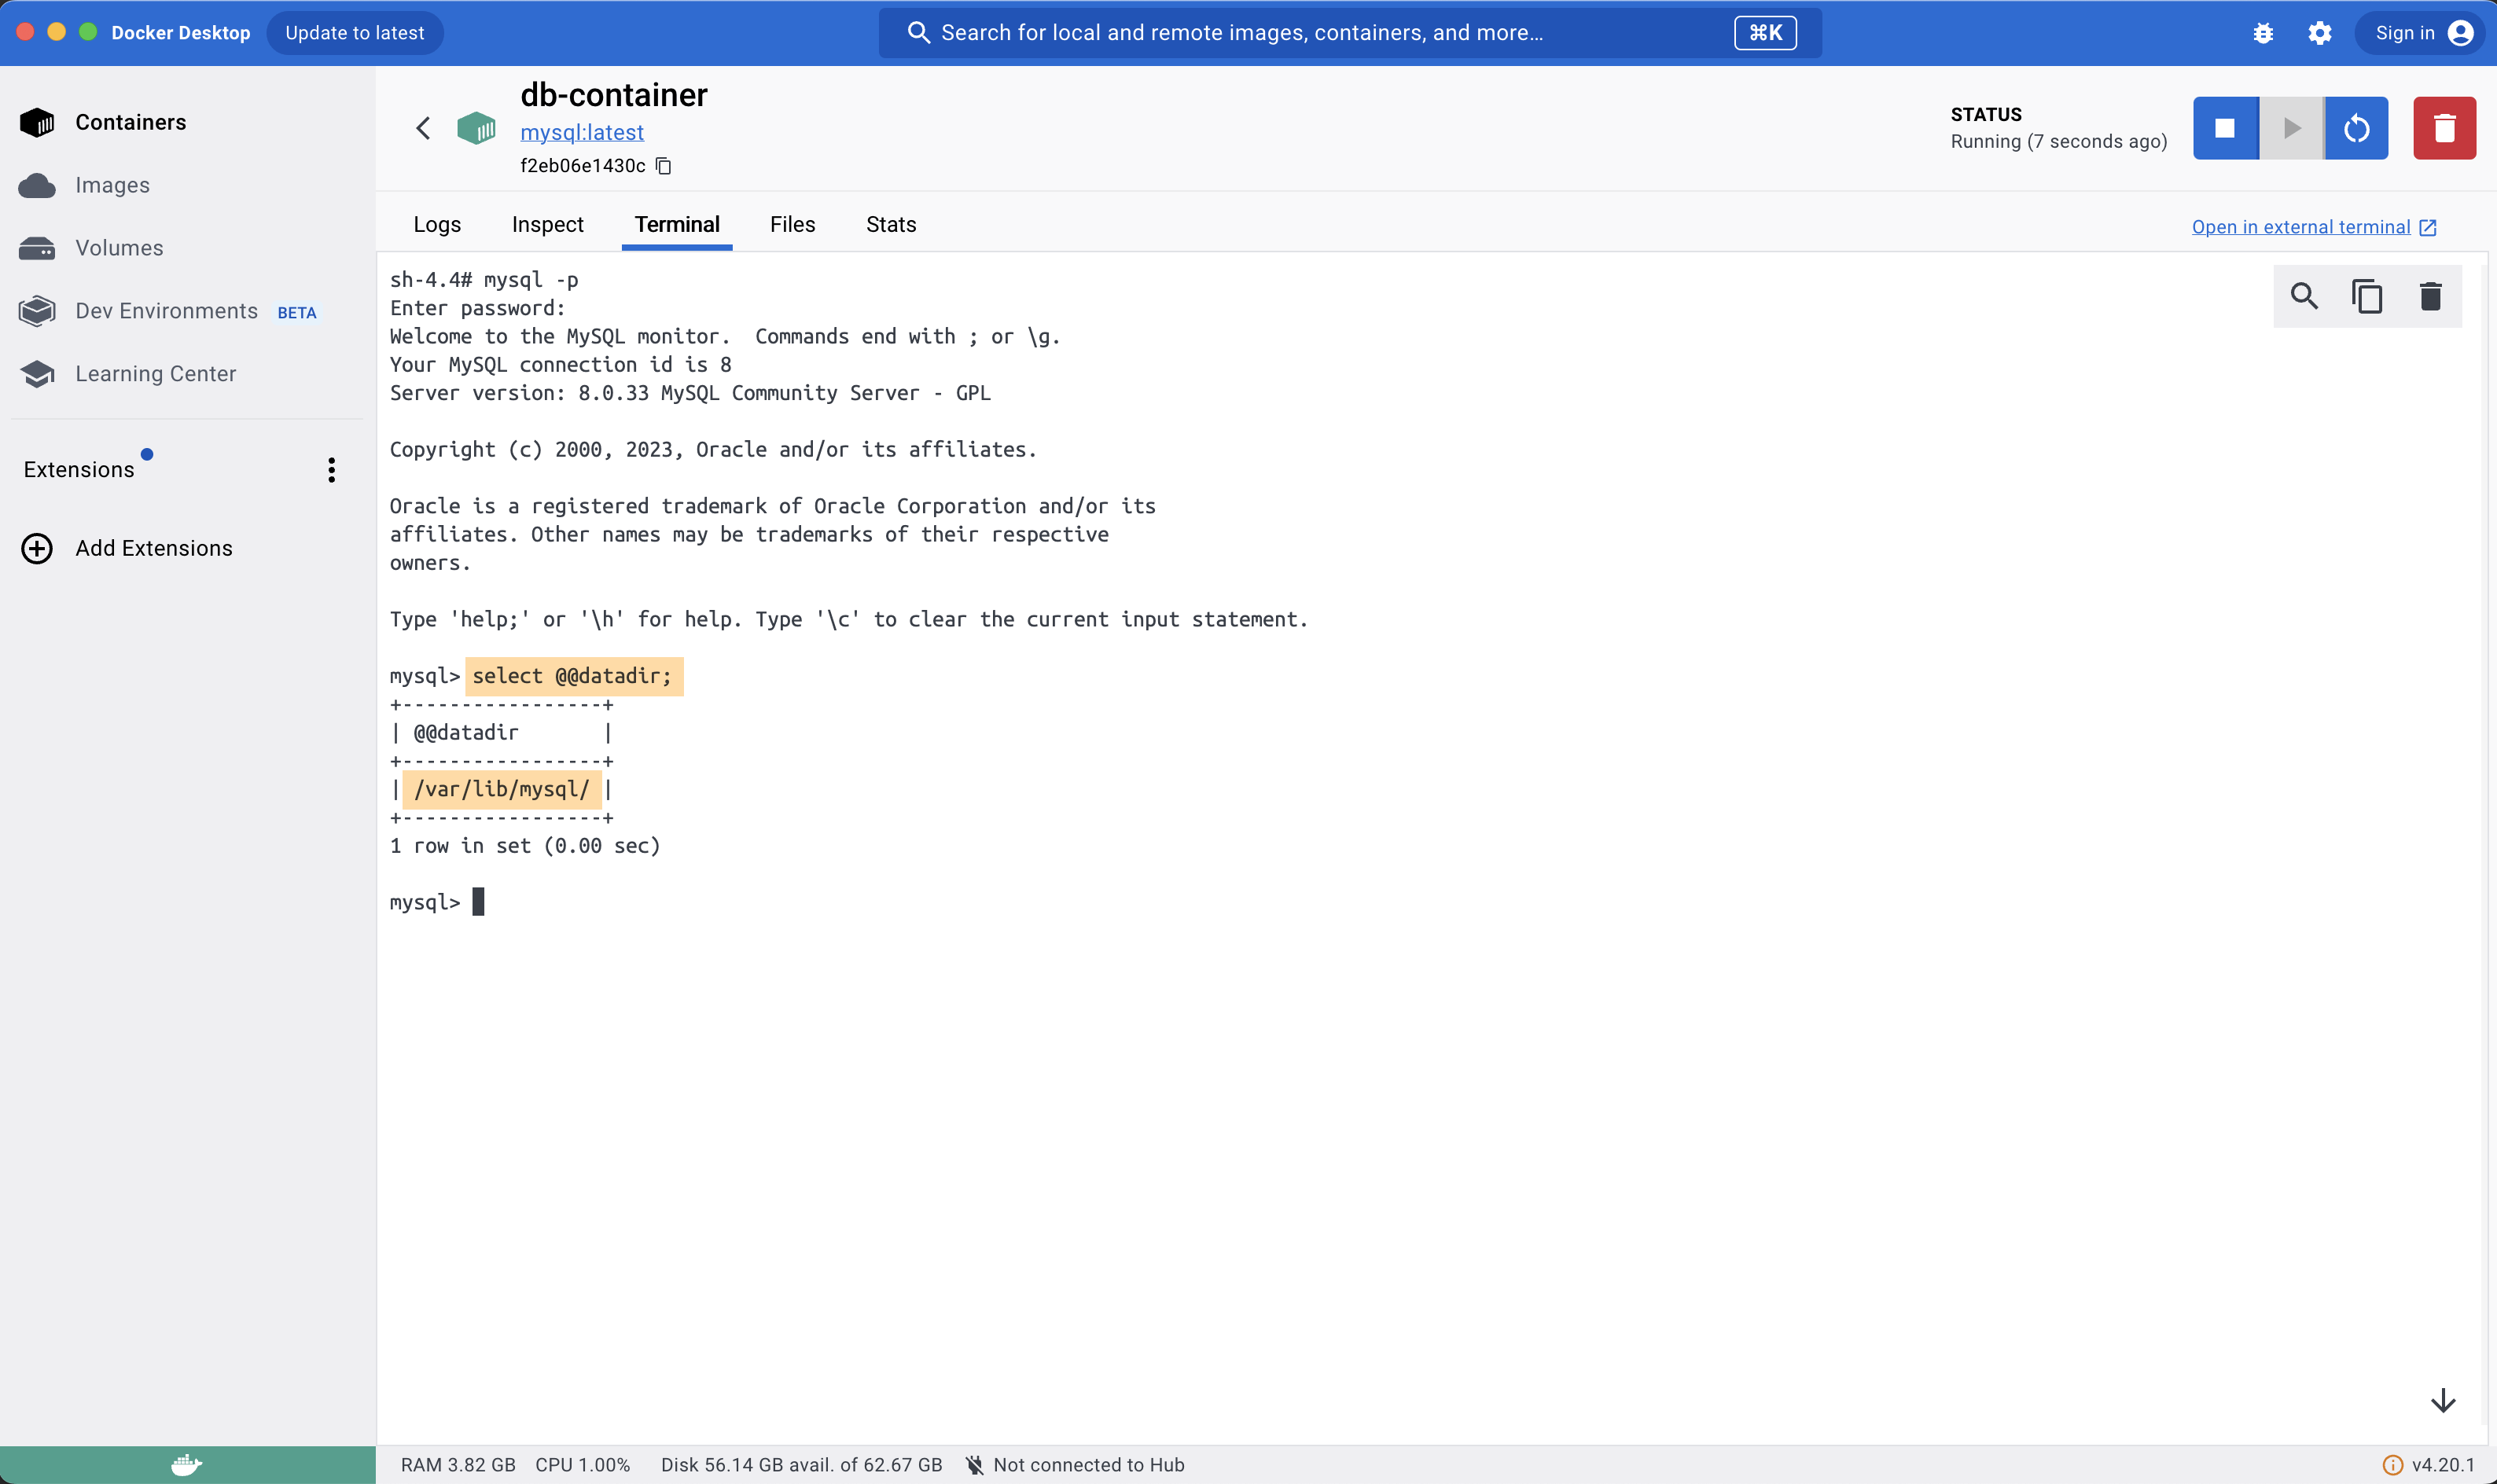
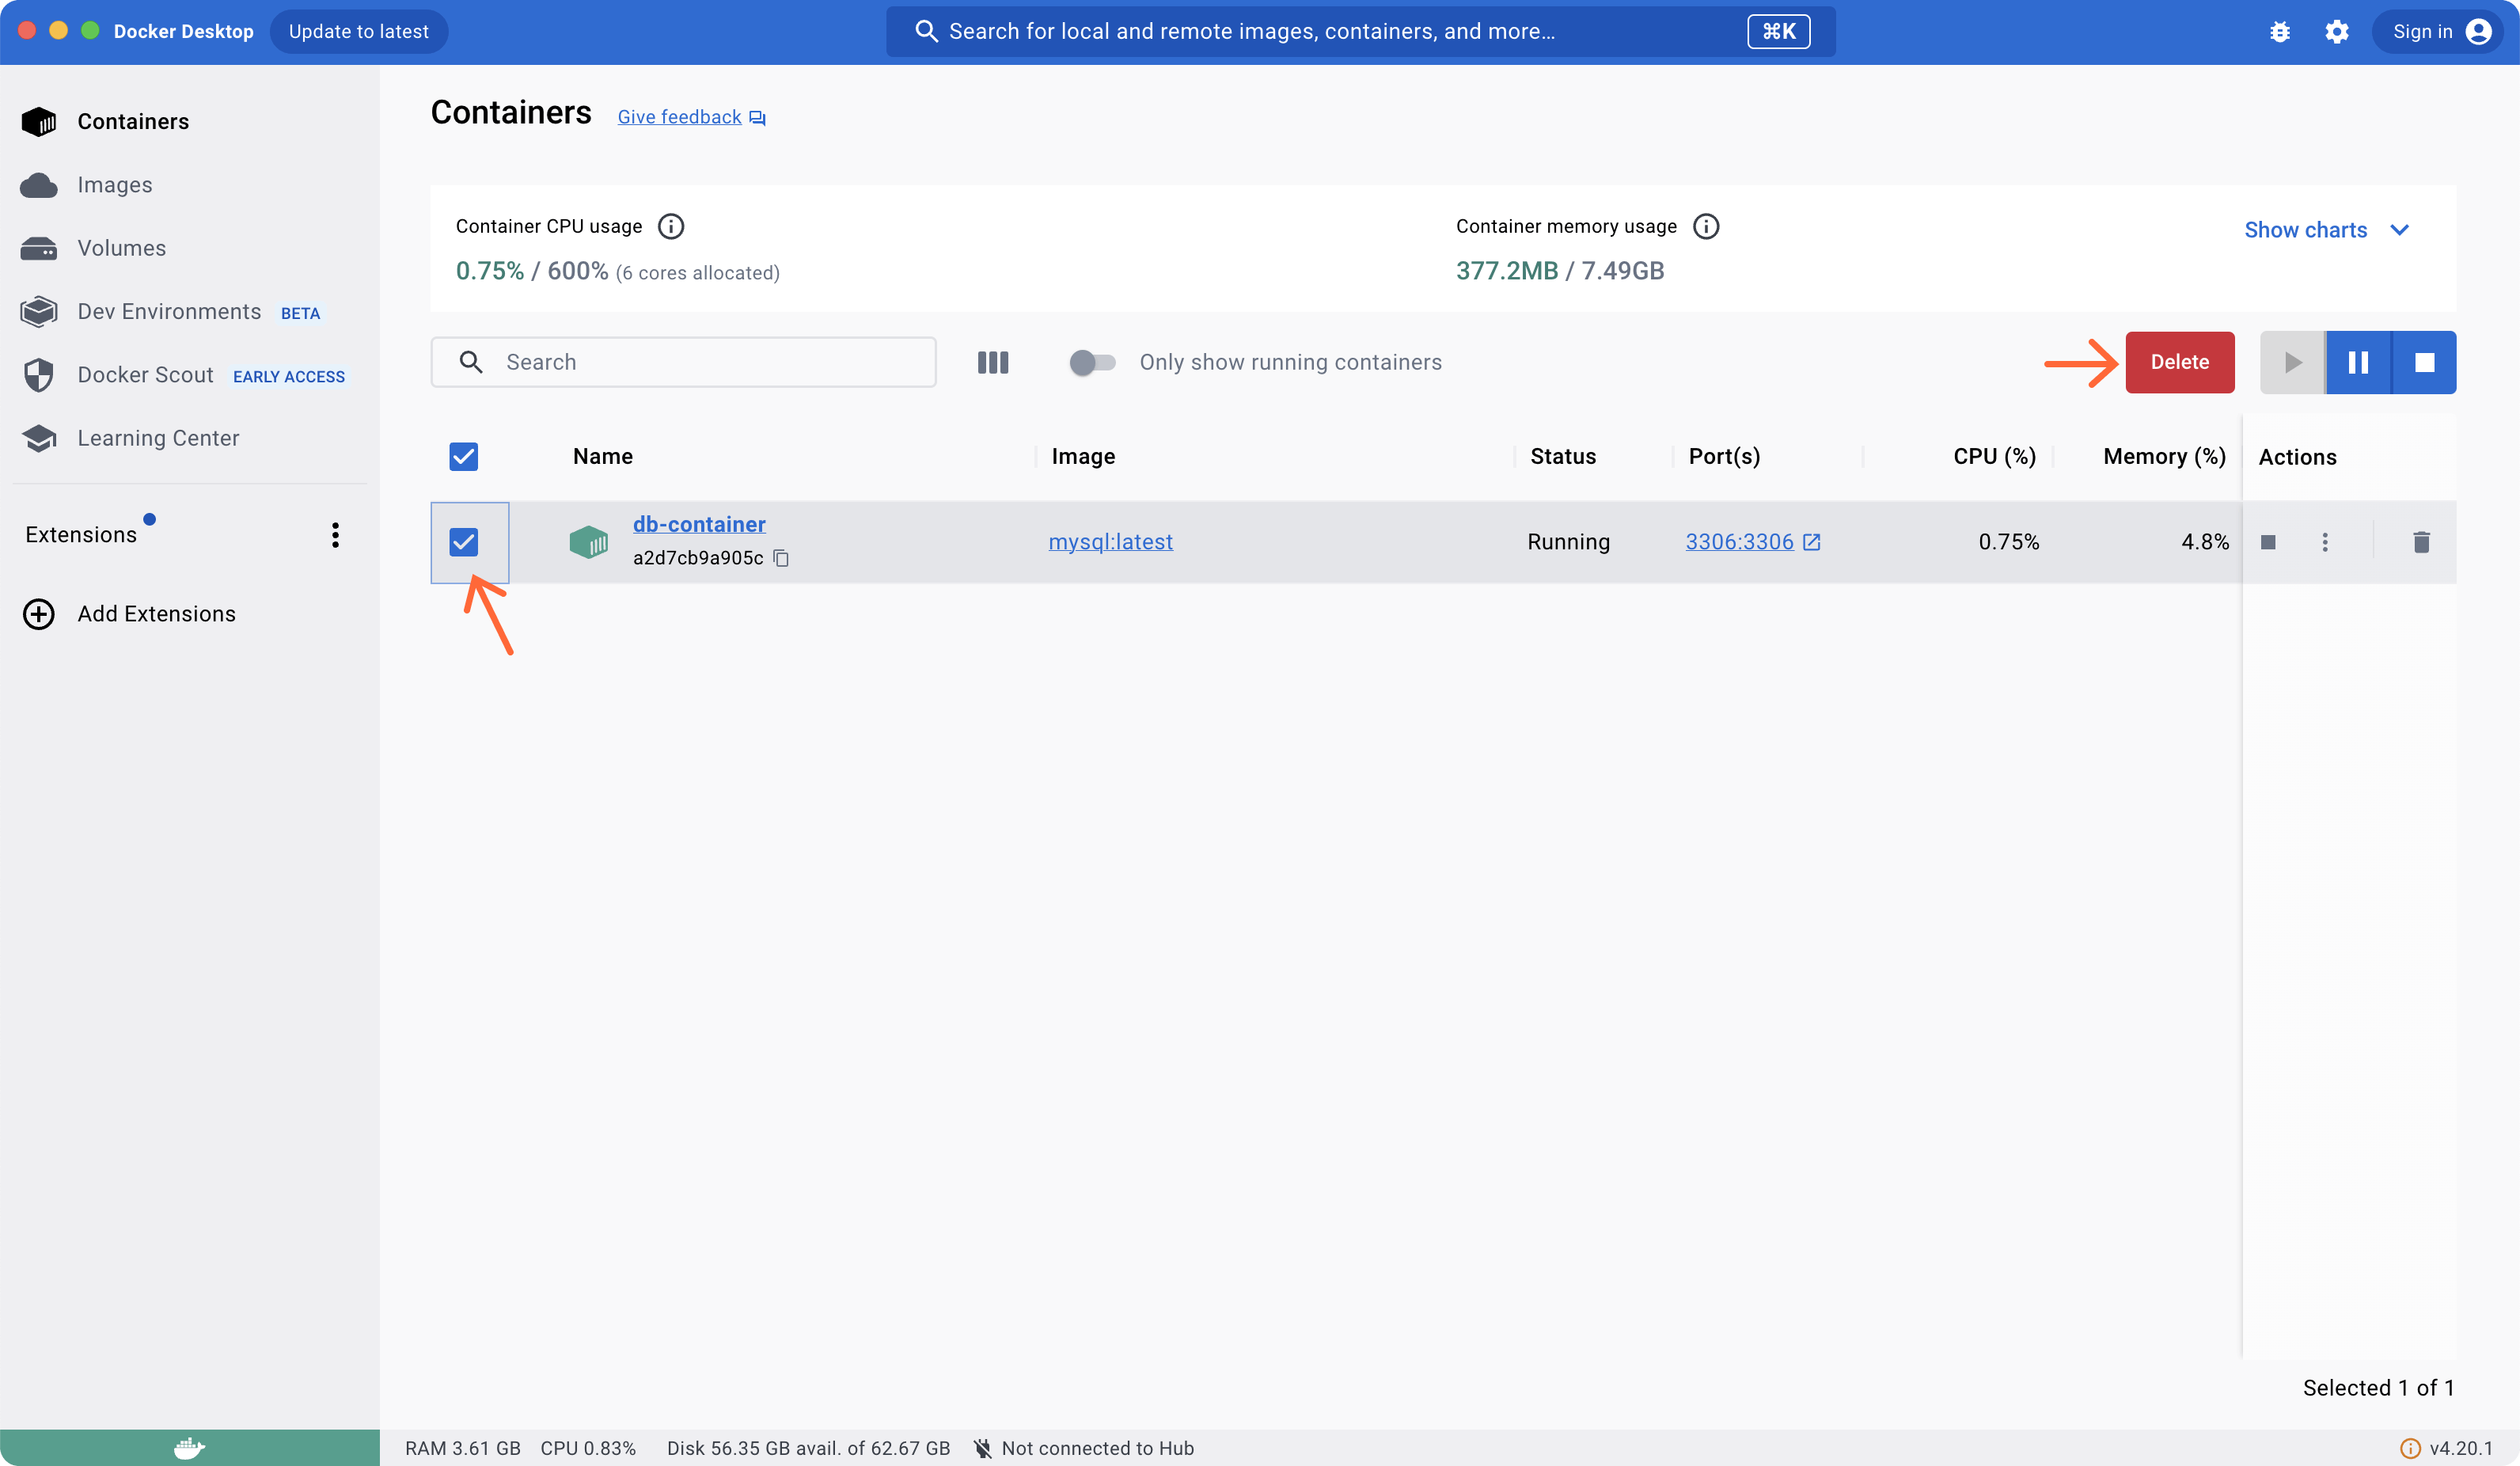
/var/lib/mysqlNow we can delete this running container by clicking on top right Red delete icon, confirm Remove & let us run a new container with our system volume mapped to /var/lib/mysql of container.
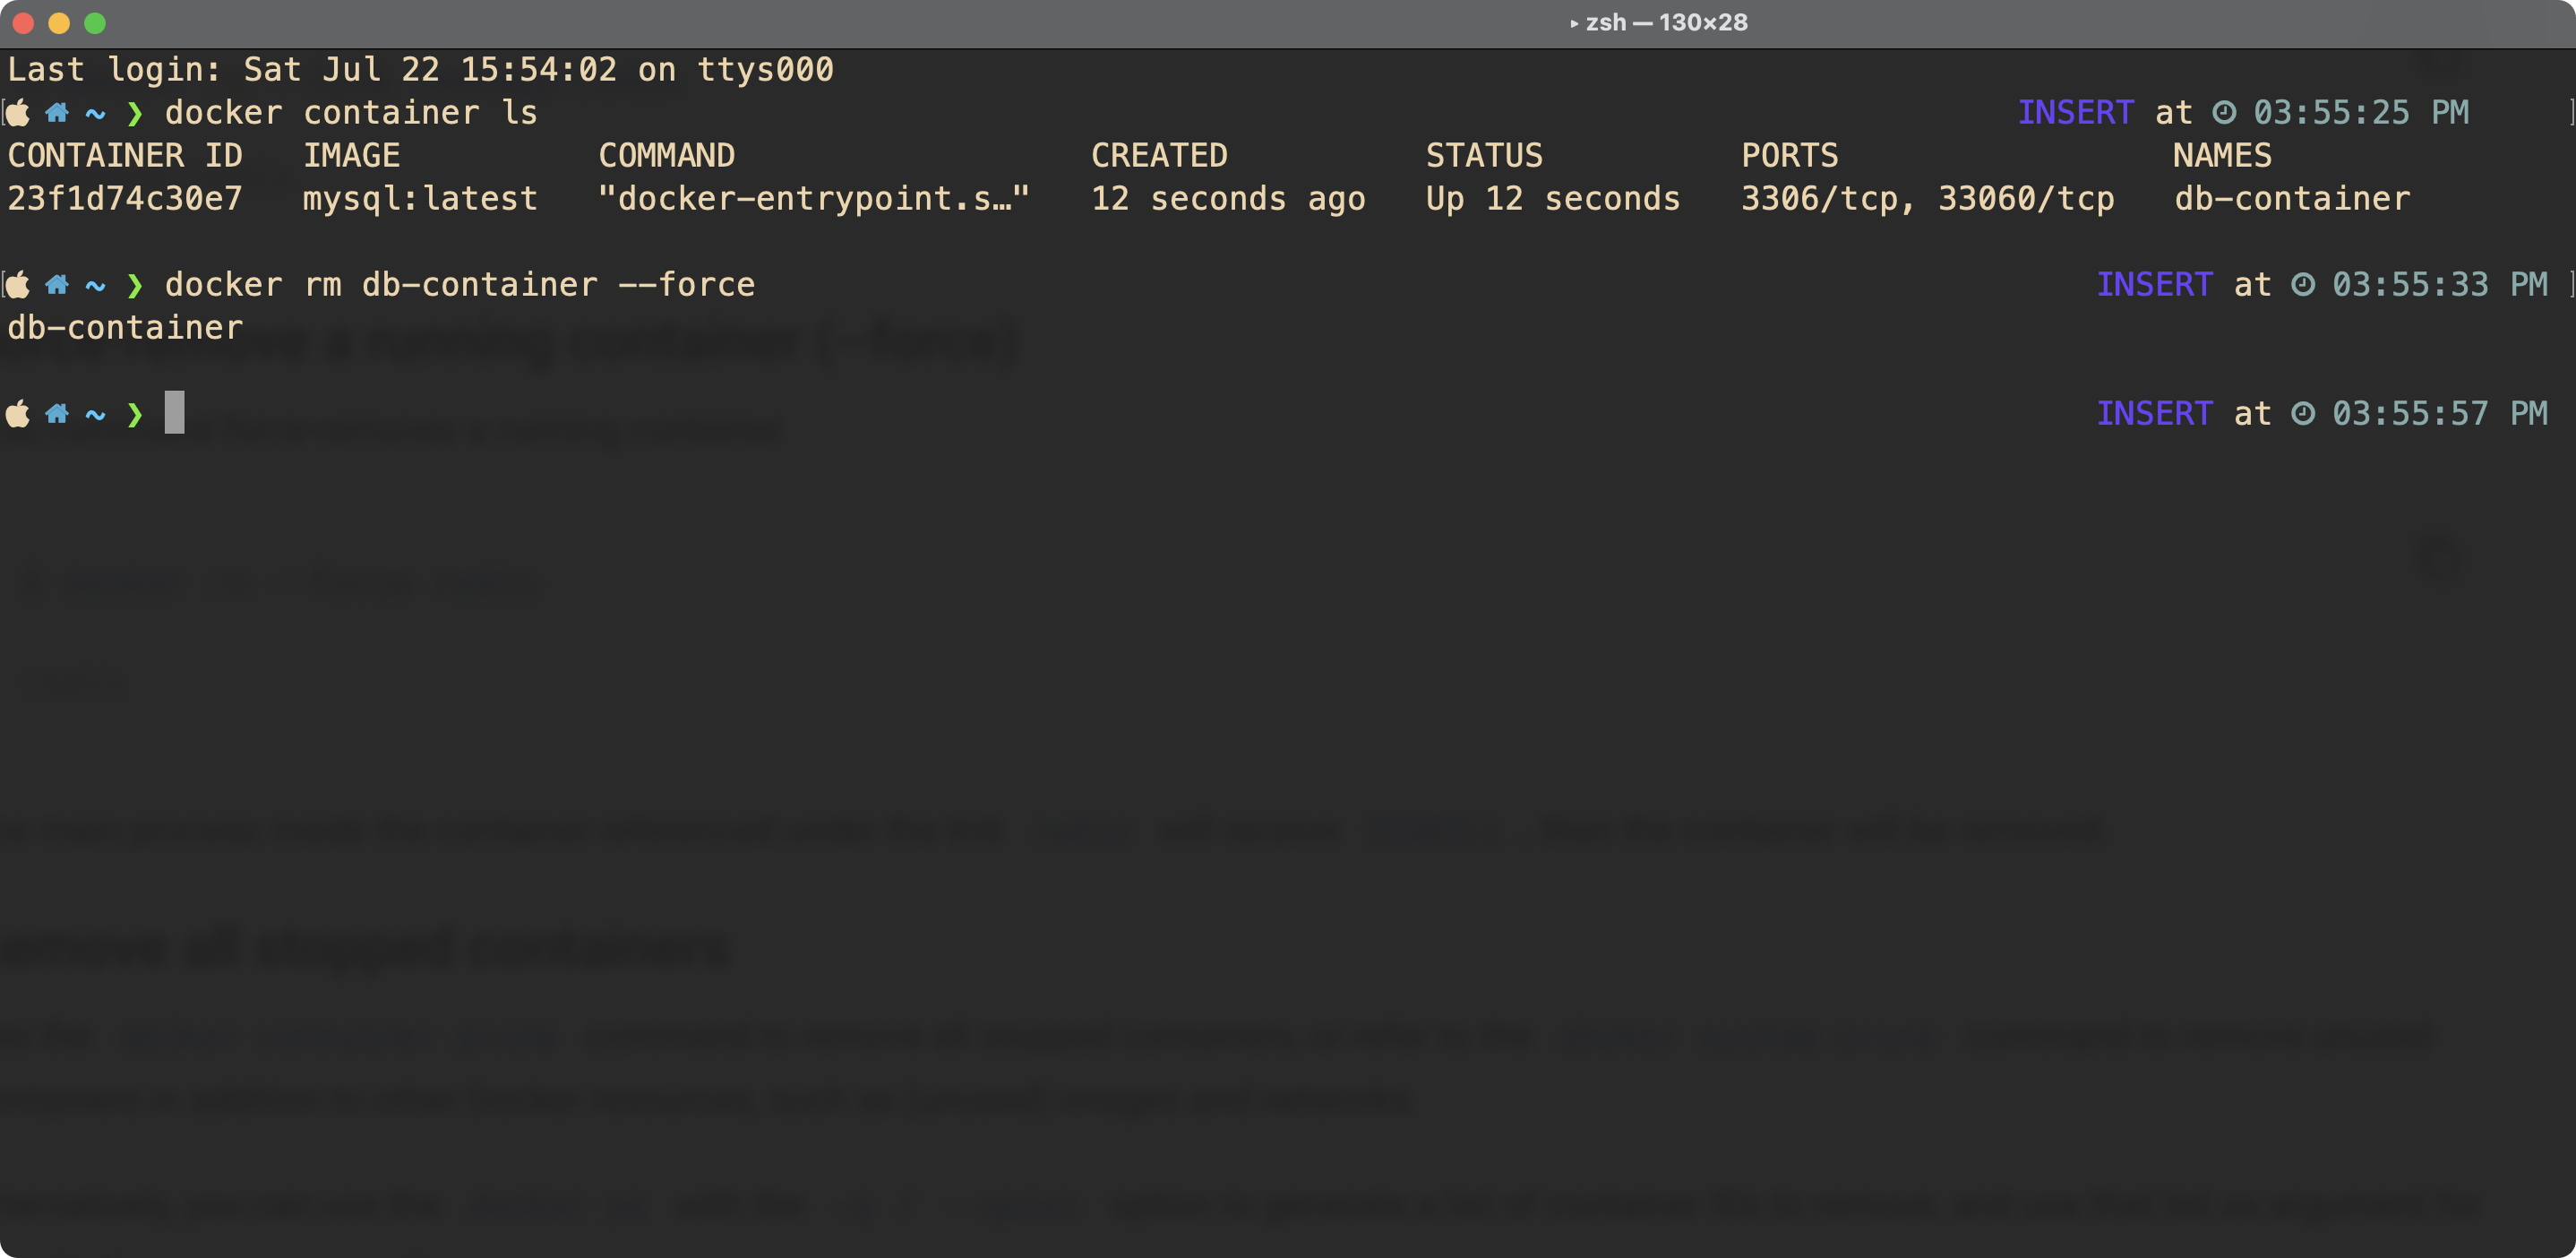
You can stop & remove docker container from your terminal by running:
docker rm db-container --forcedb-containeris the name of container--forceis to remove the container forcefully (stop if running & remove it)
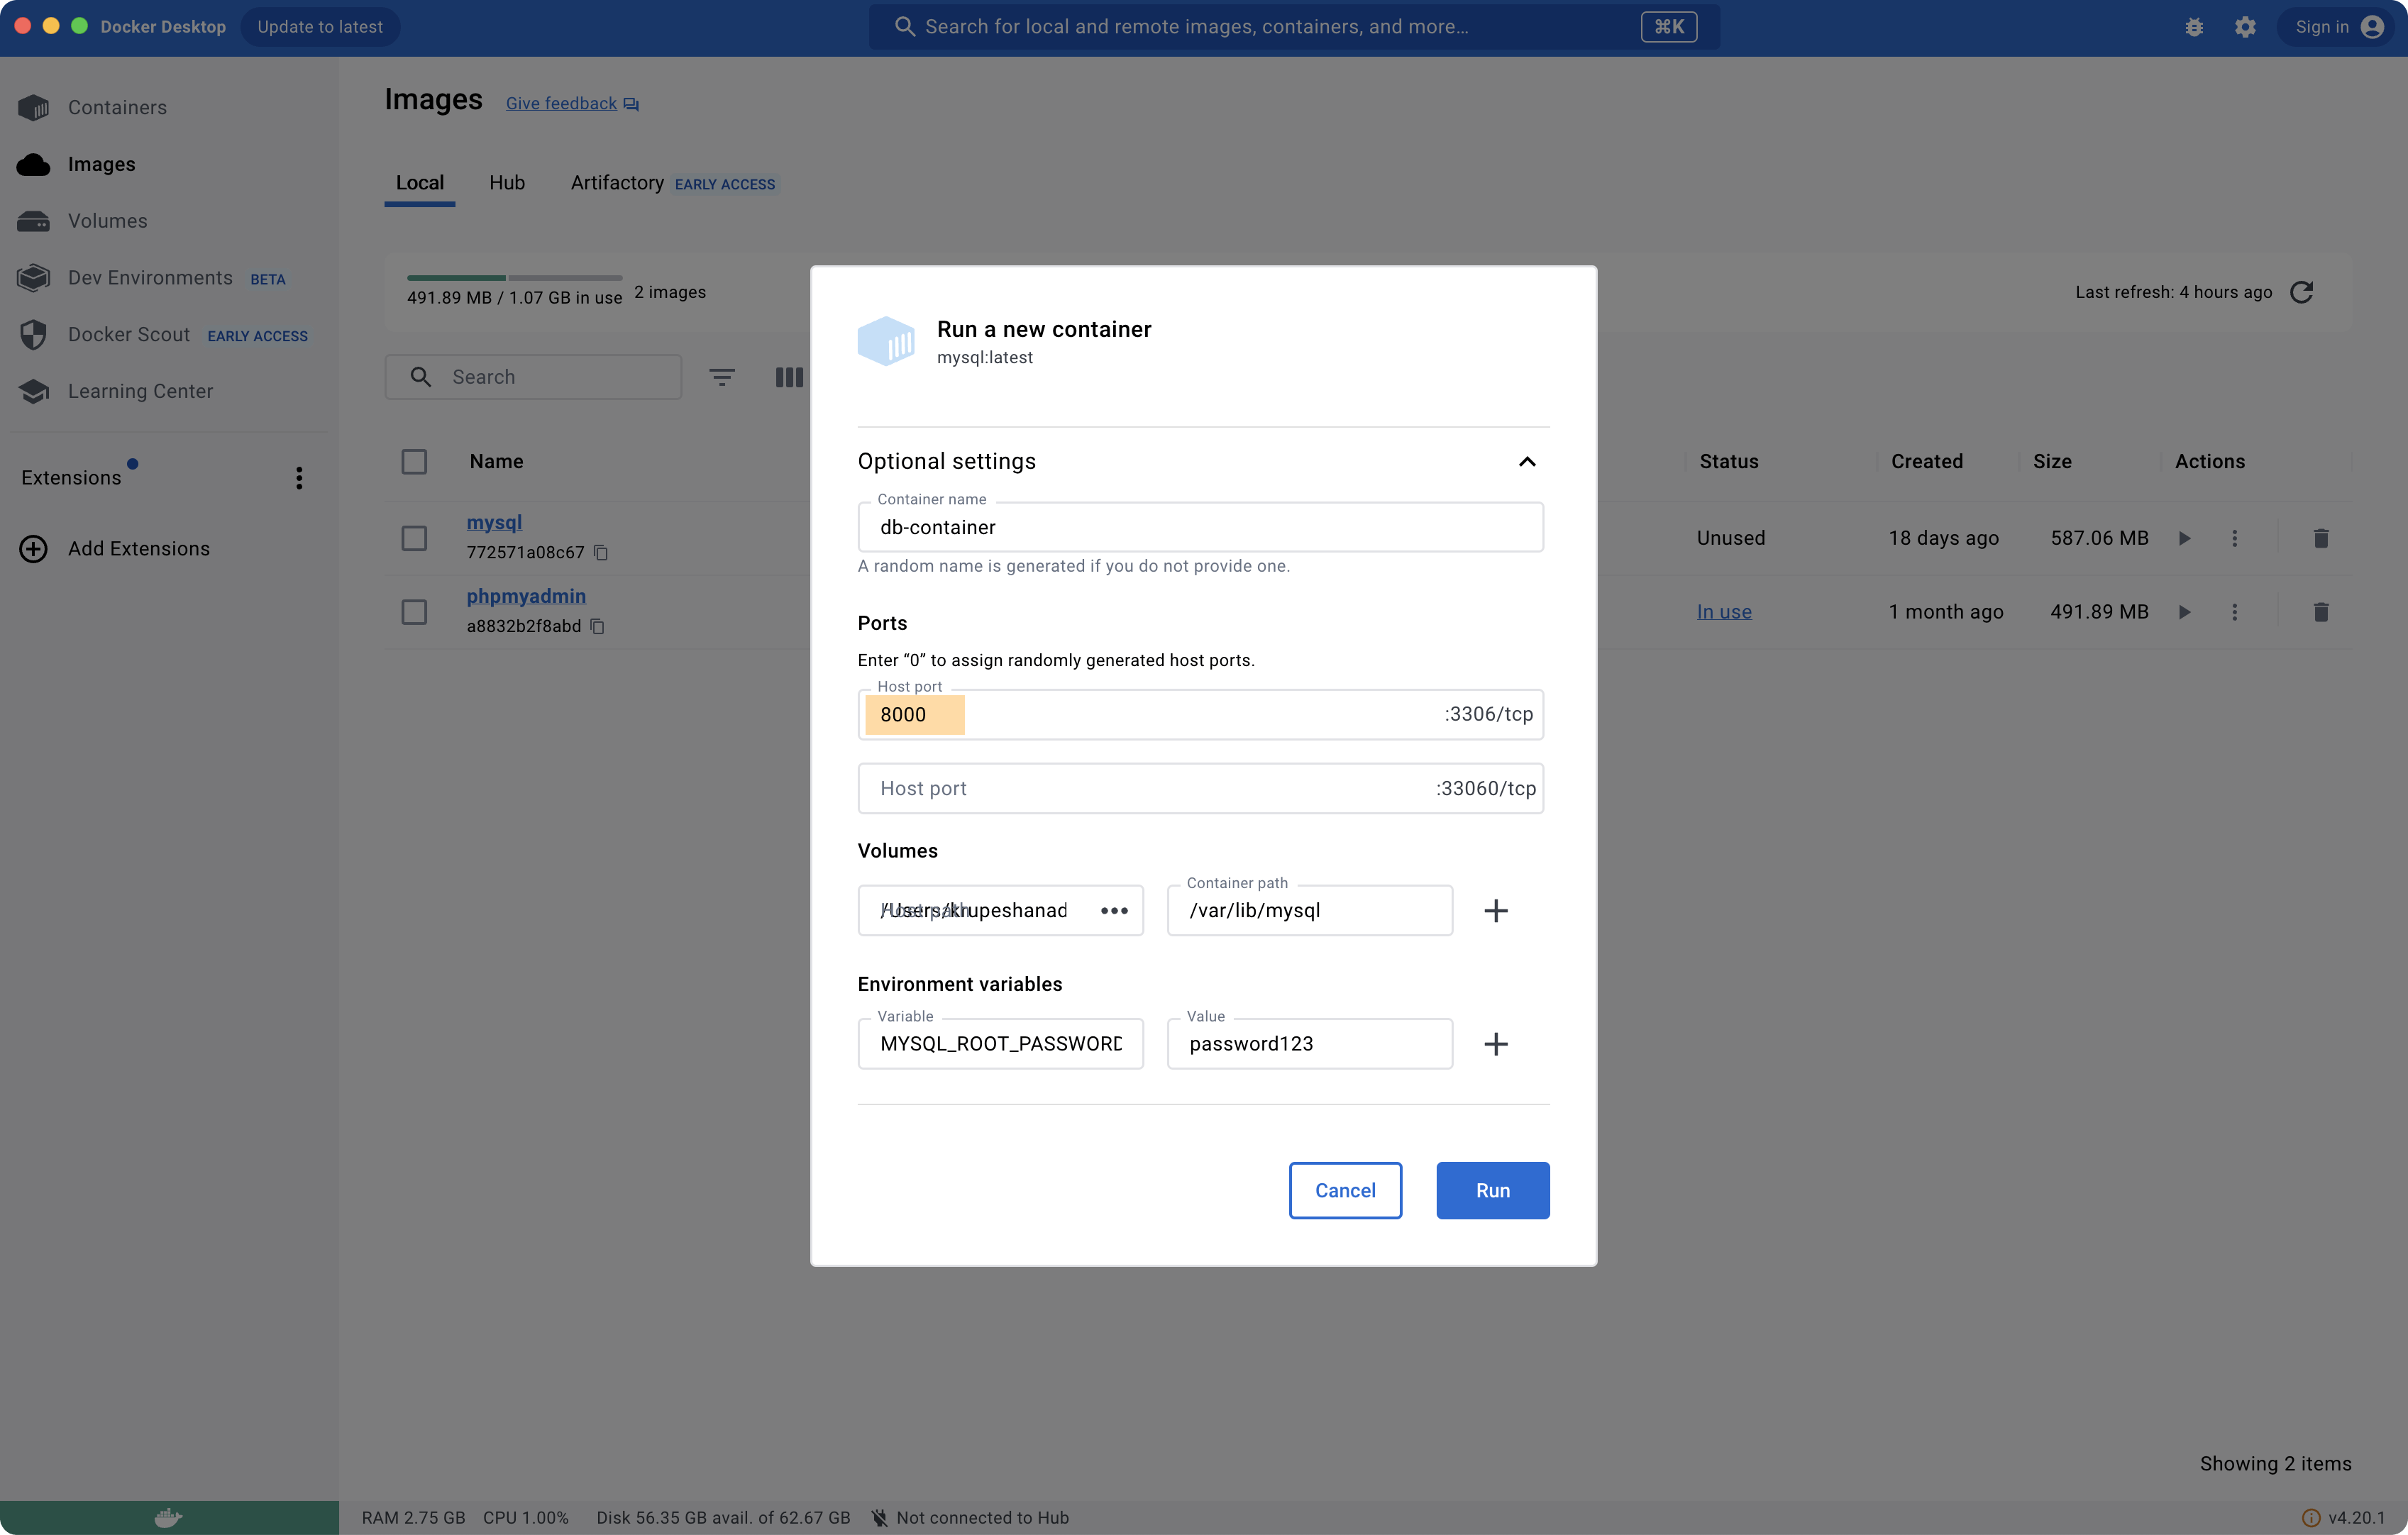
Like before, in Docker Desktop go to Images from sidebar & hit play button on right of mysql image listing & fill in details. But this time additionally you need to fill Volumes section. Follow screenshots from below.
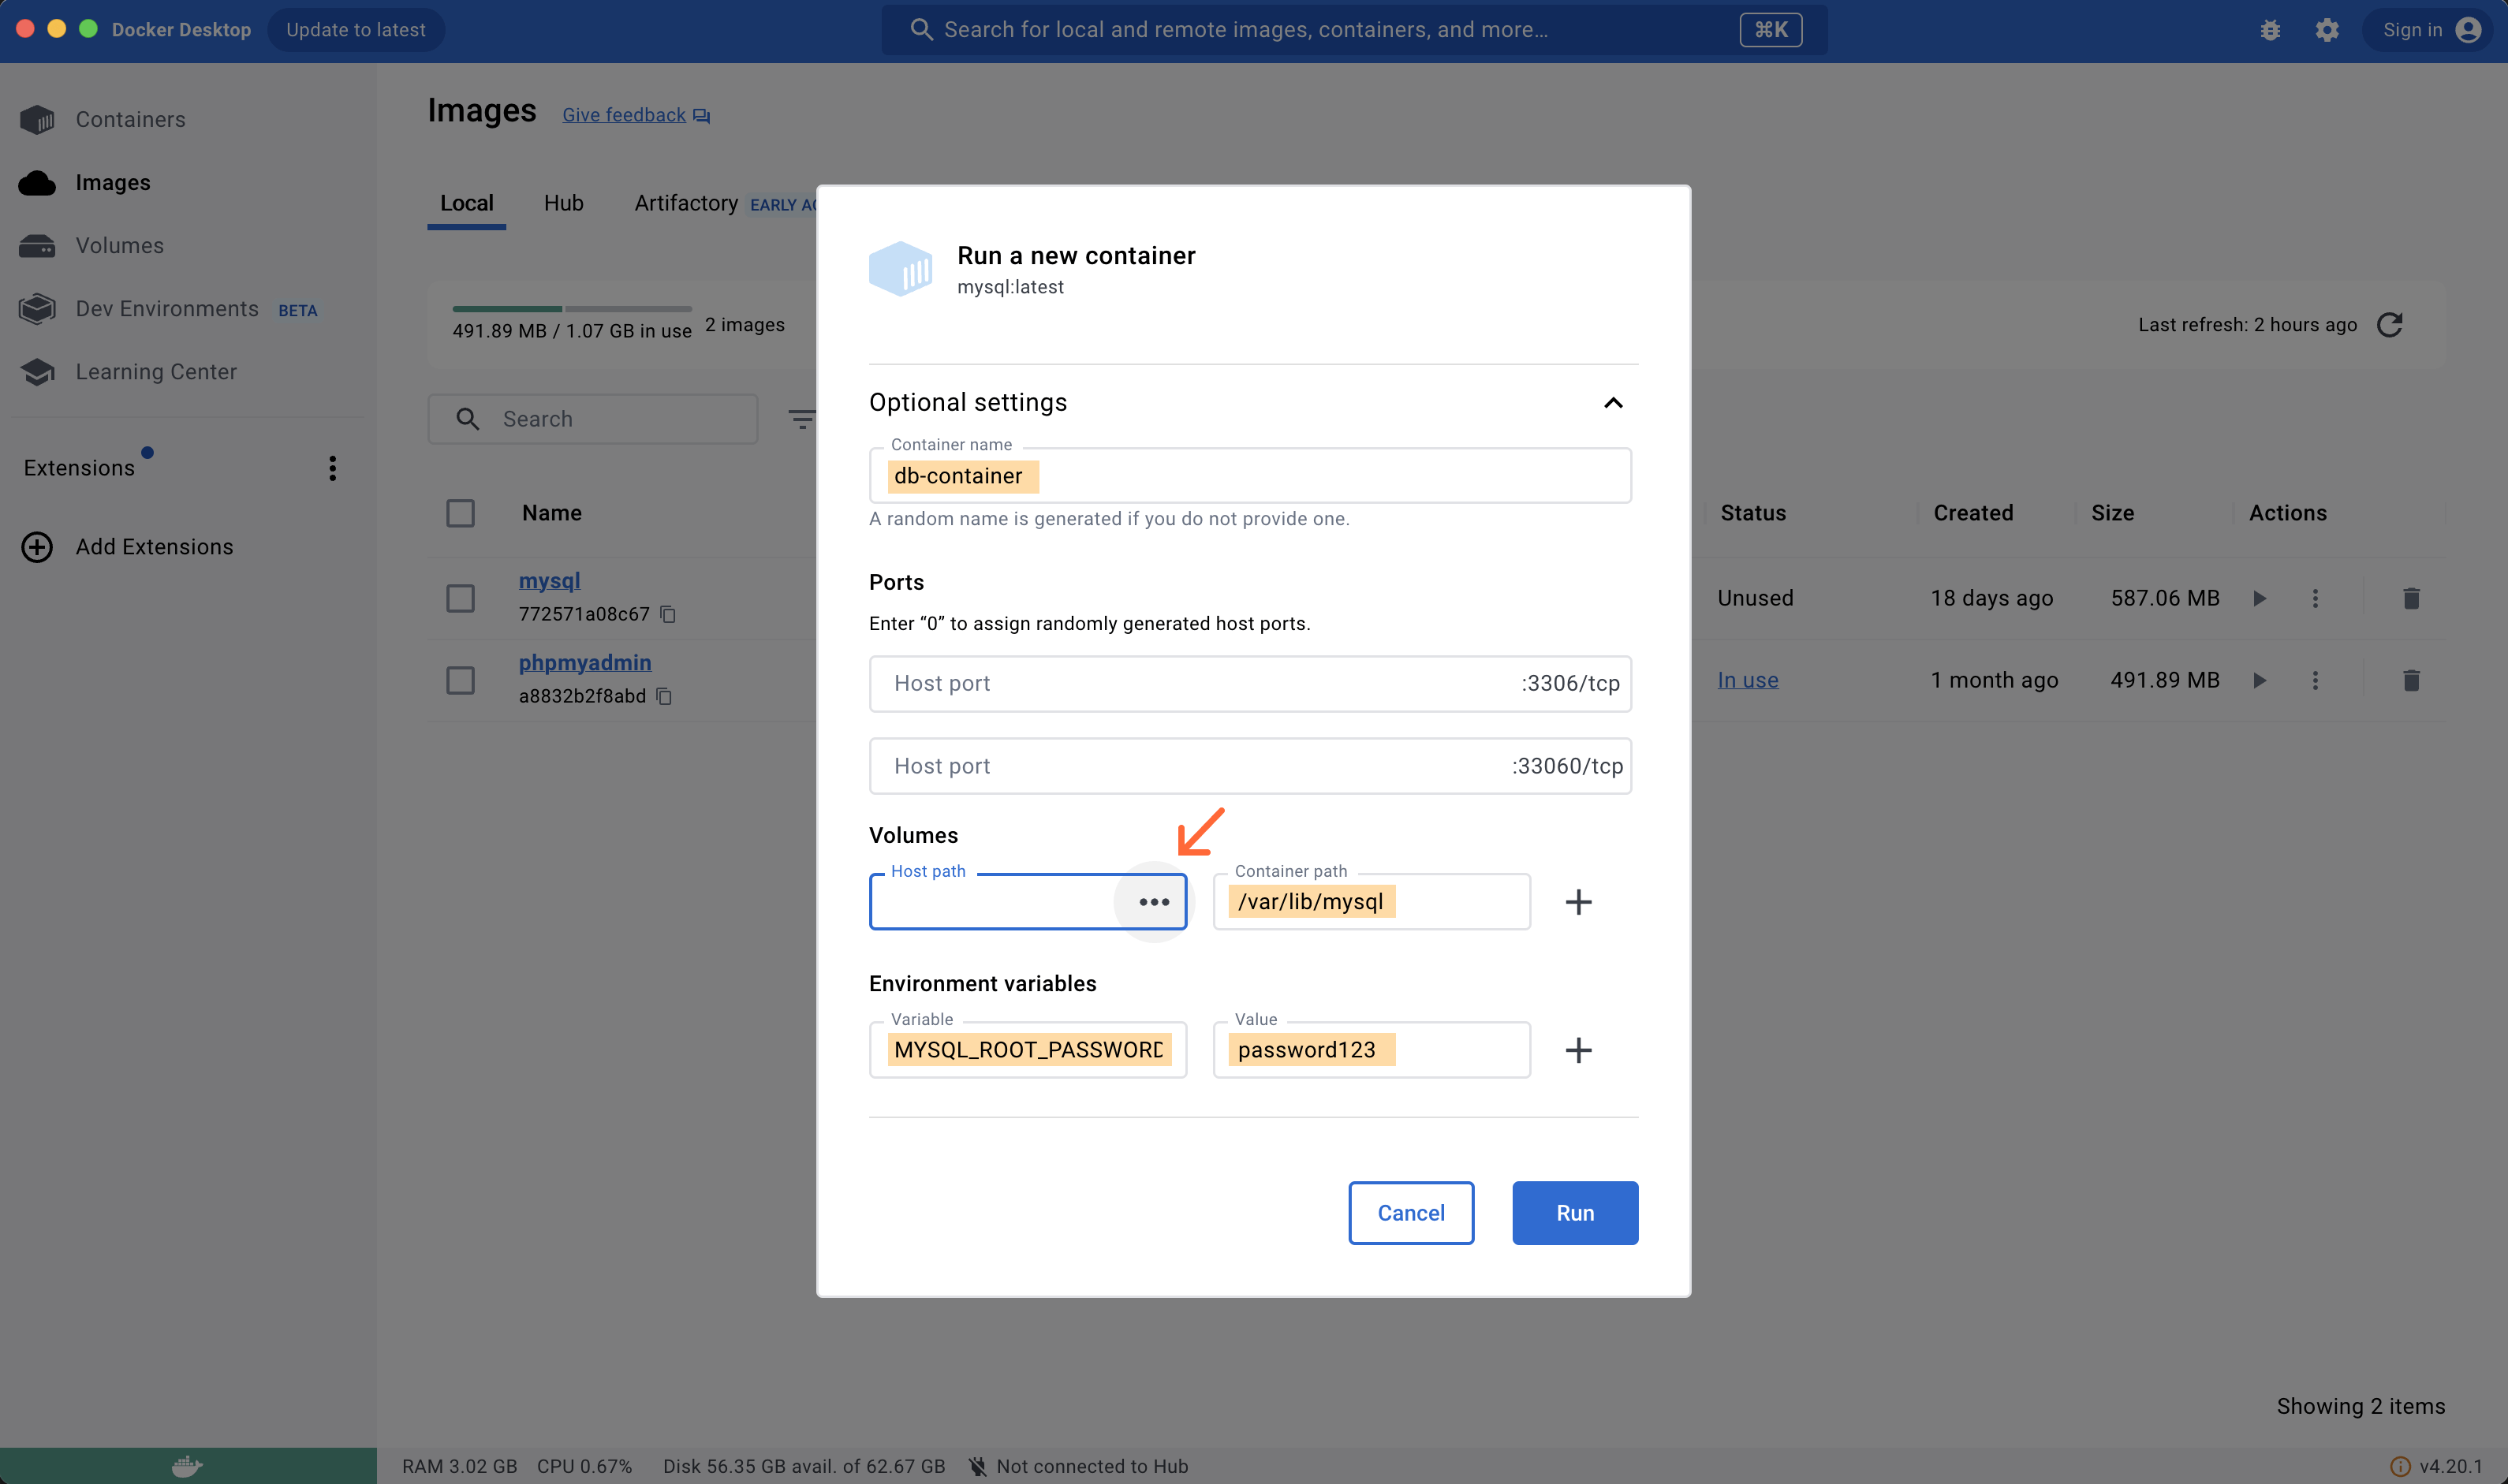
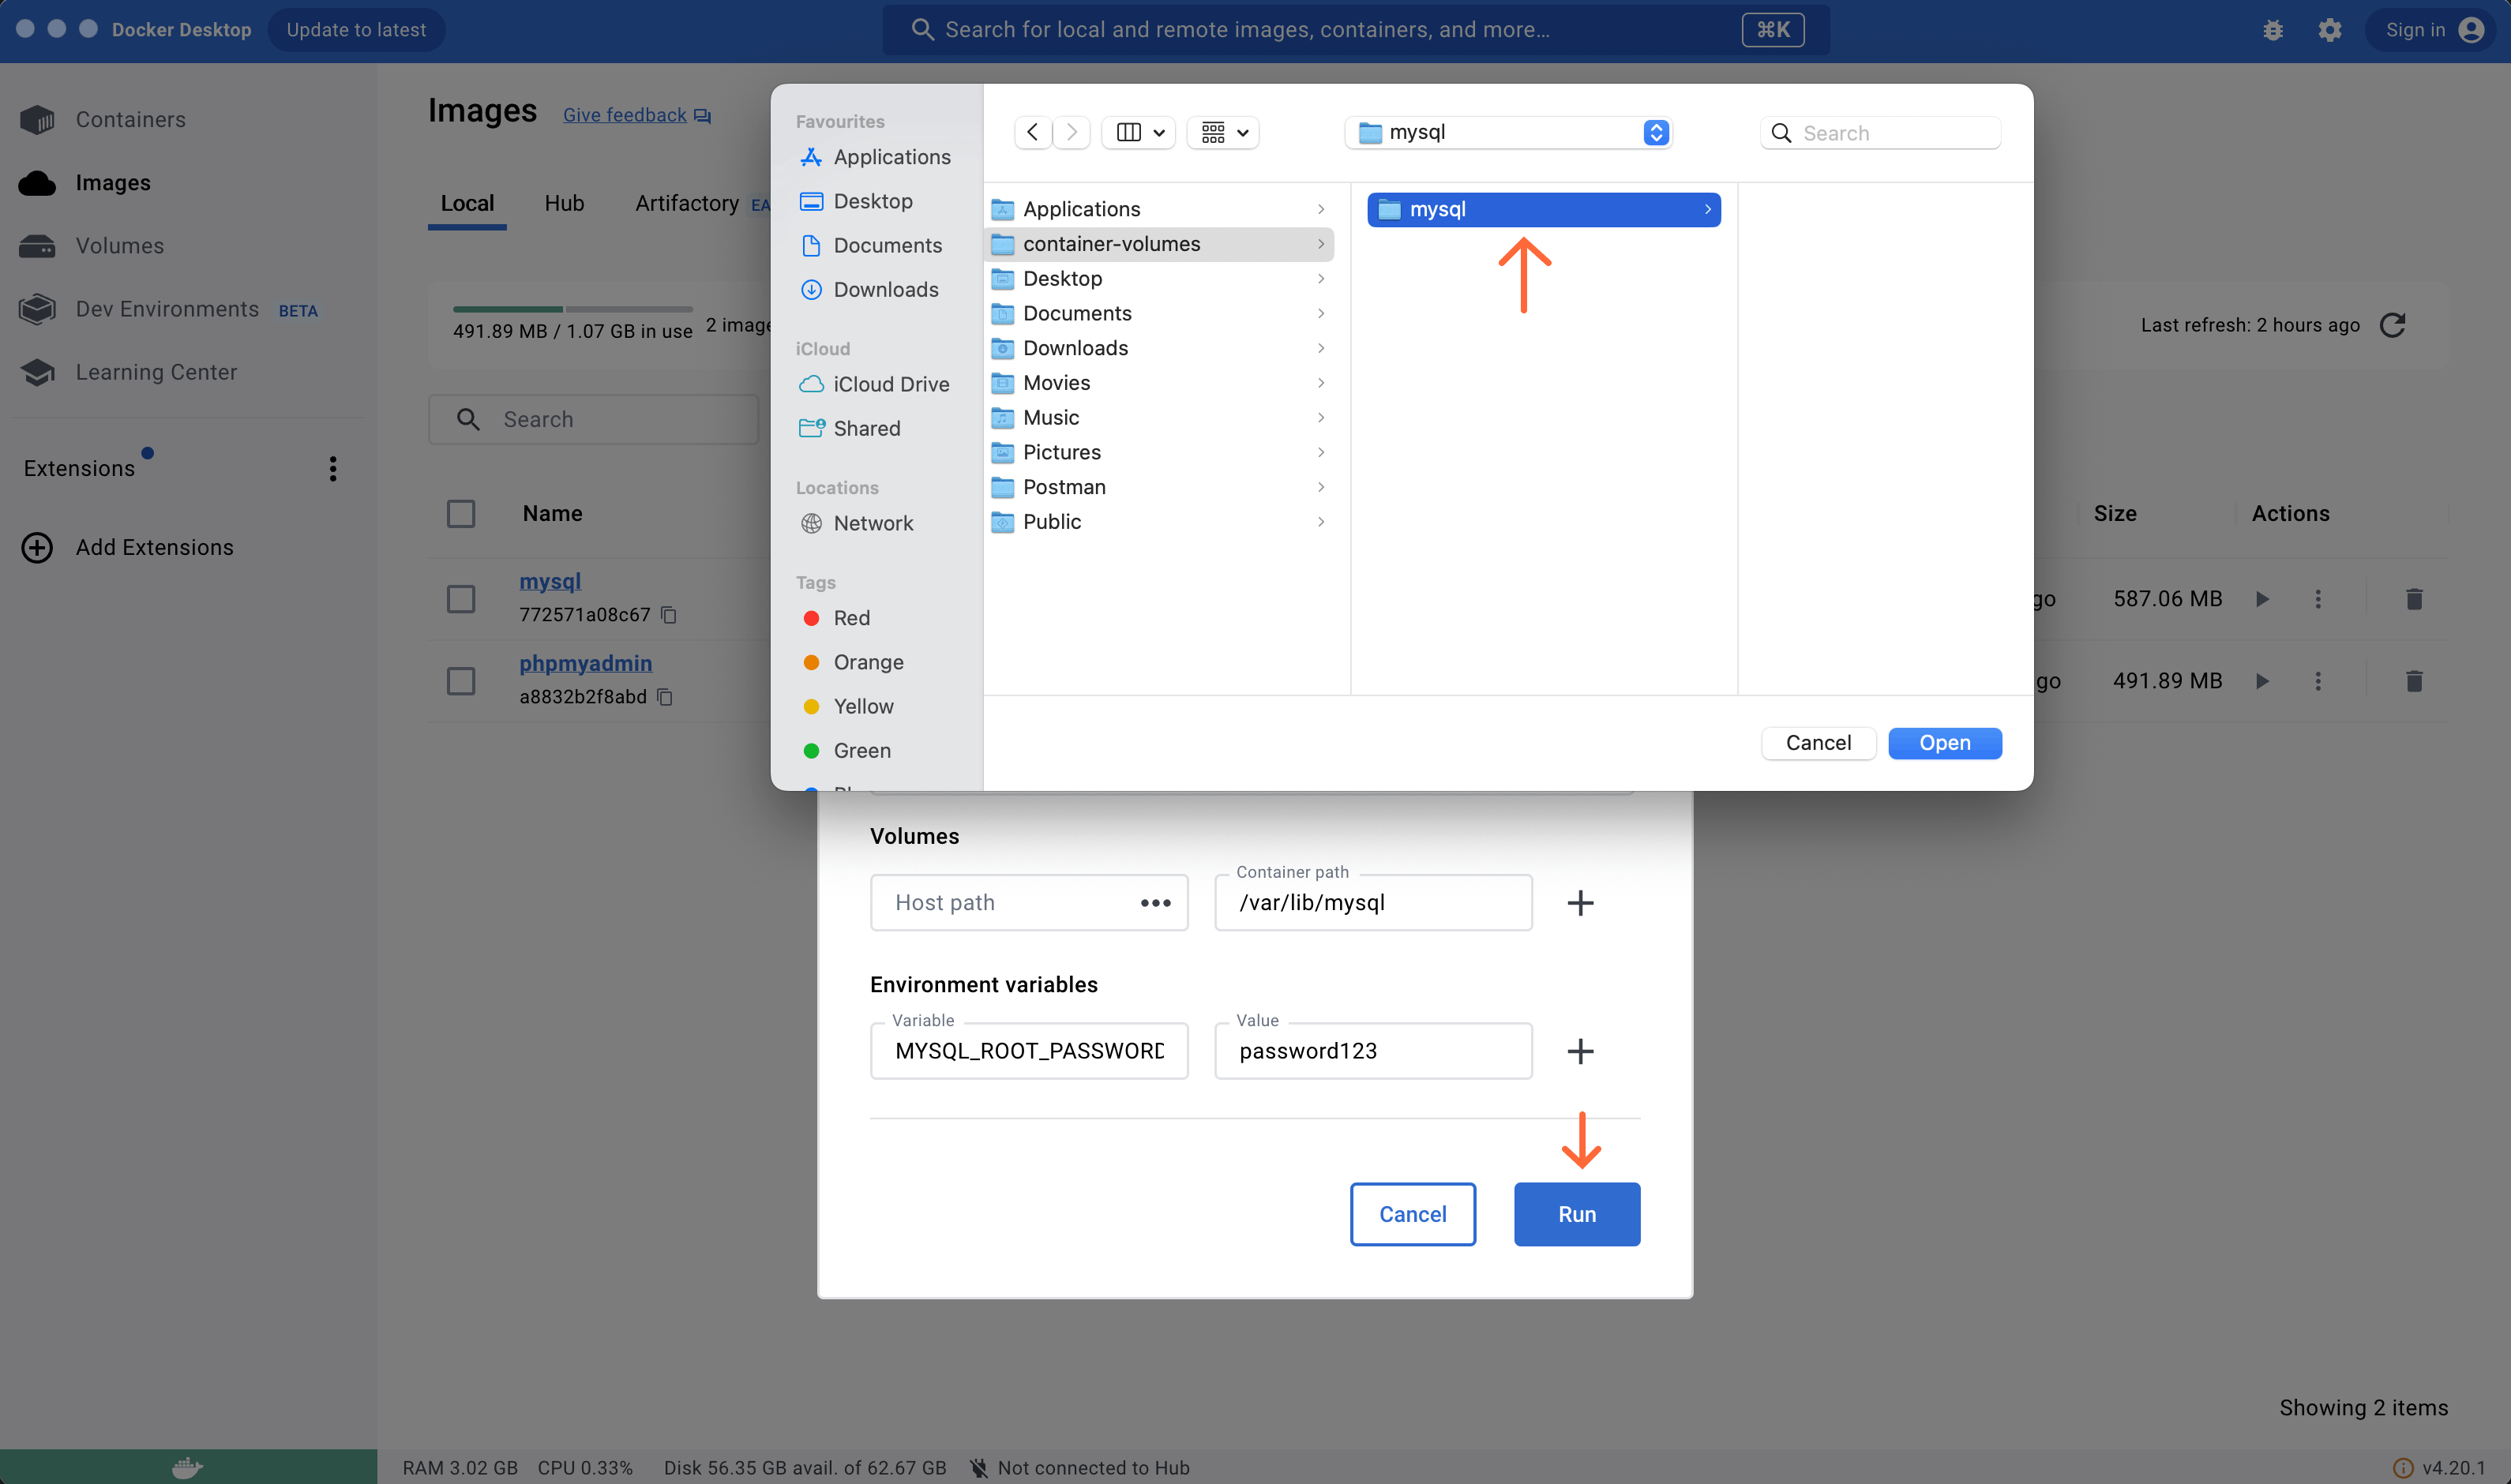
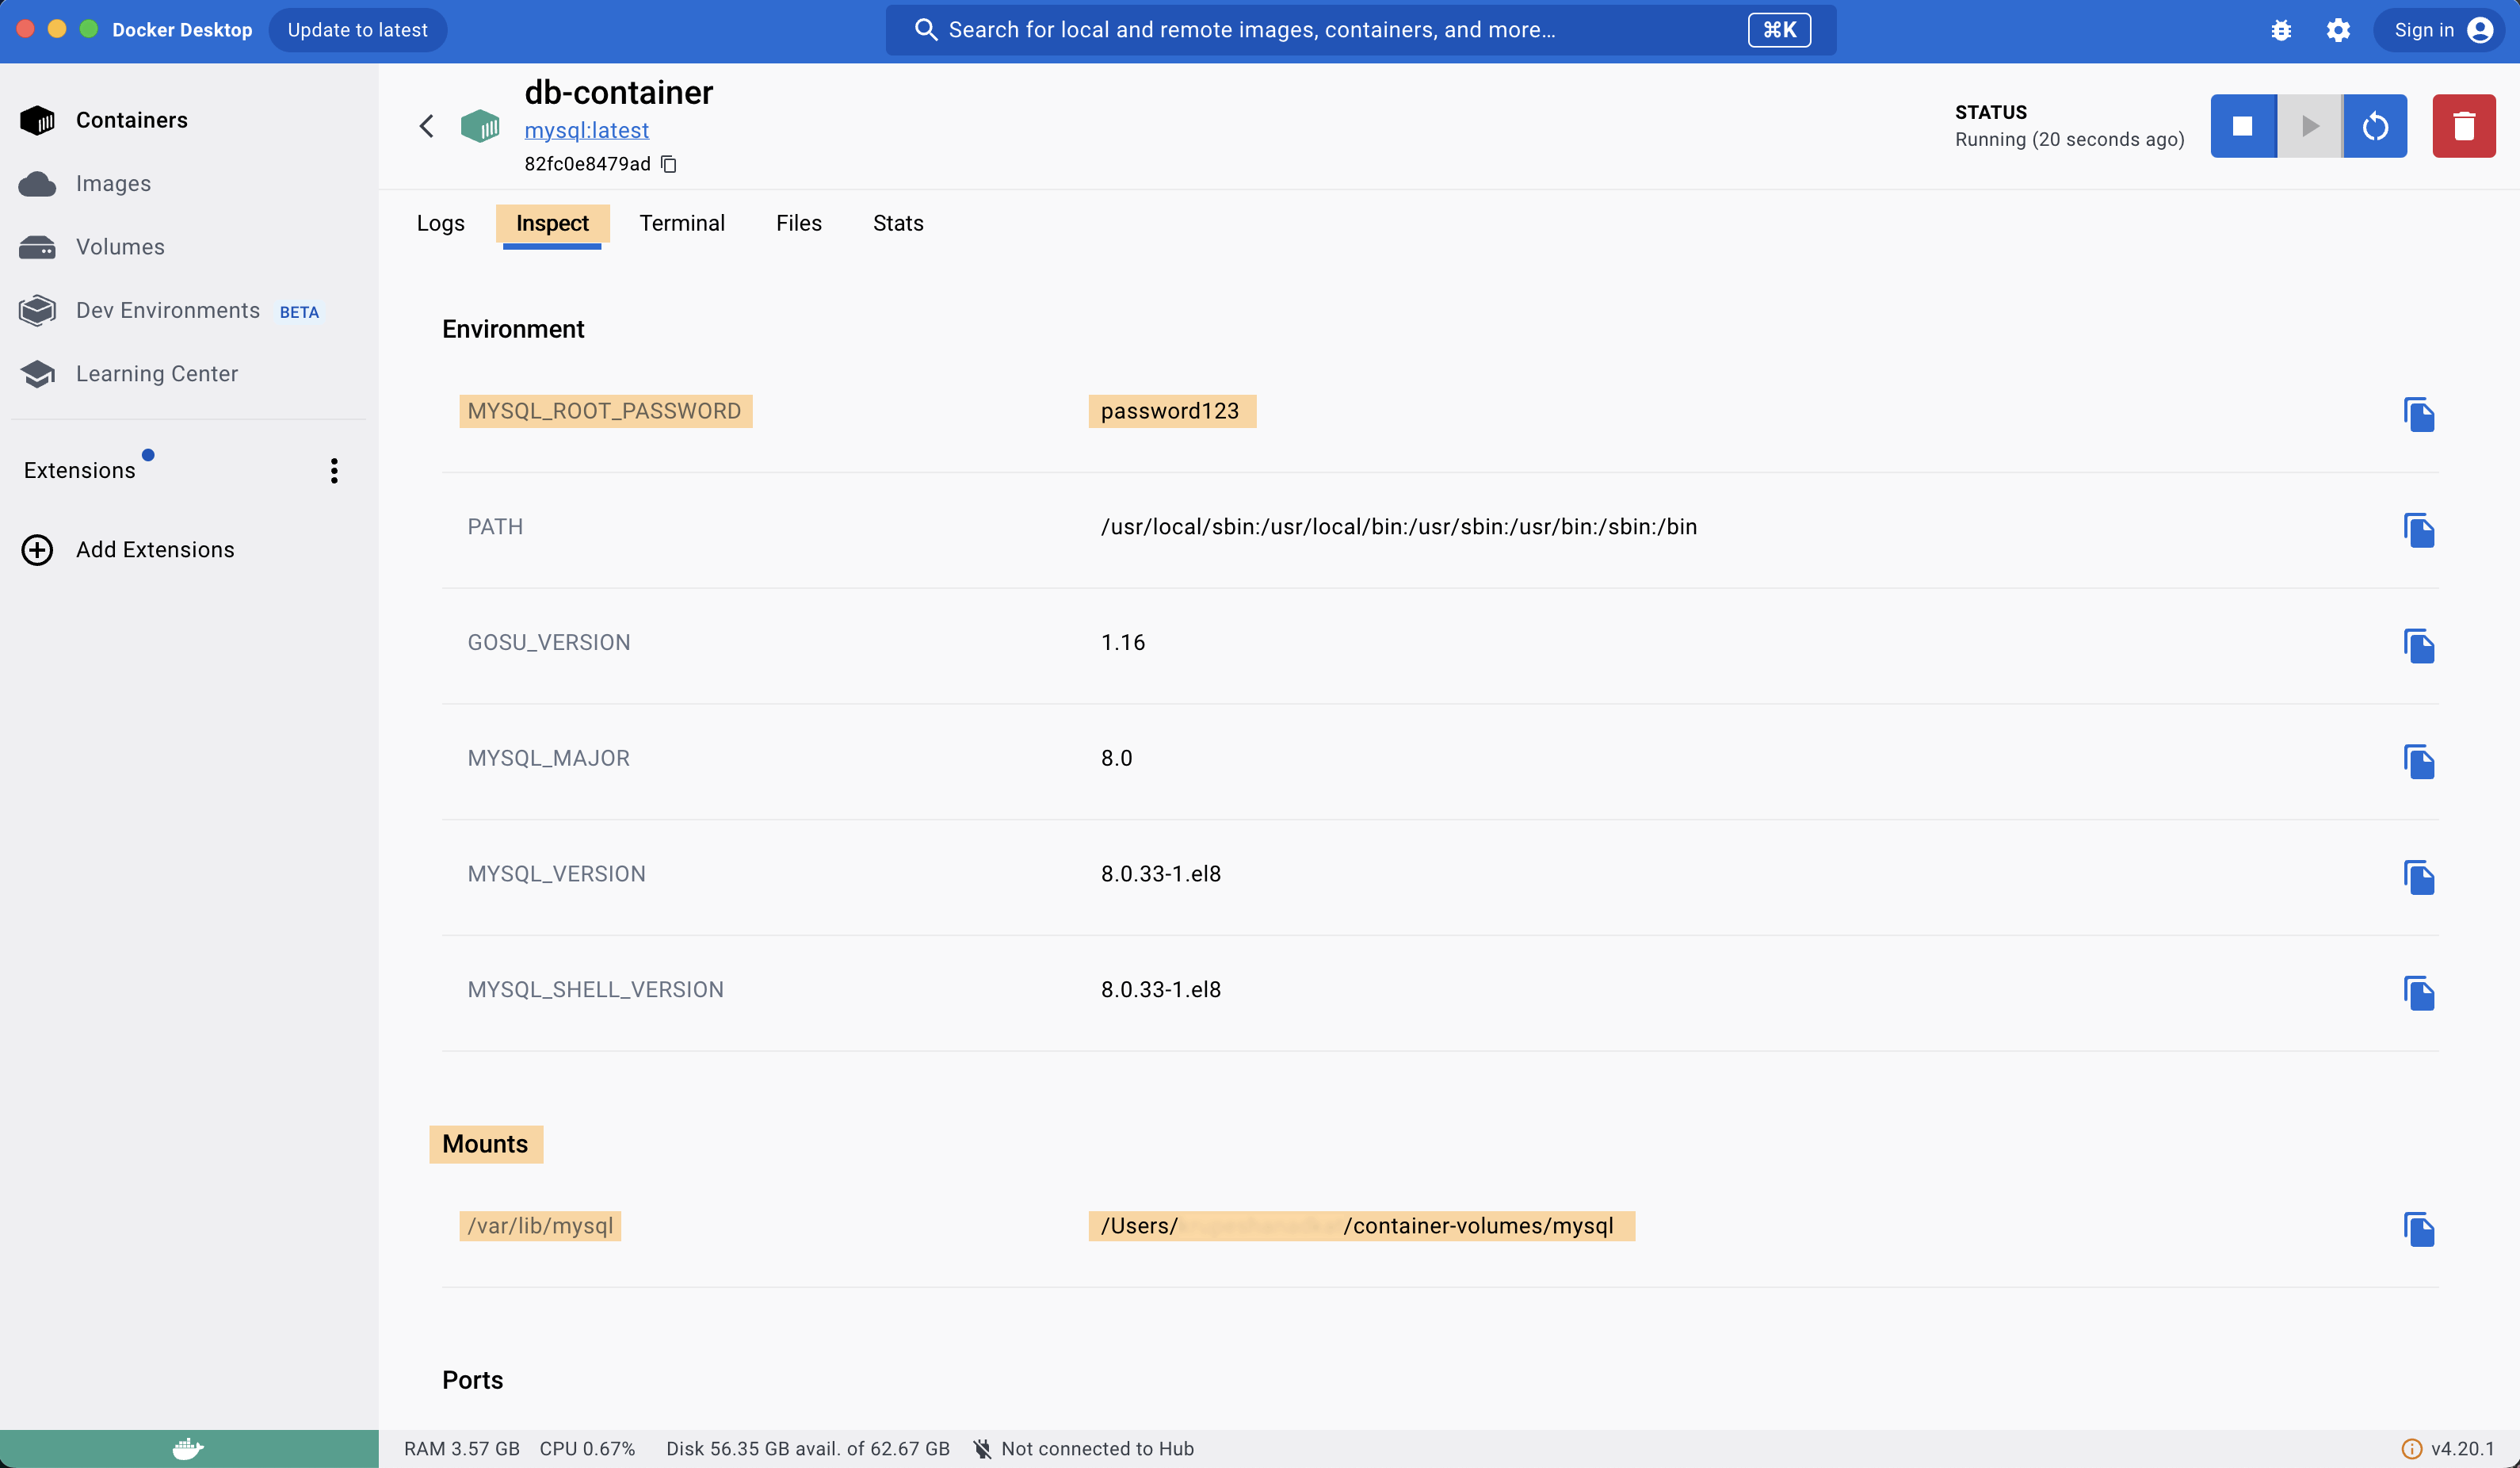
As you can see above, I have already created an empty folder mysql in my file explorer, click Open to select & Click Run after that in Docker Desktop. This will start container & store all mysql db data in the system folder you selected. You could also verify config information of container in the Inspect tab.
Alternatively, you can run the container with same config through terminal with following command.
docker run --env MYSQL_ROOT_PASSWORD=password123 --name db-container-cmd --volume /Users/username/container-volumes/mysql:/var/lib/mysql --detach mysql
Notice how huge it has become. Shell commands are awesome when they are written in some executable scripts file & there is sequence of things that need to be done. You just run the script file & get everything done with just one interaction. But when it comes to learning or tasks like this, terminal can be intimidating.
--volume /Users/username/container-volumes/mysql:/var/lib/mysql tells that mount /Users/username/container-volumes/mysql of the host system to /var/lib/mysql of the docker container system.
Now run some mysql commands to create data & then let us start another container from Images tab & verify that data persists.
Stop this container using Blue button with White square on top right. OR using os terminal run following command:
docker container stop db-container
Start another container named db-container-2 with same configuration except container name to be db-container-2 & go to mysql repl to verify if data exists.
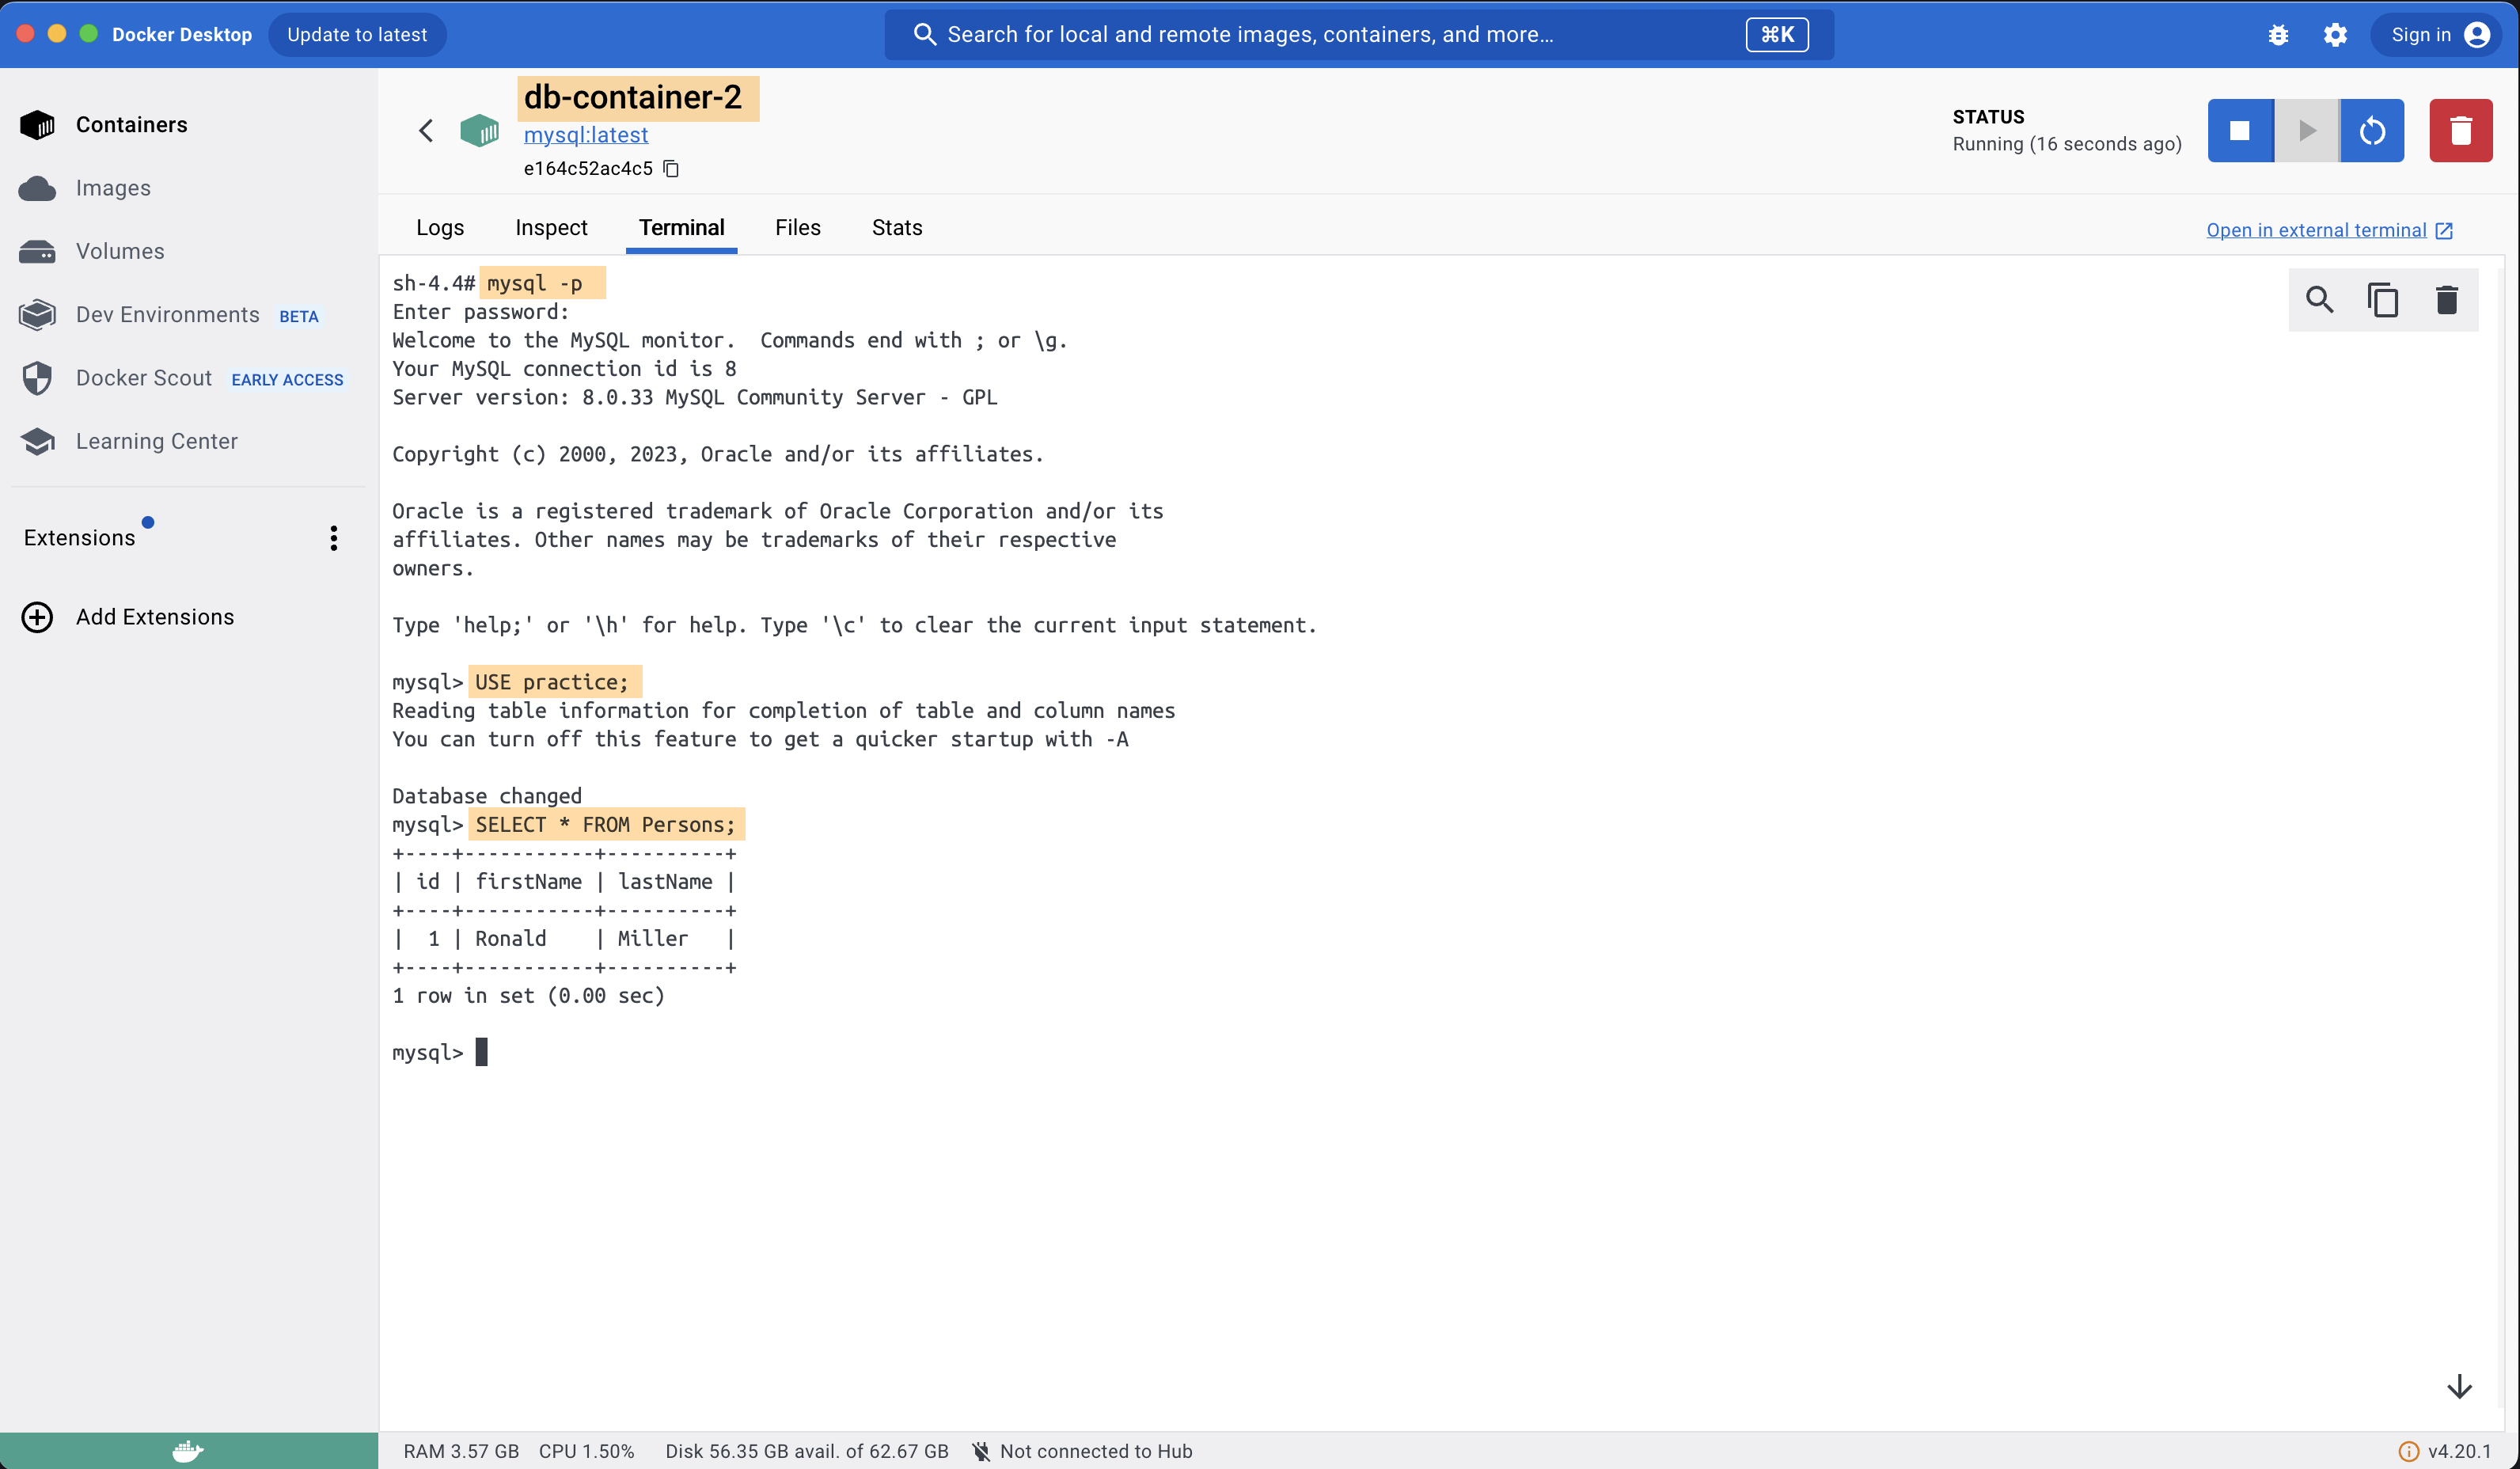
The data persists!
Publishing Container Port
Often times we want to access server running inside container through our code or some other application. For example, connecting to mysql server from our backend code running in system. In context of this post, we want phpMyAdmin to access mysql db connection. So we need to expose or publish the port at which mysql server is running inside container.
Very soon we will expose phpMyAdmin port also to be able to open it in browser of system.
Delete existing mysql db container.
Go to Images tab & hit play on right on mysql image listing & fill the details like below. Only difference this time is to set Ports > Host Port to 8000 mapped to 3306/tcp of container. If port 8000 is occupied then try another port like 8001, but keep a note of it. We will need this port when configuring phpMyAdmin container.
Click Run & we are all done for mysql server container. To do the above in terminal below is the command:
docker run --env MYSQL_ROOT_PASSWORD=password123 --name db-container --volume /Users/username/container-volumes/mysql:/var/lib/mysql --publish 8000:3306 --detach mysql
--publish 8000:3306 map 8000 port of host system to 3306 of docker container. We will see use of this when configuring phpmyadmin container.
I have made 3306 as bold above because I usually mix it with 3360, which is another port that mysql exposes. You should not map that, else phpMyAdmin GUI won't connect with mysql server. Map 3306!
Running phpMyAdmin Container
phpMyAdmin is a popular GUI client for relational databases. More recently other GUIs like MySQL Workbench are also used widely.
I use to setup Apache XAMPP in windows back in the year ~2016 when I had to work on any php & MySQL projects. Back then it use to be simple to setup phpMyAdmin because Apache server was already up for php through XAMPP. Now I rarely work with php so I found phpMyAdmin Docker Image which can be setup with just few clicks without explicitly setting up apache or polluting my OS with softwares
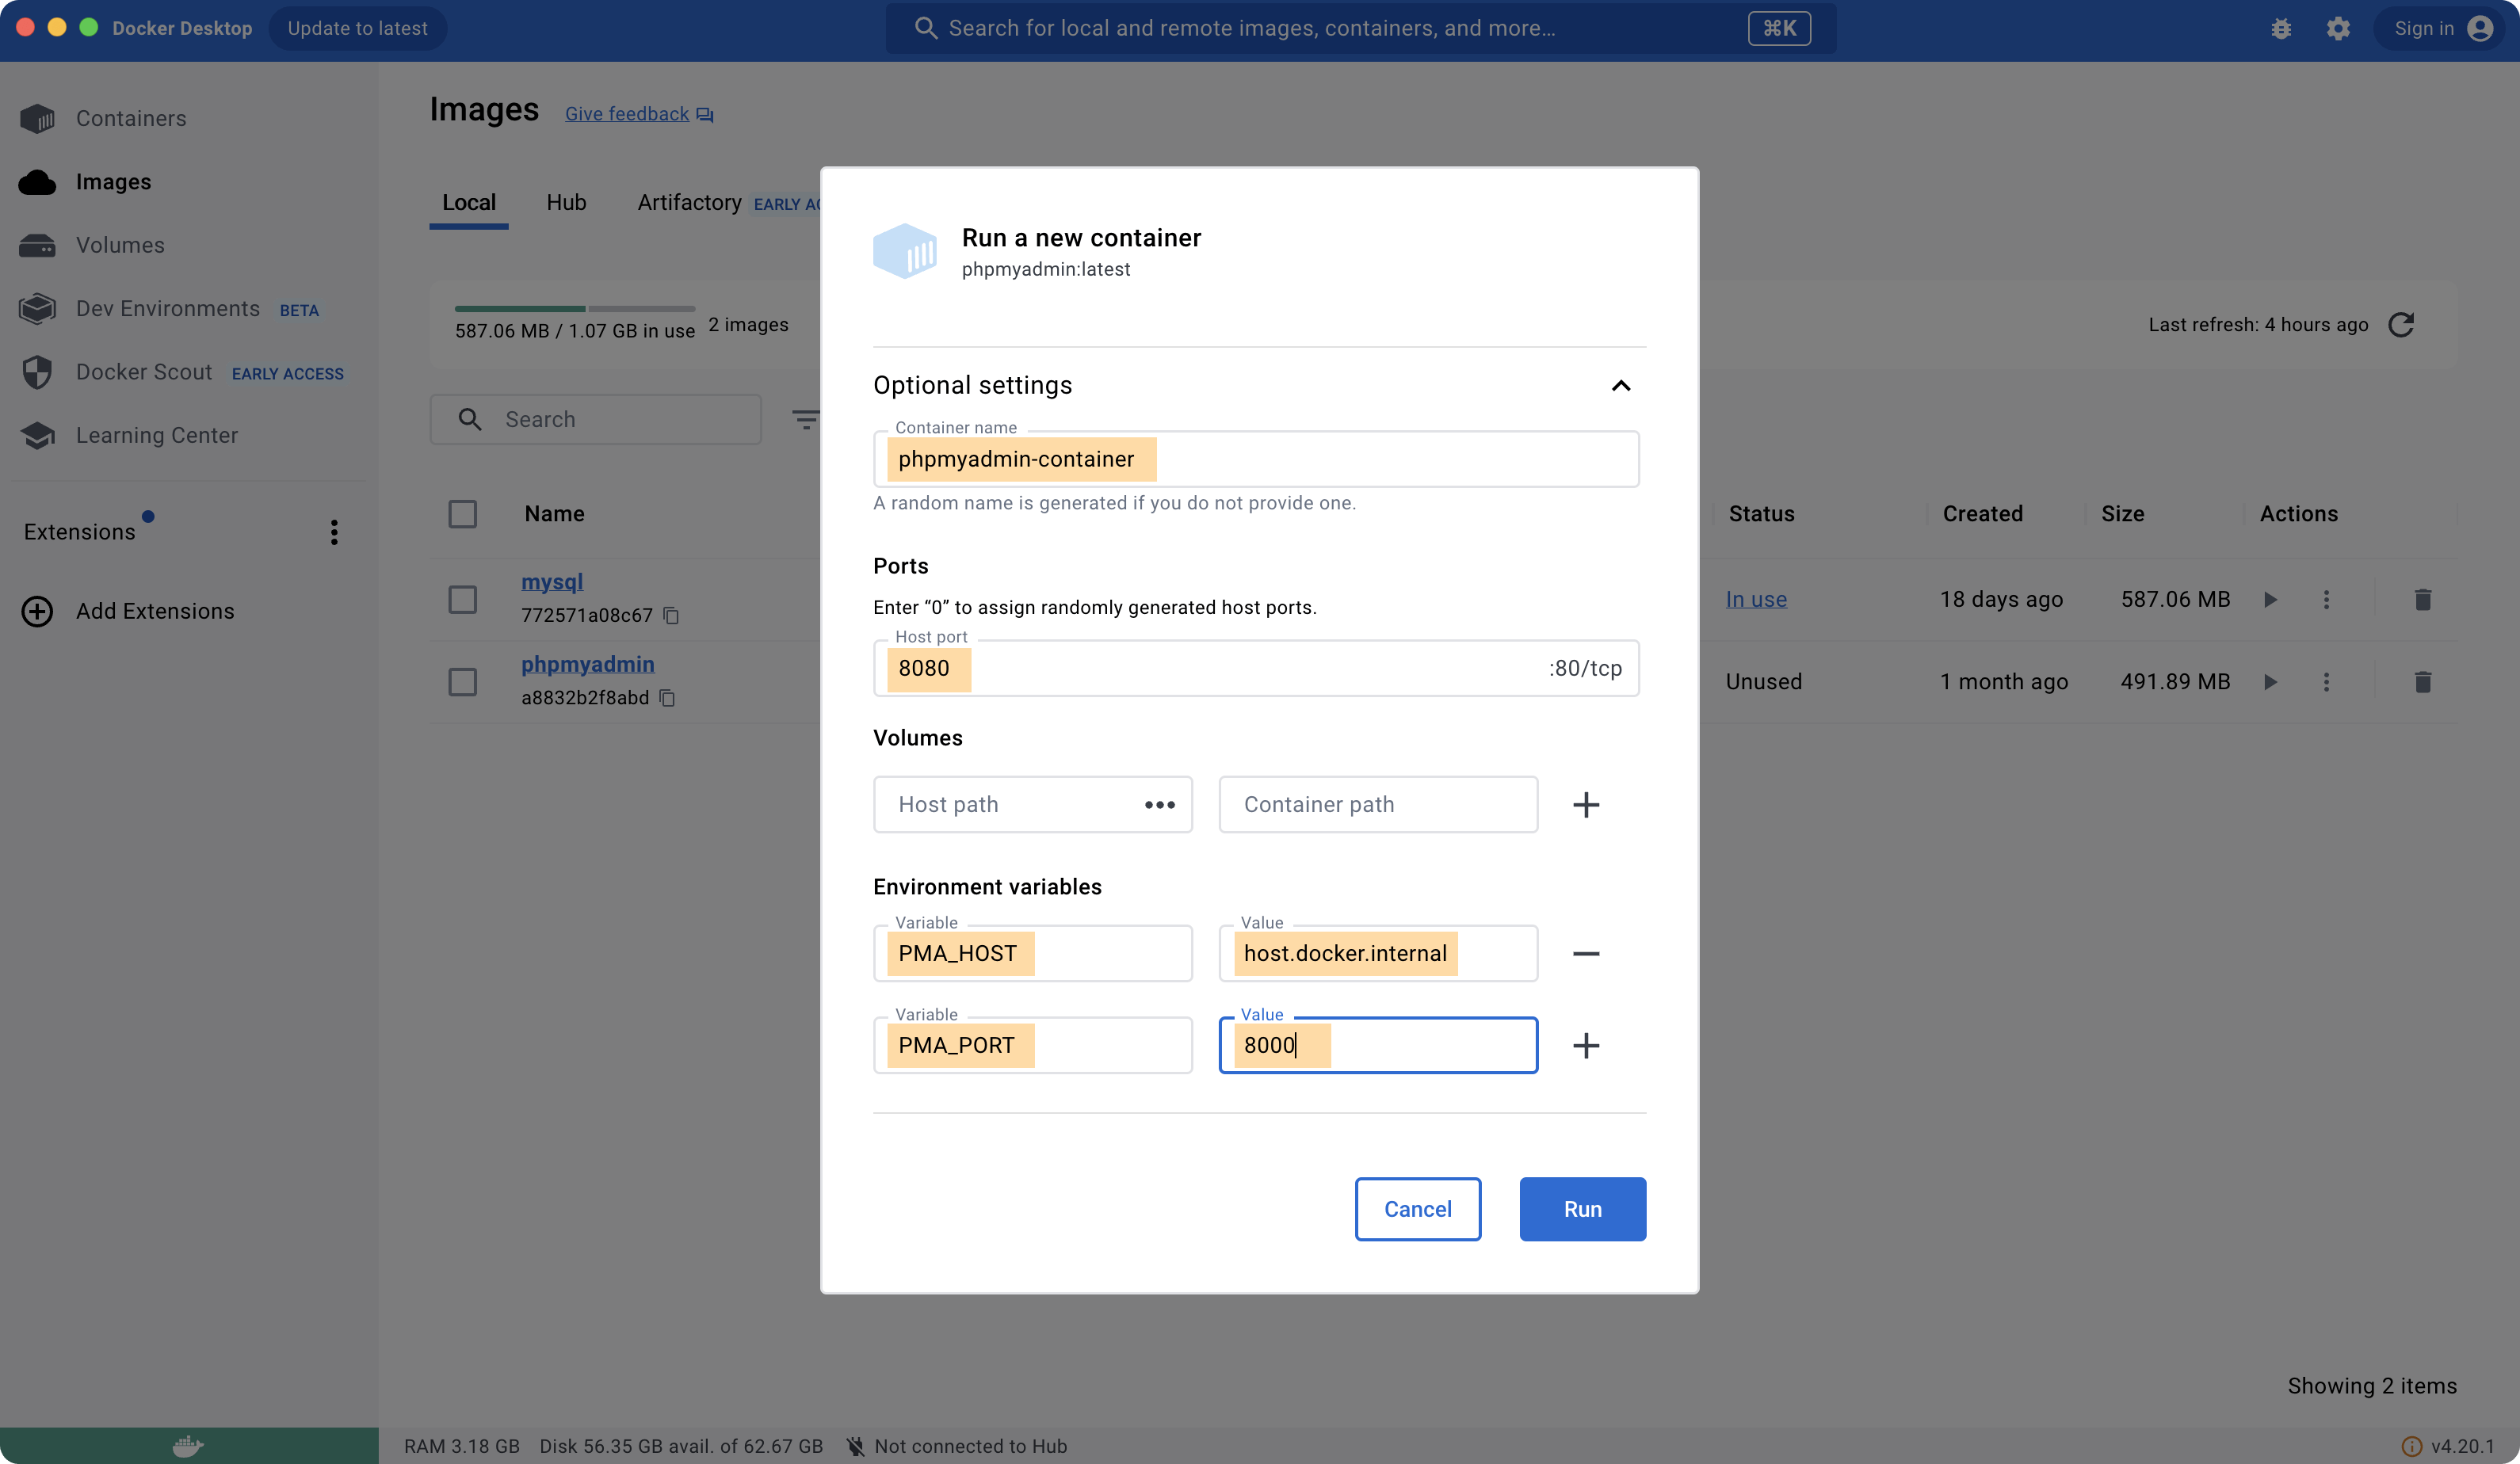
Go to images, hit Play on right of phpmyadmin image listing & do the following config.
Or same config in terminal with docker cli will be:
docker run --env PMA_HOST=host.docker.internal --env PMA_PORT=8000 --name phpmyadmin-container --publish 8080:80 --detach phpmyadmin
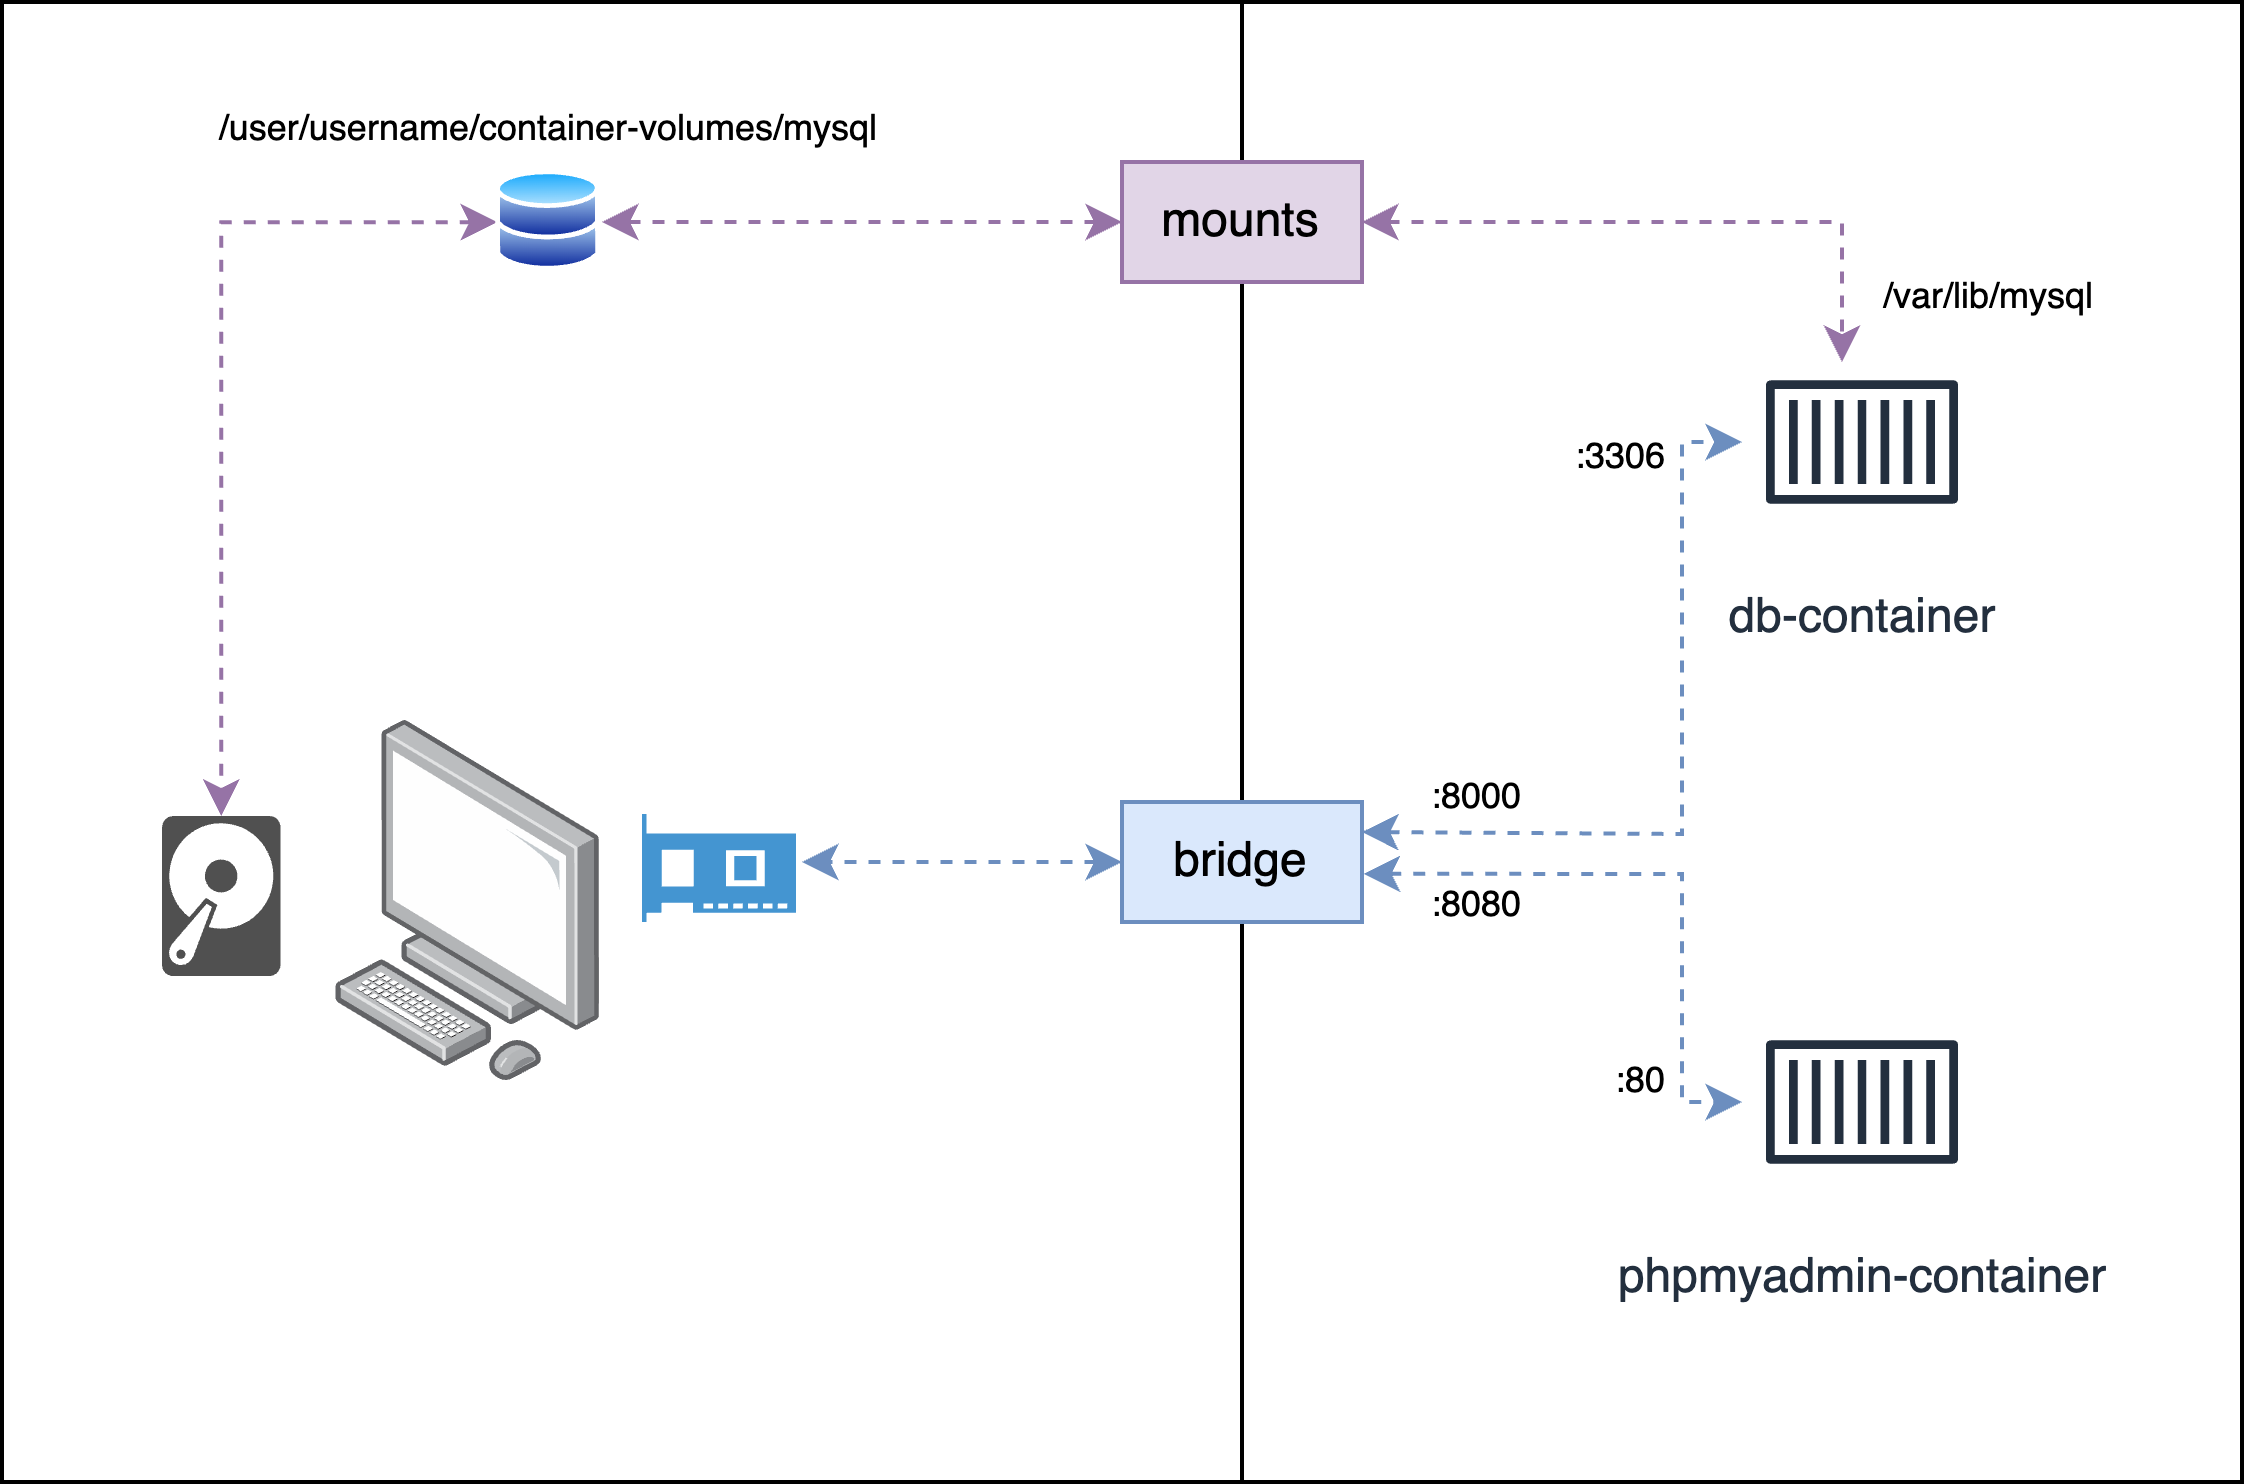
--env PMA_HOST=host.docker.internalsets environment variablePMA_HOSTto be the network address of host system. It is similar to localhost. If you write localhost instead ofhost.docker.internalthen that would point to the localhost of Container itself. We want it to point to localhost of our system because mysql server is exposed atlocalhost:8000As per config done in previous section.--env PMA_PORT=8000sets environment variablePMA_PORTto be8000, the port where mysql server is available.--publish 8080:80maps port8080of host system to port80of container.
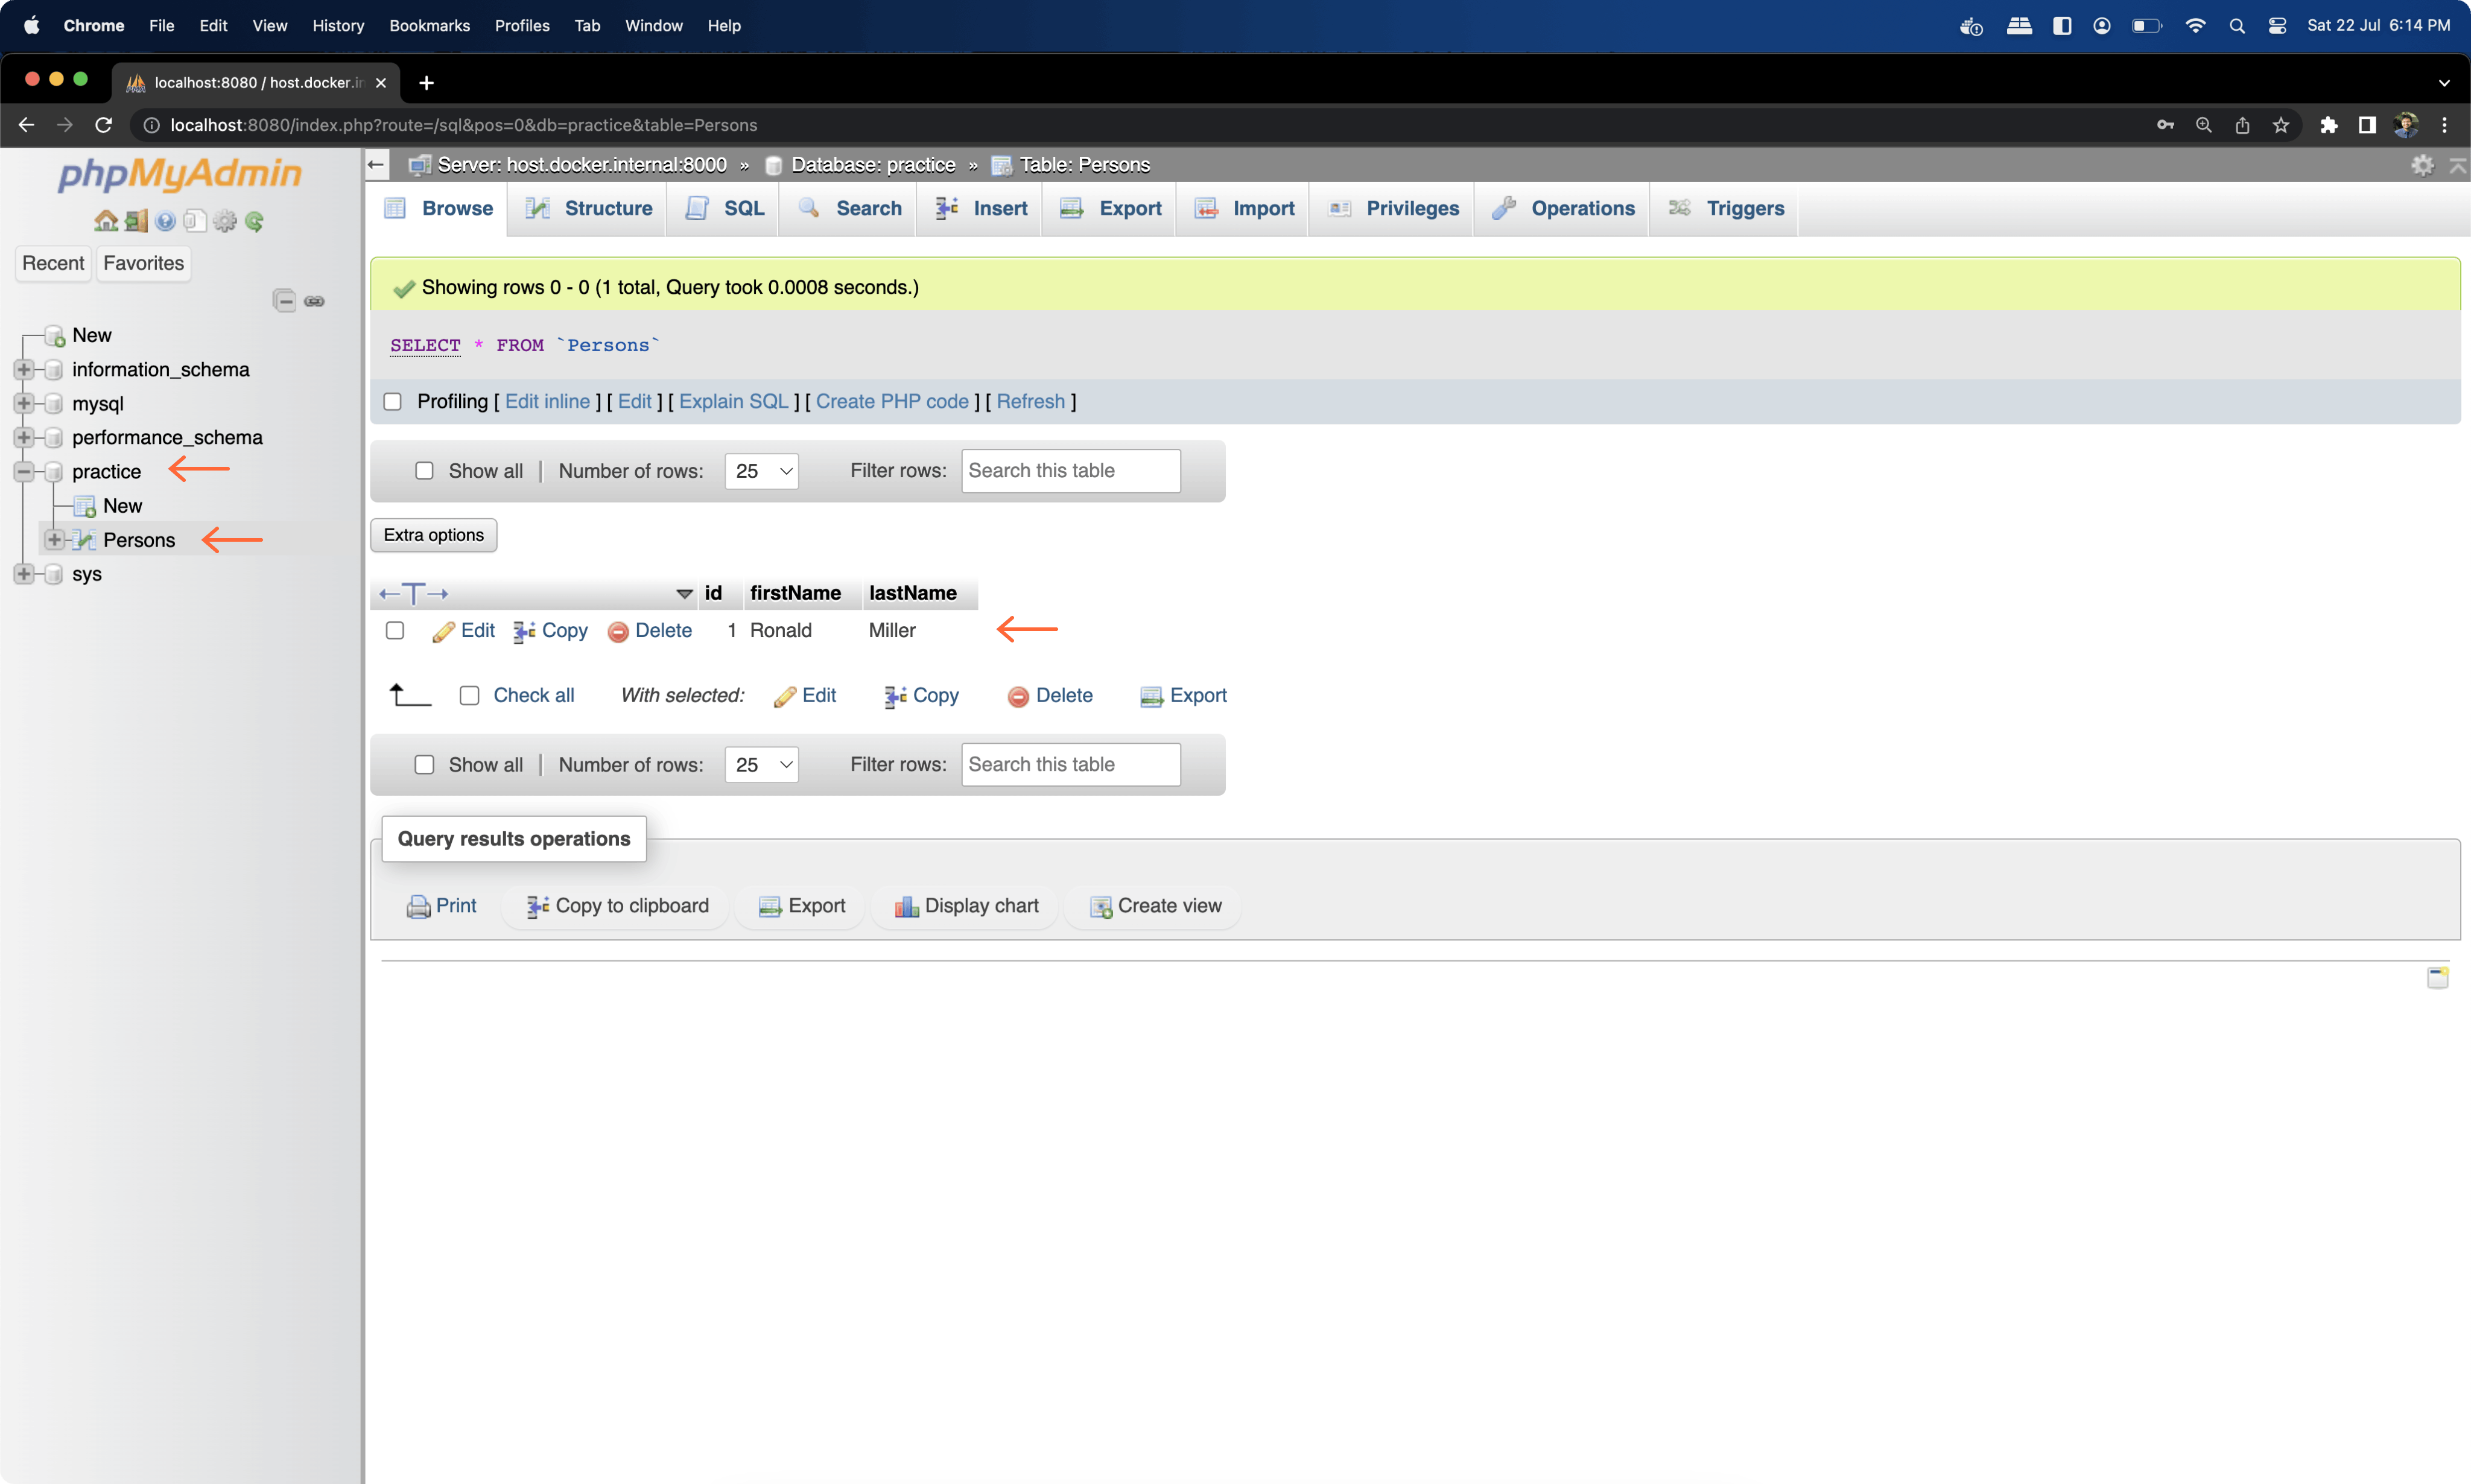
That would be it. Now you can open http://localhost:8080/, enter username & password. Default username is root & password is the one you had set while configuring mysql server container MYSQL_ROOT_PASSWORD=password123

TL;DR
Here is very brief summary of what we did:
# Pull Docker Images
docker pull mysql
docker pull phpmyadmin

# Run MySQL Server Container
docker run --env MYSQL_ROOT_PASSWORD=password123 --name db-container --volume /Users/username/container-volumes/mysql:/var/lib/mysql --publish 8000:3306 --detach mysql

# Run PhpMyAdmin Container
docker run --env PMA_HOST=host.docker.internal --env PMA_PORT=8000 --name phpmyadmin-container --publish 8080:80 --detach phpmyadmin
This entire process could have been done with Docker Compose by Building just one Docker file & then executing it. But I wanted to keep this one beginner friendly, targeting folks who knew how to run containers at the simplest.
A Small Request From Your Fellow Developer 💙
What took you 10-15 minutes to read took me several days to perfect. And honestly? That's completely worth it when I know it saves you hours of frustration.
🫤 Here's the reality: Creating quality tech content takes countless late nights testing different setups, breaking my own system multiple times, taking screenshots at every step, and then rewriting everything until it makes perfect sense. If this helped you, please consider supporting my work! 🥳
{ "Small support": "Big motivation to create more content!" }