
A Practical Guide To Asymmetric Encryption - Part 2
Background
We want to encrypt & decrypt information using Asymmetric Encryption that was explained in the previous article. We also want to know, how this can be added to real-world applications. It is going to be a hands-on article so it is expected that you follow along.
Prerequisites
Unlike the previous article, this one has some crucial prerequisites that you must know:
- You should have beginner's knowledge of Javascript & Node Js module ecosystem. I have Node Js
v14.15.1installed. Any version from v10 to the latest would do. - All the theory related to asymmetric encryption is covered in detail in my last article, definitely give it a read before proceeding with this one.
- I am using free editor Microsoft Vscode however you can continue with any other editor too.

Getting Started
I have prepared a mini-project starter to follow along. You can download it from the Github repository's Starter Code commit. Below is the files & folders structure:
├── data
│   ├── encryptedData.json
│   ├── keys.json
│   └── rawData.json
├── generateKey.js
├── encryptData.js
├── decryptData.js
├── main.js
└── LICENSE
We have a data directory where we would store private & public cryptographic keys. We have other two files to store raw data & encrypted data i.e. an important message. Json structure of raw message looks like below:
{
  "senderId": "abcd-1234",
  "receiverId": "pqrs-6789",
  "createdAt": "2021-06-12T07:05:53.769Z",
  "message": "Hey Robin, I am having meeting at 6pm with Richard on 4th Evenue, Backer's Vistro. Please bring documents with you, see ya!",
  "isDelivered": "true",
  "isRead": "false"
}
The structure is a real-world message entity example, you might want to save a message like this in a database table or collection. All the properties are self-explanatory. The message seems to be critical here: "Hey Robin, I am having meeting at 6pm with Richard on 4th Evenue, Backer's Vistro. Please bring the documents with you, see ya!"
Next, we have are 4 files generateKey.js, encryptData.js, decryptData.js & main.js. The plan is simple:
- We want to first generate public & private keys, & store them in the keys.json file.
- Fetch the raw message from rawData.json, encrypt it with the public key from keys.json & save the encrypted message in encryptedData.json
- Finally, we could bring encrypted data from encryptedData.json and decrypt it with the private key from keys.json
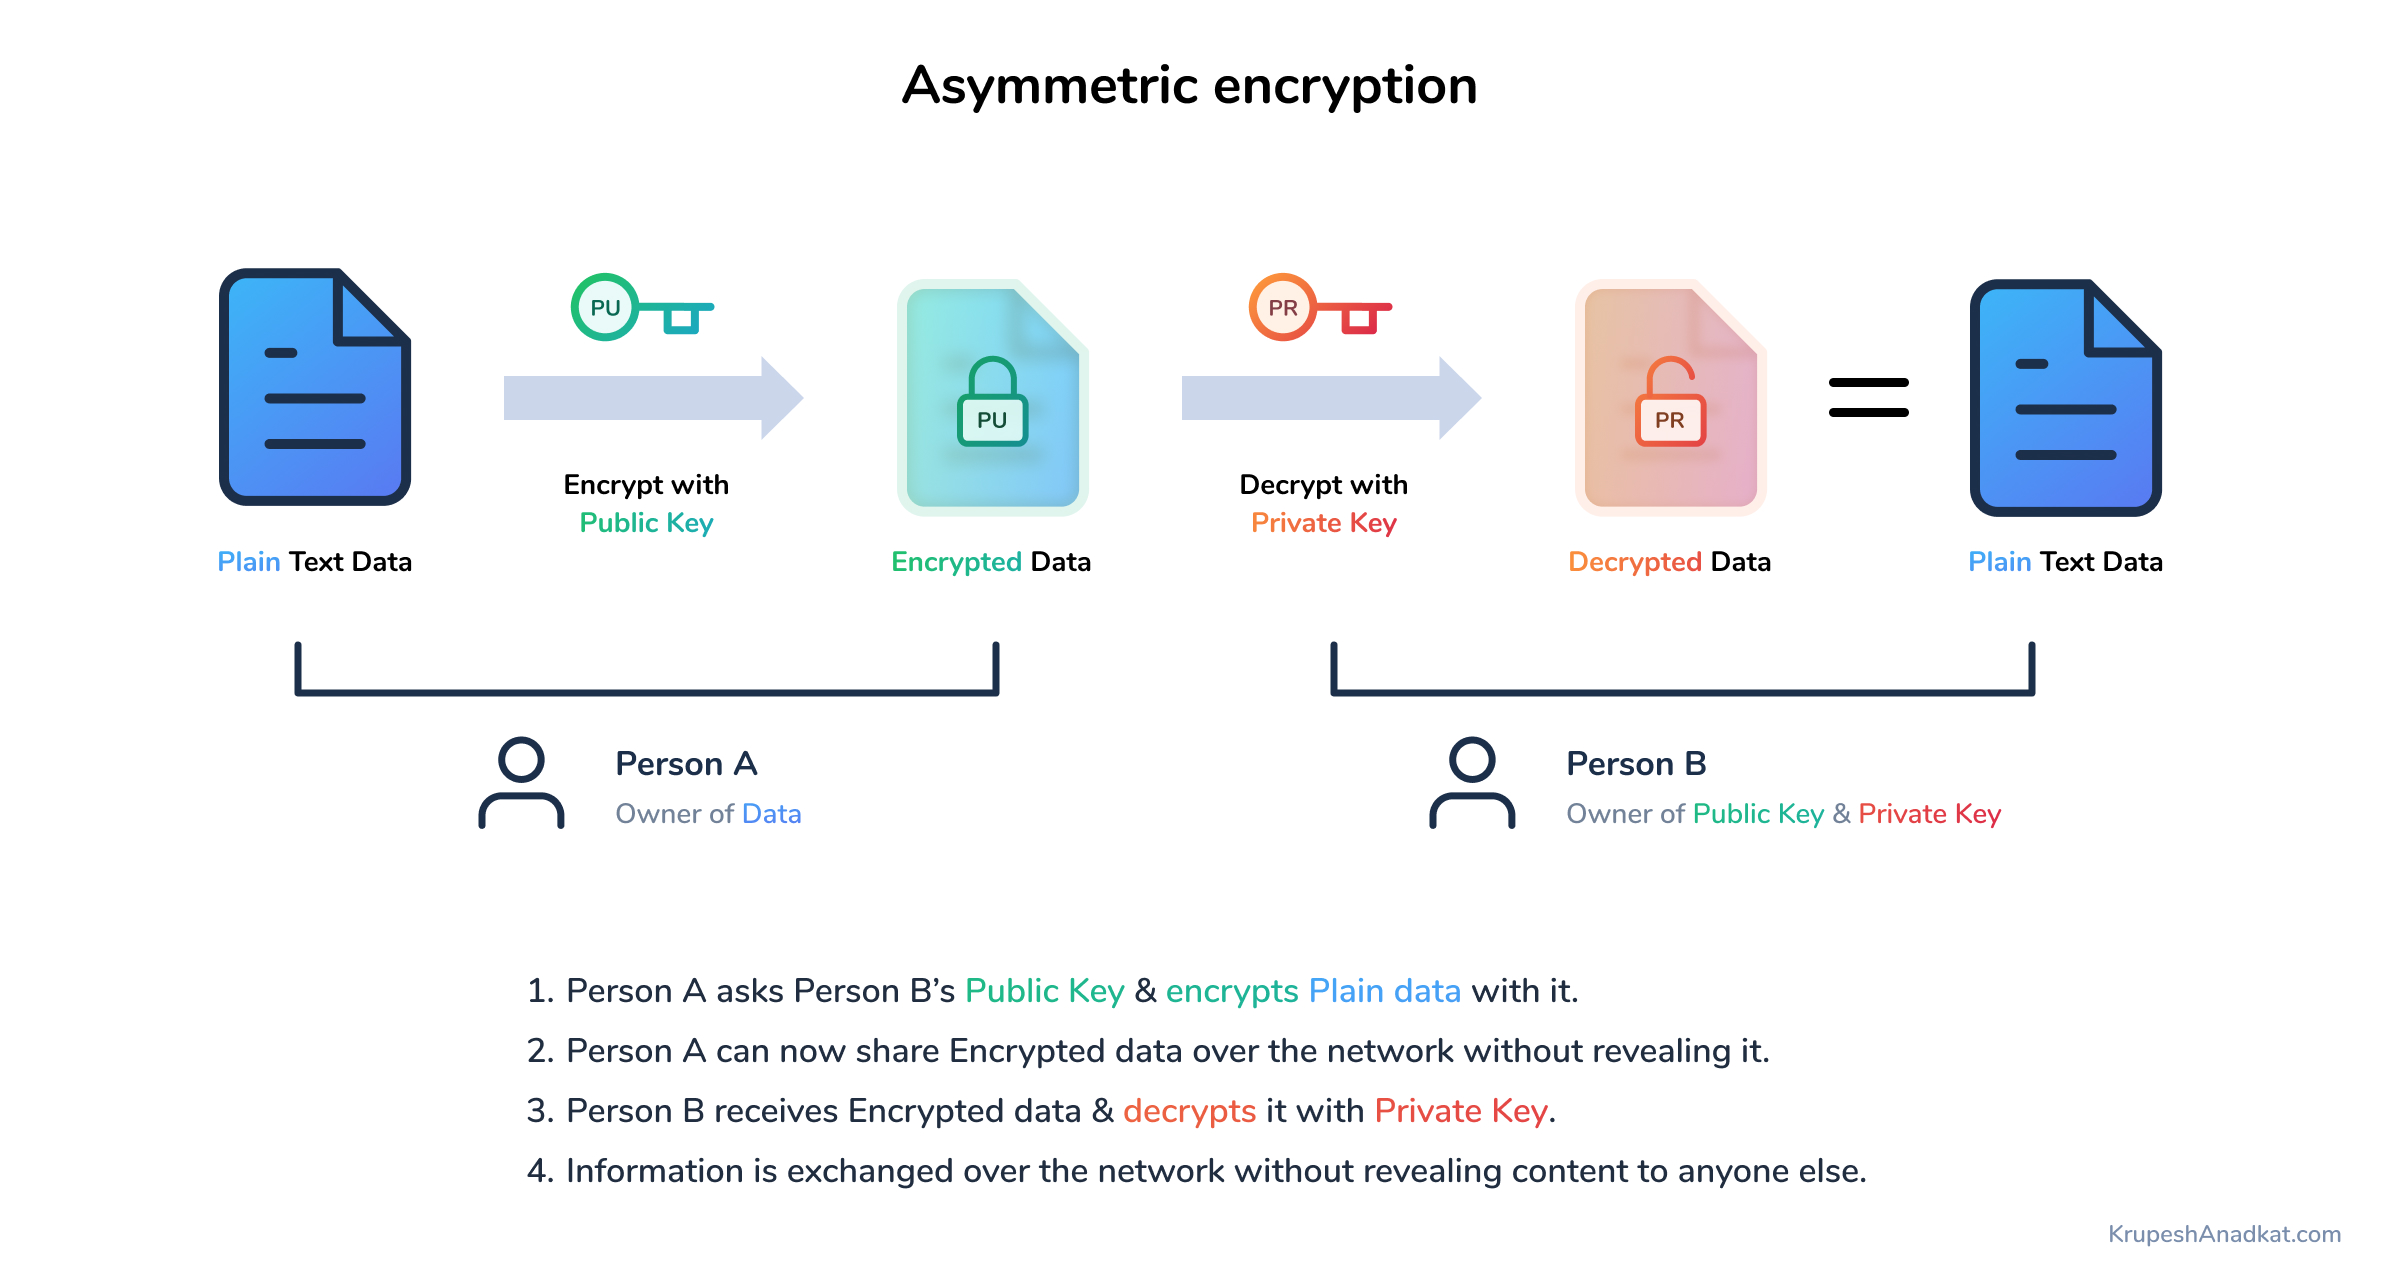
The above 3 steps & the diagram are sufficient to get a complete idea of the encryption & decryption process.
1. Asymmetric Keys
We are going to use Node's inbuilt modules throughout. Open generateKey.js file in the editor.
const fs = require('fs')
const path = require('path')
const crypto = require('crypto')
We want to read and write json files and that can be done with the fs module. The path module is for having json file paths. The crypto module has several methods and we would cover just a few. Later, I would suggest you look up official docs and get an idea of other methods in the crypto module.
// ...

const generateAndSaveKeys = () => {
  // Generate Keys -> Key Objects
  const { publicKey, privateKey } = crypto.generateKeyPairSync('rsa', {
    modulusLength: 2048 * 3,
  })

  // Convert KeyObjects to Strings -> To save easily
  const publicKeyStr = publicKey.export({ type: 'pkcs1', format: 'pem' }).toString('hex')
  const privateKeyStr = privateKey.export({ type: 'pkcs1', format: 'pem' }).toString('hex')

  // ...
}
Above we added a function in the file to generate and save the public & private keys. generateKeyPairSync is an inbuilt function from the crypto module, that takes in algorithm and config object. We have chosen the rsa algorithm & modulusLength in config which is roughly equal to the length of public key + private key (combined). Larger the key size, larger string you can encrypt & more secure will be the encryption.
As per NSA's Commercial National Security Algorithm Suite, we should have at least 3072 bits or larger rsa keys.
We get Key Objects as the output of generateKeyPairSync function. To save these keys for later use, we need to convert them into a string.
Key Object has a method called export which takes encoding options type & format. PKCS1 is an acronym for Public-Key Cryptography Standards #1. You can read about it here. It's fine even if you do not know that 🙂. PEM is Privacy Enhanced Mail, it tells how we want to have file content and it will begin with headers & footers like below:
-----BEGIN ABC DEFGH KEY-----
...
...
-----END ABC DEFGH KEY-----
Then we convert output of the export method to a hexadecimal string. Adding below to function will help us to save these keys in the keys.json file & completes the code we want to have in this file.
//...

const generateAndSaveKeys = () => {
  //...

  // Convert KeyObjects to Strings -> To save easily
  const publicKeyStr = publicKey.export({ type: 'pkcs1', format: 'pem' }).toString('hex')
  const privateKeyStr = privateKey.export({ type: 'pkcs1', format: 'pem' }).toString('hex')

  // Form object to save
  const keys = {
    publicKey: publicKeyStr,
    privateKey: privateKeyStr,
  }

  // Save Key to data/keys.json
  const filePath = path.join(__dirname, '/data/keys.json')
  fs.writeFileSync(filePath, JSON.stringify(keys))
}
Finally, we export the function with module.exports = generateAndSaveKeys at the bottom of the file. Find here the complete code of this file.
2. Encrypt Data With Public Key
The moment we have been long waiting for. If you follow this well, I bet you could do decrypting part on your own. Open encryptData.js file & bring the same 3 modules we used in the above section. Then let's define a function encryptAndSave in it.
const fs = require('fs')
const path = require('path')
const crypto = require('crypto')

const encryptAndSave = () => {
  // 1. Bring Public Key From data/keys.json

  // 2. Bring Raw Data From data/rawData.json

  // 3. Encrypt Raw Data

  // 4. Form Data To Save

  // 5. Save Data to data/encryptedData.json
}

module.exports = encryptAndSave
Above is the skeleton of our function. I have written down in comments what are the steps we would follow. First, let's bring the public key string and convert it to a key object so that we can later use it to encrypt data.
const encryptAndSave = () => {
  // 1. Bring Public Key From data/keys.json
  const keysJsonStr = fs.readFileSync(path.join(__dirname, './data/keys.json')).toString()
  const { publicKey } = JSON.parse(keysJsonStr)
  const publicKeyObj = crypto.createPublicKey({ key: publicKey, type: 'pkcs1', format: 'pem' })

  // ...
}
We brought the entire file content as a string then converted it to Json with the parse method which helped us to extract publicKey (object de-structuring). The crypto module has a method called createPublicKey which helps us to form Key Object from Key string. We have specified the same encoding parameters that we used while creating Key string.
We would now bring raw data and encrypt it like below:
const encryptAndSave = () => {
  // ...

  // 2. Bring Raw Data From data/rawData.json
  const rawDataStr = fs.readFileSync(path.join(__dirname, './data/rawData.json')).toString()
  const rawDataObj = JSON.parse(rawDataStr)[0]

  // 3. Encrypt Raw Data
  const encryptedData = crypto.publicEncrypt(
    {
      key: publicKeyObj,
      padding: crypto.constants.RSA_PKCS1_OAEP_PADDING,
      oaepHash: 'sha256',
    },
    Buffer.from(JSON.stringify(rawDataObj))
  )
  const encryptedDataStr = encryptedData.toString('base64')

  //...
}
It looks big addition but it's fine. Just like before, we read the file rawData.json as a string and converted it to Json with parse method, you see [0] at the end because parsed string becomes an array of objects (rawData.json has an array of messages - have a look at file) and we want first message (index = 0) from the array.
We used the crypto module's publicEncrypt method which takes in a public key object, padding type & hashing format of padding. Wait! what is padding? It is like a wrapper of dummy data around original data, something like below:
9bf7787dcThis is an important message & should be encrypted.5ca846e45fb3Notice the random characters at the start and end of the message above. That's the padding. This will enhance the security of encryption. You can read about OAEP here. The publicEncrypt method further takes a Buffer which will be encrypted using the public key. We converted rawDataObj to string with Json stringify method and converted it to Buffer using from method.
The publicEncrypt method returns a Buffer containing encrypted data. We converted that to a base64 string for saving it in json file.
If you have followed till here then you did it 🤝, there isn't much left now in this article! We will save encrypted data, bring it back & decrypt it. The decryption code is very similar to the encryption code above.
Below is the format of json object which we want to save in the encryptedData.json file:
{
  "id": "...",
  "data": "..."
}
As per our file structure, this object is inside an array. Since we have only one message here, we will keep it simple & directly save stringified array having a single object into the file.
const encryptAndSave = () => {
  //...

  // 4. Form Data To Save
  const encryptedDataArr = [
    {
      id: new Date().getTime(),
      data: encryptedDataStr,
    },
  ]

  // 5. Save Data to data/encryptedData.json
  const encryptedDataArrStr = JSON.stringify(encryptedDataArr)
  fs.writeFileSync(path.join(__dirname, './data/encryptedData.json'), encryptedDataArrStr)
}

module.exports = encryptAndSave
The above code is self-explanatory. We form an array with an object inside it. The id property has time value in epochs for example 1623524380978 which is 13th June Sunday, 12:30 am. It has precision up to milliseconds. Ideally, we would use something like uuid to create unique ids. The purpose of id here is to have a unique reference corresponding to every encrypted data string.
This completes encryptAndSave function. The complete code for this file is available here.
3. Decrypt Data With Private key
Last step of the process. I would say you can try this one on your own. All the code you need is already discussed and few new things can be referred to in the crypto module docs.
Open the decryptData.js file and bring the 3 modules that we have used throughout. Add a function decryptAndPrintData which will have similar steps to encryptData.js. For now, we will print decrypted data to the console (perhaps you would want to send this data as an API response to the authorised request).
const fs = require('fs')
const path = require('path')
const crypto = require('crypto')

const decryptAndPrintData = () => {
  // 1. Bring Private Key From data/keys.json

  // 2. Bring Encrypted Data From data/encryptedData.json

  // 3. Decrypt Data

  // 4. Print Decrypted Data
}

module.exports = decryptAndPrintData
The below code brings the private key and forms a Key Object. For creating a public key object, we used crypto's createPublicKey method. Here instead, we have used the createPrivateKey method, encoding parameters remaining the same.
//...

const decryptAndPrintData = () => {
  // 1. Bring Private Key From data/keys.json
  const keysJsonStr = fs.readFileSync(path.join(__dirname, './data/keys.json')).toString()
  const { privateKey } = JSON.parse(keysJsonStr)
  const privateKeyObj = crypto.createPrivateKey({ key: privateKey, type: 'pkcs1', format: 'pem' })

  //...
}
Bringing encrypted data from json file should be straightforward now.
//...

const decryptAndPrintData = () => {
  //...

  // 2. Bring Encrypted Data From data/encryptedData.json
  const encryptedDataStr = fs.readFileSync(path.join(__dirname, './data/encryptedData.json')).toString()
  const encryptedDataObj = JSON.parse(encryptedDataStr)[0]

  //...
}
While encrypting data we used publicEncrypt, here we are using the privateDecrypt method to decrypt data. The parameters are same except for two things. Firstly, we have provided the private key object instead of the public key object. Second, earlier we passed Buffer created from a Json string, this time it is created from a base64 string (which we got as the output while encrypting).
//...

const decryptAndPrintData = () => {
  //...

  // 3. Decrypt Data
  const decryptedData = crypto.privateDecrypt(
    {
      key: privateKeyObj,
      padding: crypto.constants.RSA_PKCS1_OAEP_PADDING,
      oaepHash: 'sha256',
    },
    Buffer.from(encryptedDataObj.data, 'base64')
  )

  // 4. Print Decrypted Data
  const decryptedDataObj = JSON.parse(decryptedData.toString())
  console.log("Decrypted Data : ", decryptedDataObj)
}

module.exports = decryptAndPrintData
We get a Buffer of decrypted data from the privateDecrypt method, we convert it to string first and then to Json object with the parse method.
Finally, we print decrypted data with console.log 🙌 This completes our last critical function, code for this file can be found in this commit.
Driver Function
We have one more file left, main.js. We want to write driver code in this, such that all steps function gets called inside one main function. It is very simple indeed.
const generateAndSaveKeys = require('./generateKey')
const encryptAndSave = require('./encryptData')
const decryptAndPrintData = require('./decryptData')

const mainRunner = () => {
  // 1. Generate & Save Asymmetric Keys
  generateAndSaveKeys()

  // 2. Print Raw Data, Encrypt Data, Print It & Save It
  encryptAndSave()

  // 3. Decrypt Data & Print It
  decryptAndPrintData()
}

mainRunner()
As you can see, I am calling every function we created so far. I went ahead and added two console log statements in the encryptAndSave function to print raw data & encrypted data. The complete code for this file and additions of console logs can be found in this commit.
You can now run the main.js file and see everything in action! Execute the below command in root directory of project.
node main.js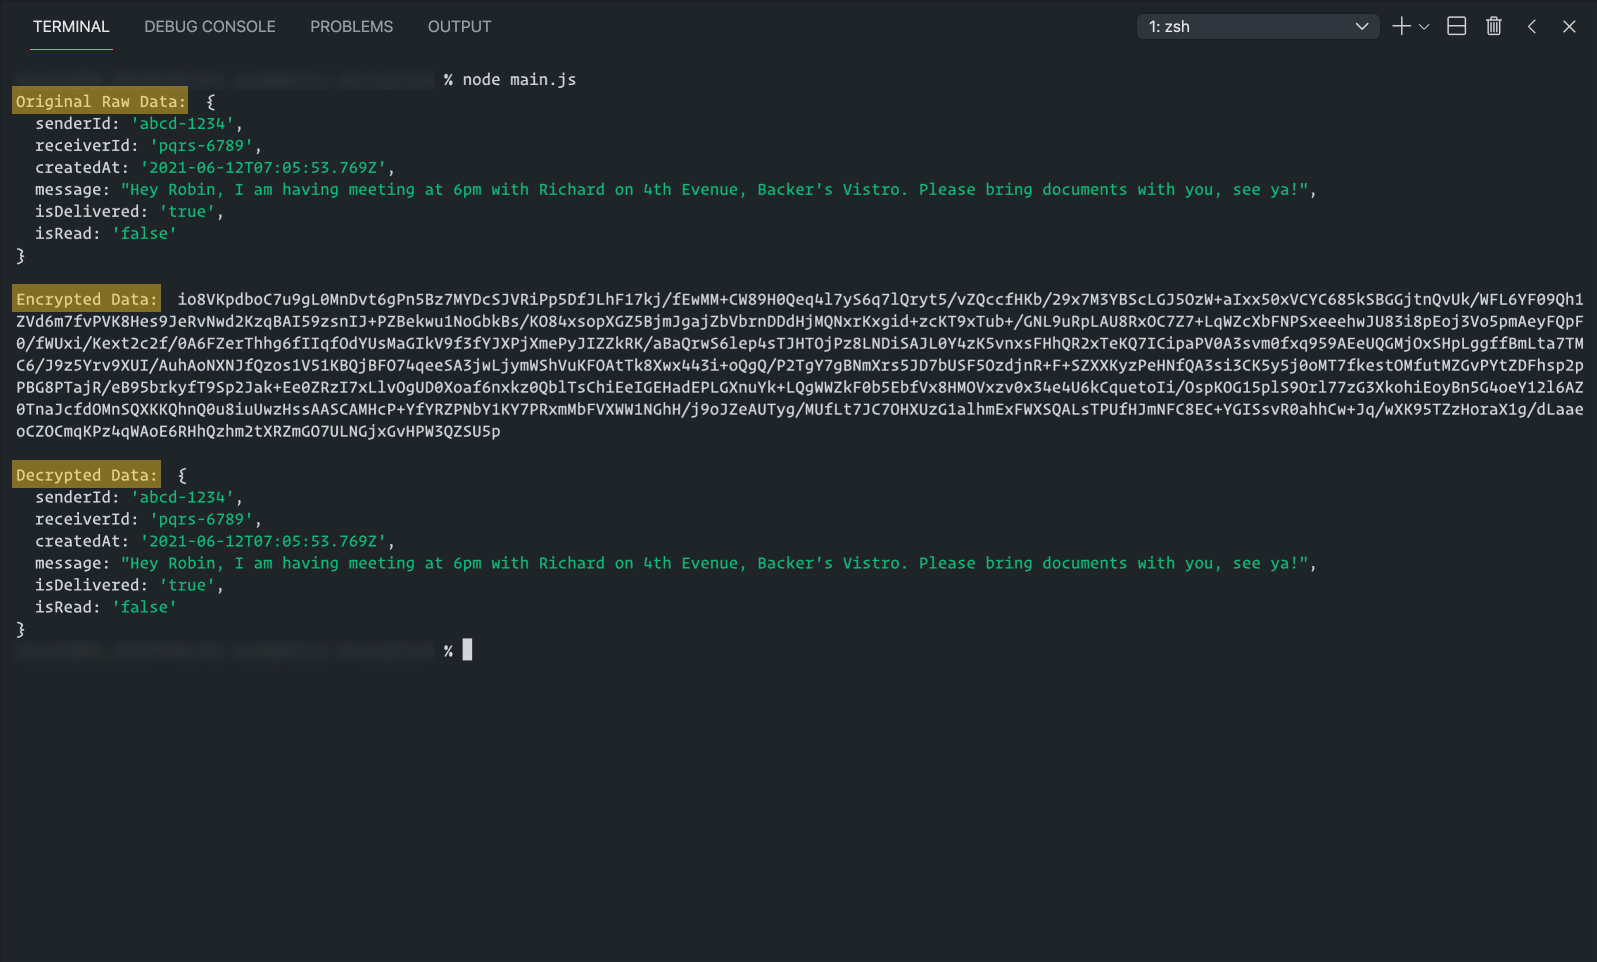
Conclusion
This article aimed to give you a hands-on foundational knowledge of asymmetric encryption. This can be useful as the starting point for building an application with highly secure data. The entire project is added to Github public repository.
If you ever want to send me an encrypted message, below is my public key 😉
-----BEGIN RSA PUBLIC KEY-----\nMIIDCgKCAwEAl/ZZtwifIGkOdI9KXVkE3mdAMfkuRPti9hN3HAcltVGeHyf1QUil\nkNuTLnX/iSn2rG5vgIhEQN2U/Dfyi6V/MHweHiwPfUjBTQs6IQdx+9Dh7y5JxMuG\nXTfy0d4tL/VwS44W1BoXkkBcsN7CLHHLeztHoHL39tCKVlwWC4yqLLGH5t1pw8rH\nN2wC7m3/M3kKScSKVJXI5b0dI8oa9okqGKcj6ycQL/SiQf3Hn4yPoagbqRa63r6W\ntrMh8SqMt35yS7/ck9ztXuouWoNBSEsBaFrJFd5yXTdTSOWwDiKmgFXVDzT3SfUg\nrnieOPX3SbVG/vI2bX2AGWrW1fxThh7jqZcjo41/mXmWnUeKj8cTT4Ljrrw2XWTC\nwPqJJzIM3olYxj8eW3aC5N0WUtU/Rlm/ISCFf3yc928QMbf3Q4pL4oYZl/bnppXB\nUumm+JSyNBly2c53eUYQEFFHxjSbMORzzKv3e4A+YYt058UM7/PCPyqwVAEtWKvL\nAl26XvQPpgPzN722oiAZuotWu1kd83oLqHkRCE1MLRKb6LEAVGGlYsSbvvlEc60I\nJg1GjrxofsBkGMXVPmlOlslksboucFJIHOlHcUSUgqCW/quUV3NCCWGyJWlAj5N6\njoTHz/WbHYg0xwOwKGS1wWTxC2VeOywuE/I8LdKXd8XYHtuaxEQIOBewMEOcKCdM\naGbh6K/XyqRSwJeiAHcAsq0WEIW1eLiS1sDdOoziepzO/SozXyc4CspyotOB2SPu\n+blPsWNzXG82tA21PFrCeakDuG9mT8L7lMEceK4yKrR9tMqmHyUyKb8hkd83NlzN\nqeHvGM5MG5wlBqV6KlUNi0fzc7ajoua0CAMES16APnqwYoJtuzTp/GKMBrGdR8CS\nYsst1loirNe3Js1uxRo2Cy/Pi2lY8+JWnLpqVRWF3ZtTEMUTuwVrBKPGy8ZKfMgq\n4aQyRmDUwbJJk0OpIRFEkFbX2p/8acazYgxqxvTfu4DTV/9SNaYArYOgMVUOQwQl\n92oGzIkspGshAgMBAAE=\n-----END RSA PUBLIC KEY-----\n
If you found this article useful and interested in sponsoring my next article, consider buying me a cup of coffee securely using the link below :) See you next time!
A Small Request From Your Fellow Developer 💙
What took you 10-15 minutes to read took me several days to perfect. And honestly? That's completely worth it when I know it saves you hours of frustration.
🫤 Here's the reality: Creating quality tech content takes countless late nights testing different setups, breaking my own system multiple times, taking screenshots at every step, and then rewriting everything until it makes perfect sense. If this helped you, please consider supporting my work! 🥳
{ "Small support": "Big motivation to create more content!" }